I’ve had an Etsy store for a few months. Overall, I’d been very happy with the platform. I’ve sold a lot more through my Etsy store than I have through the store here on my own website. In fact, most months, I made more than ten times as much from Etsy than I did from my own web store.
This week, Etsy closed my store for violating their prohibited items policy.
Needless to say, it’s upsetting to lose a good source of revenue. What’s really frustrating, though, is that they deleted my store because it contained several items that they claim violated the “Nudity and Mature Content” section of their policy. Here’s what that says:
It specifically says they allow nudity, but they prohibit “pornography, illegal or exploitive items, and used intimate items”. Nothing I sold was even arguably illegal or exploitive, nor did I sell anything used, let alone used “intimate items”. By process of elimination, that means they took down my store for selling “pornography”.
The word “pornography” is incredibly vague and means very different things to different people. Etsy is saying there’s a whole class of stuff that is not allowed and can get your store closed, but they won’t specifically define what those things are. They do provide a little more guidance, but it’s not very helpful:
None of the images in my Etsy store involved sex acts or “other erotic behavior for the purpose of sexual arousal or stimulation”. I was always very careful not to use images that were explicit or erotic. So, it appears that they took down my store because some of my products displayed “sex organs”.
But earlier in the policy, they specifically say nudity is allowed! By definition, if a picture contains nudity, sex organs are going to be visible. If they’re not, we usually call it “implied nudity”. Not only is the policy vague, it’s self-contradictory!
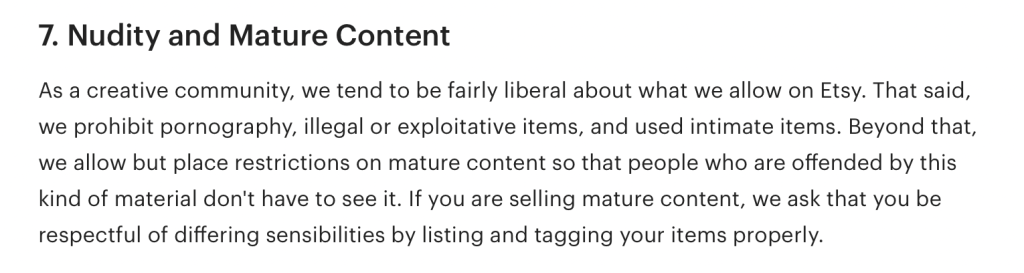
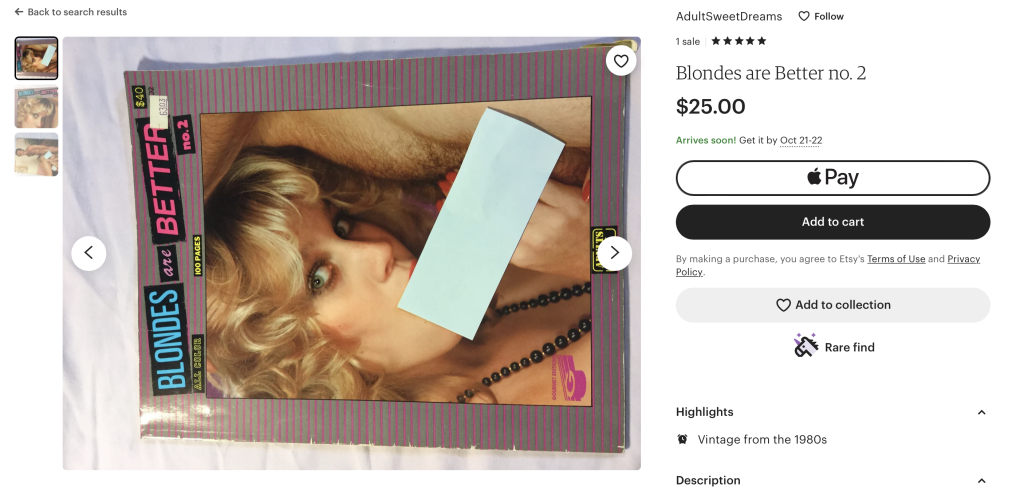
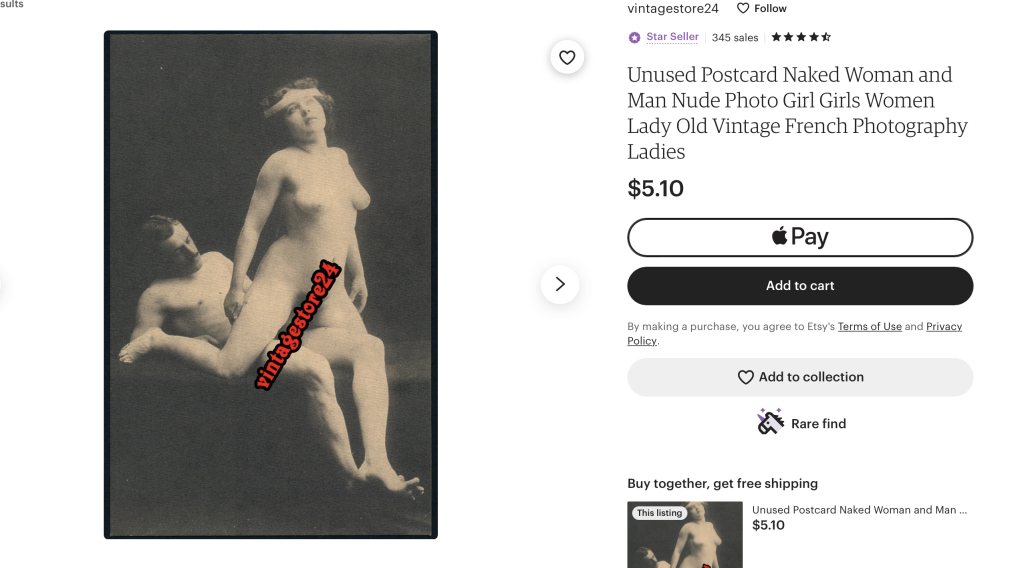
From looking at the items they deactivated before closing my entire store, I still don’t know which other items I should have removed to prevent it from happening. For example, this is a product they had a problem with:
Yes, you can see “sex organs” in the actual product (the listing photos were censored). Even so, there’s nothing sexual about this image. It’s a nude woman in a pose where you can see genitals. Her hands are nowhere near them. She’s not touching them. She’s not spreading her labia. She’s not doing anything remotely sexual. Apparently, female genitals aren’t allowed if… what? She happens to be bent at the waist at all?
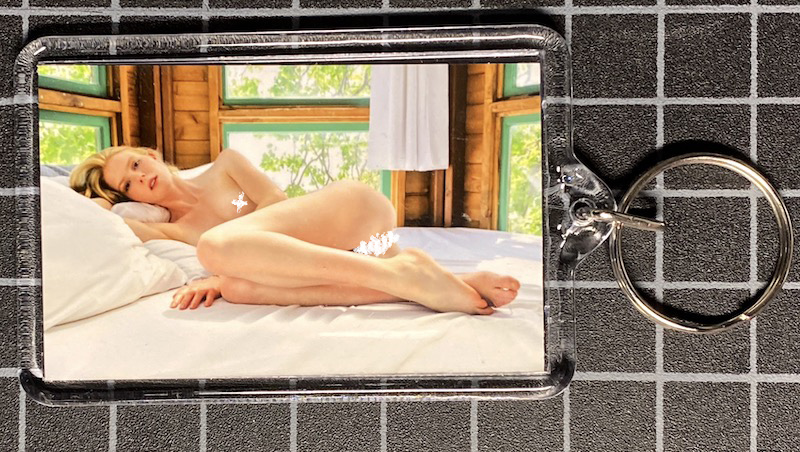
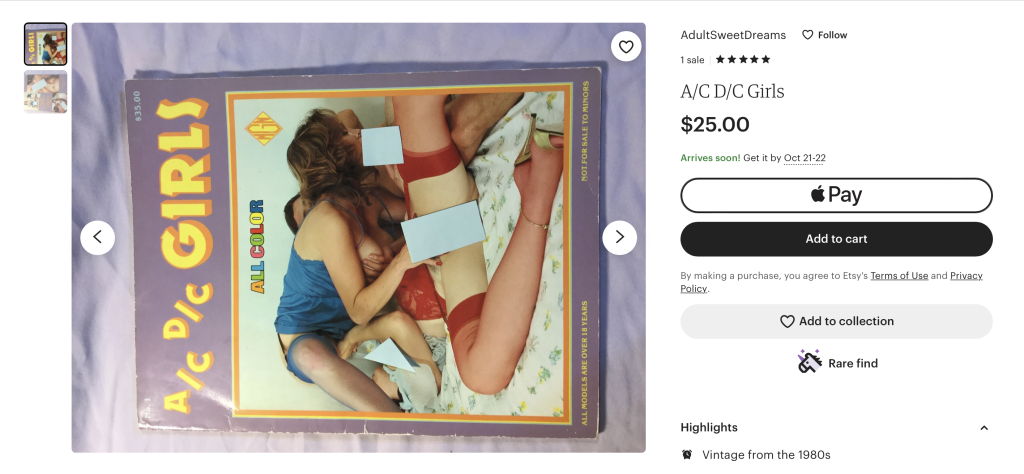
Here’s another one they deactivated before closing my store:
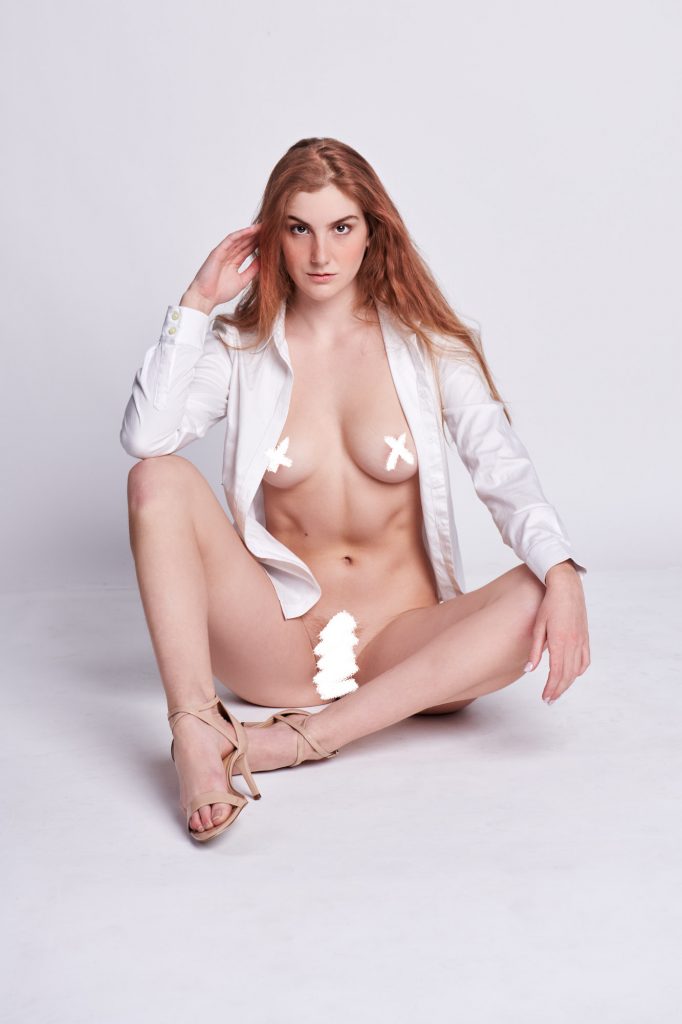
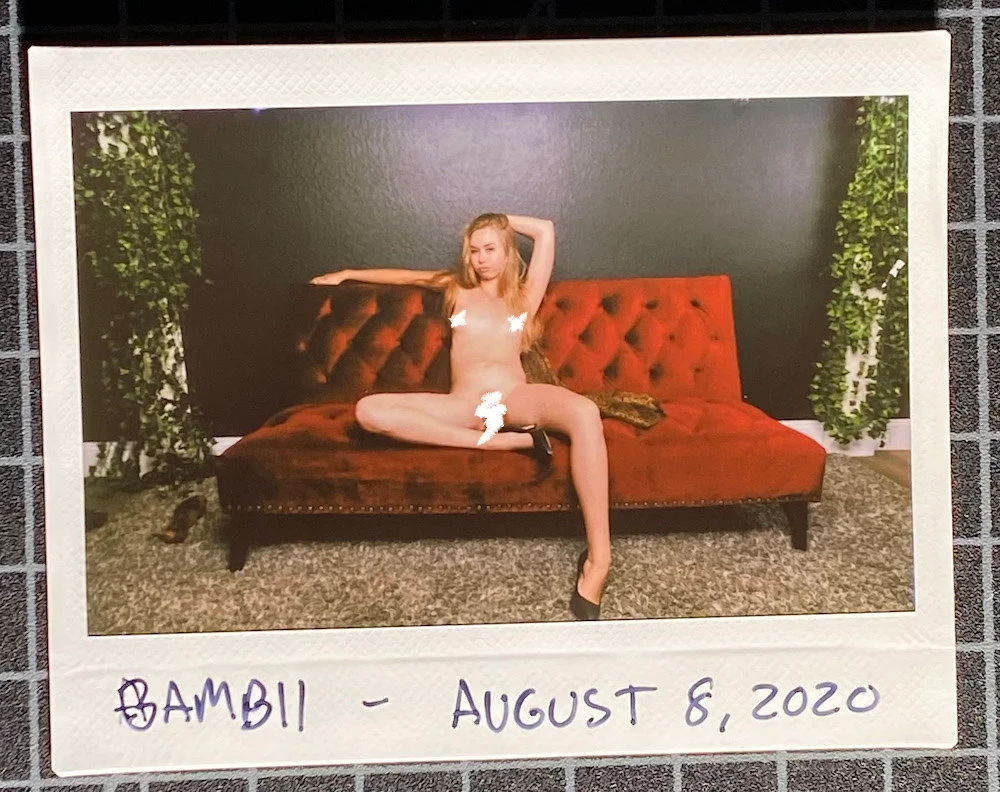
Again, it’s just a nude. She’s not doing anything sexual. She’s literally just sitting. Here’s another one they felt was just too lascivious to have on their site:
There’s nothing inherently sexual about any of these shots. I was always careful not to use more explicit or erotic images there. They’re literally all just pictures of nude woman, and like most nude women, they have genitals. Which you can see. Because they’re nude. Which they say is allowed. They’re not touching their genitals. They’re not doing anything sexual at all. These are literally just nude photos where you can see labia.
Setting a rule that’s so inherently subjective and vague that nobody could possibly define what’s allowed is incredibly unfair and hostile. You can (as I did) invest a huge amount of time, effort, and money setting up and running a store, but if some random Etsy employee thinks you’re selling “pornography”, you get closed down. They don’t even refund your listing fees, and though they claim you can appeal, I never even got a response when I submitted one.
But, at least they must enforce this policy consistently, right? They must have some internal guidelines about what’s okay, right?
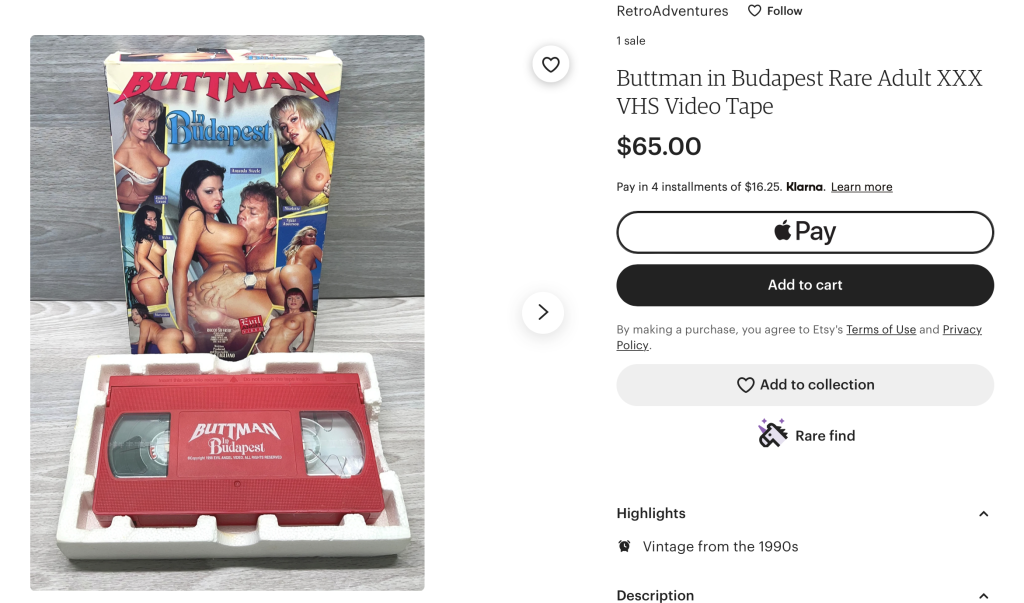
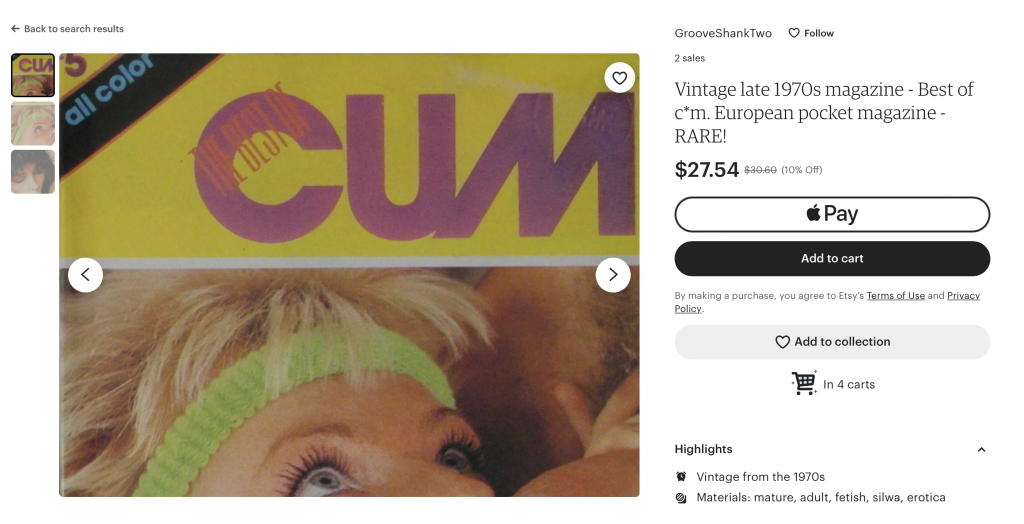
It sure doesn’t look like it. Here are some listings that are currently being sold there:
Whatever could that blue paper be hiding?
I’m sure I have no idea what’s going on behind those post-it notes.
Perfectly safe for work!!
Ah, yes. The wholesome, family magazine, “Cum”.
It’s just a “naked woman and man” so it’s totally fine with Etsy. Definitely not pornography, no sir.
And if you think those are isolated listings I cherry picked, they weren’t. These are literally all from the first page of one search. Just pick any random NSFW term and type it into the Etsy search box. I guarantee you’ll find many, many more.
Why were my fairly innocuous nudes taken down and my store closed when Etsy is rife with hardcore pornography? I have no fucking clue, but I’m pretty fucking pissed off about it, and if you’re running an Etsy store that contains nudity, you need to be aware of how they work.
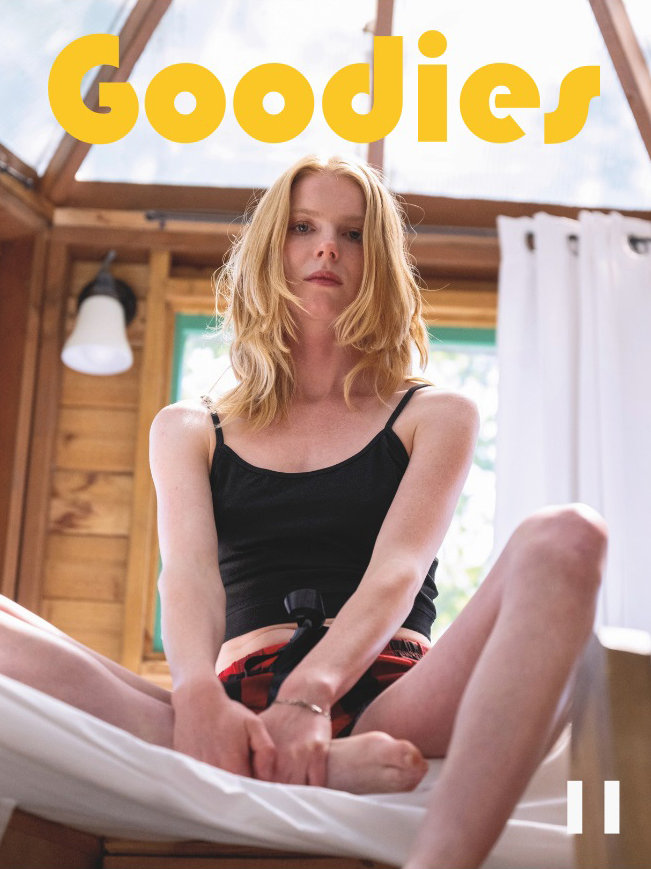
A few days ago, Goodies Issue 11 was published. I’ve been a fan of this magazine for a while. I first became aware of Goodies when they started shooting a few models that I’ve worked with. As stuff about Goodies started showing up in my feed, I couldn’t help but notice that their photography was stunning. I bought a couple of issues and was further impressed by the quality of the printed magazine. I mean, it’s just beautiful; it’s thick, high quality, beautifully designed, and filled with gorgeous nude photography and interesting articles.
What it doesn’t have, though, is ads.
I try to promote models I’ve worked with when I have an opportunity. So, when I noticed Goodies had shot Becca and Soukey, I started promoting the magazine on my social media accounts. At some point, I guess the Goodies people noticed, and that led to some conversations with Alen, their ridiculously talented head photographer. Over time, those conversations led to discussions with the rest of the Goodies team, and those conversations eventually resulted in me getting an incredible opportunity: to shoot a pictorial for Issue 11.
They gave me a lot of freedom when it came to choosing a model, location, and theme, though I obviously had to work within certain parameters to keep with the magazine’s look and feel. There were a whole bunch of models who came to mind for the shoot, but I had to rule many out for various reasons. Working with the editor and creative director, I eventually whittled the list down to just two names: Lia and Zöe.
Since I had last worked with her, Lia had moved down to Los Angeles, so that actually left me, in reality, with a list of just one. I had been wanting to work with Zöe again ever since I first shot with her about a year earlier, so I was super excited with how it worked out. After some more discussions with the editorial team, I set up a shoot with Zoe.
We shot on April 25, 2022 in a treehouse, of all places. The shoot went great… and then I spent the next five months anxiously awaiting publication of the issue*. And now it’s… finally… out!
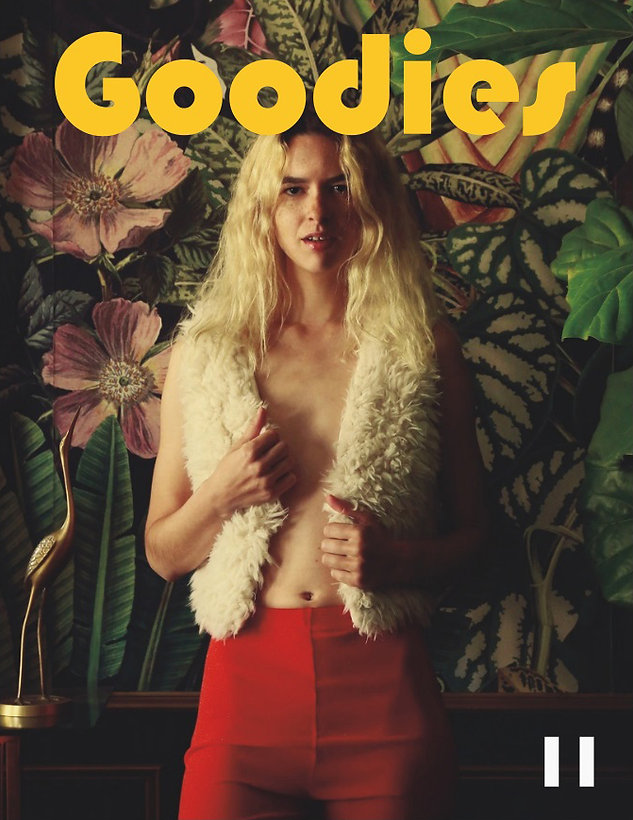
Goodies is based out of Orange County (just South of LA), and in a happy set of circumstances, I introduced Lia to Alen, and that led to both Lia and Zöe being featured in Issue 11.
Goodies features multiple covers per issue. The featured image for this post is Zöe’s cover. This one above is Lia’s cover, shot by Alen. I know, right?
I’m still a little bit in shock that such an amazing magazine chose to publish my work. Check the issue out. I think you’ll be as impressed with Goodies as I am.
Note: There are actually two Zöes in Issue 11. I shot the one with no last name listed.
* As I’m writing this, I still haven’t actually seen the issue. My copy should be here any day. 🤞
You may noticed that things have changed a little bit around here. I’ve migrated my website to a different software platform that will allow me to do more than I could with the old site, including set up a shop to sell digital images, prints, and merchandise.
I chose not to migrate every post from the old blog, but I did bring over many of the tutorials and other long-form articles that seemed like they might continue to be of interest. I was able to automate moving my old blog posts to this new site, but I do need to do a little work to get old posts clean up and published, so additional older posts may pop up now and again as I have time to go through them.
Since getting back into photography, I haven’t spent a huge amount time or effort on getting more followers on social media. As a result, until recently, my follower counts have stayed pretty modest. I am, however, slowly approaching an important milestone. On Instagram, I should hit 10,000 followers sometime in the next month if all goes well. This milestone is important because it opens up a bunch of new creator tools and features, such as the ability to post links in stories, so I’m pretty excited about getting there.
I’ve been toying with the idea of doing some kind of giveaway for quite a while, and this seemed like a good opportunity to finally do it. I’ve come up with — and discarded — several ideas. Most involved raffling off different types of mounted prints or producing some kind of publication. But with what’s going on with shipping and logistics right now, larger items are very expensive to ship and are much more prone to getting damaged or lost than in times past. The reality is that I could only afford to do gifts like those for a couple of people.
I really want to do something unique but also inexpensive enough that I can afford to send them to quite a few people. Ideally, it should be something that’s kind of silly and fun, too.
I was recently at the game and comic store where one of my kids works. I noticed that they sell mystery packs of dice at the main counter. They’re sealed, opaque mylar bag with a set of gaming dice inside. You know they’re dice, but you don’t know the color, the style, or whether they’re opaque, translucent, or transparent until you open the bag. These bags are so popular that they have trouble keeping them in stock. I even bought one myself, even though I had absolutely no need for any more dice.
As I walked around the store, I noticed that there were several other types of items sold in similar ways: miniatures, cards, artwork, and even comics. I think they’re popular for the same reason that collectible card games are. Sure, you’re buying cards, dice, miniatures, or whatever, but you’re also buying a moment of excitement and anticipation at the possibility of getting something you really like or something rare or unusual.
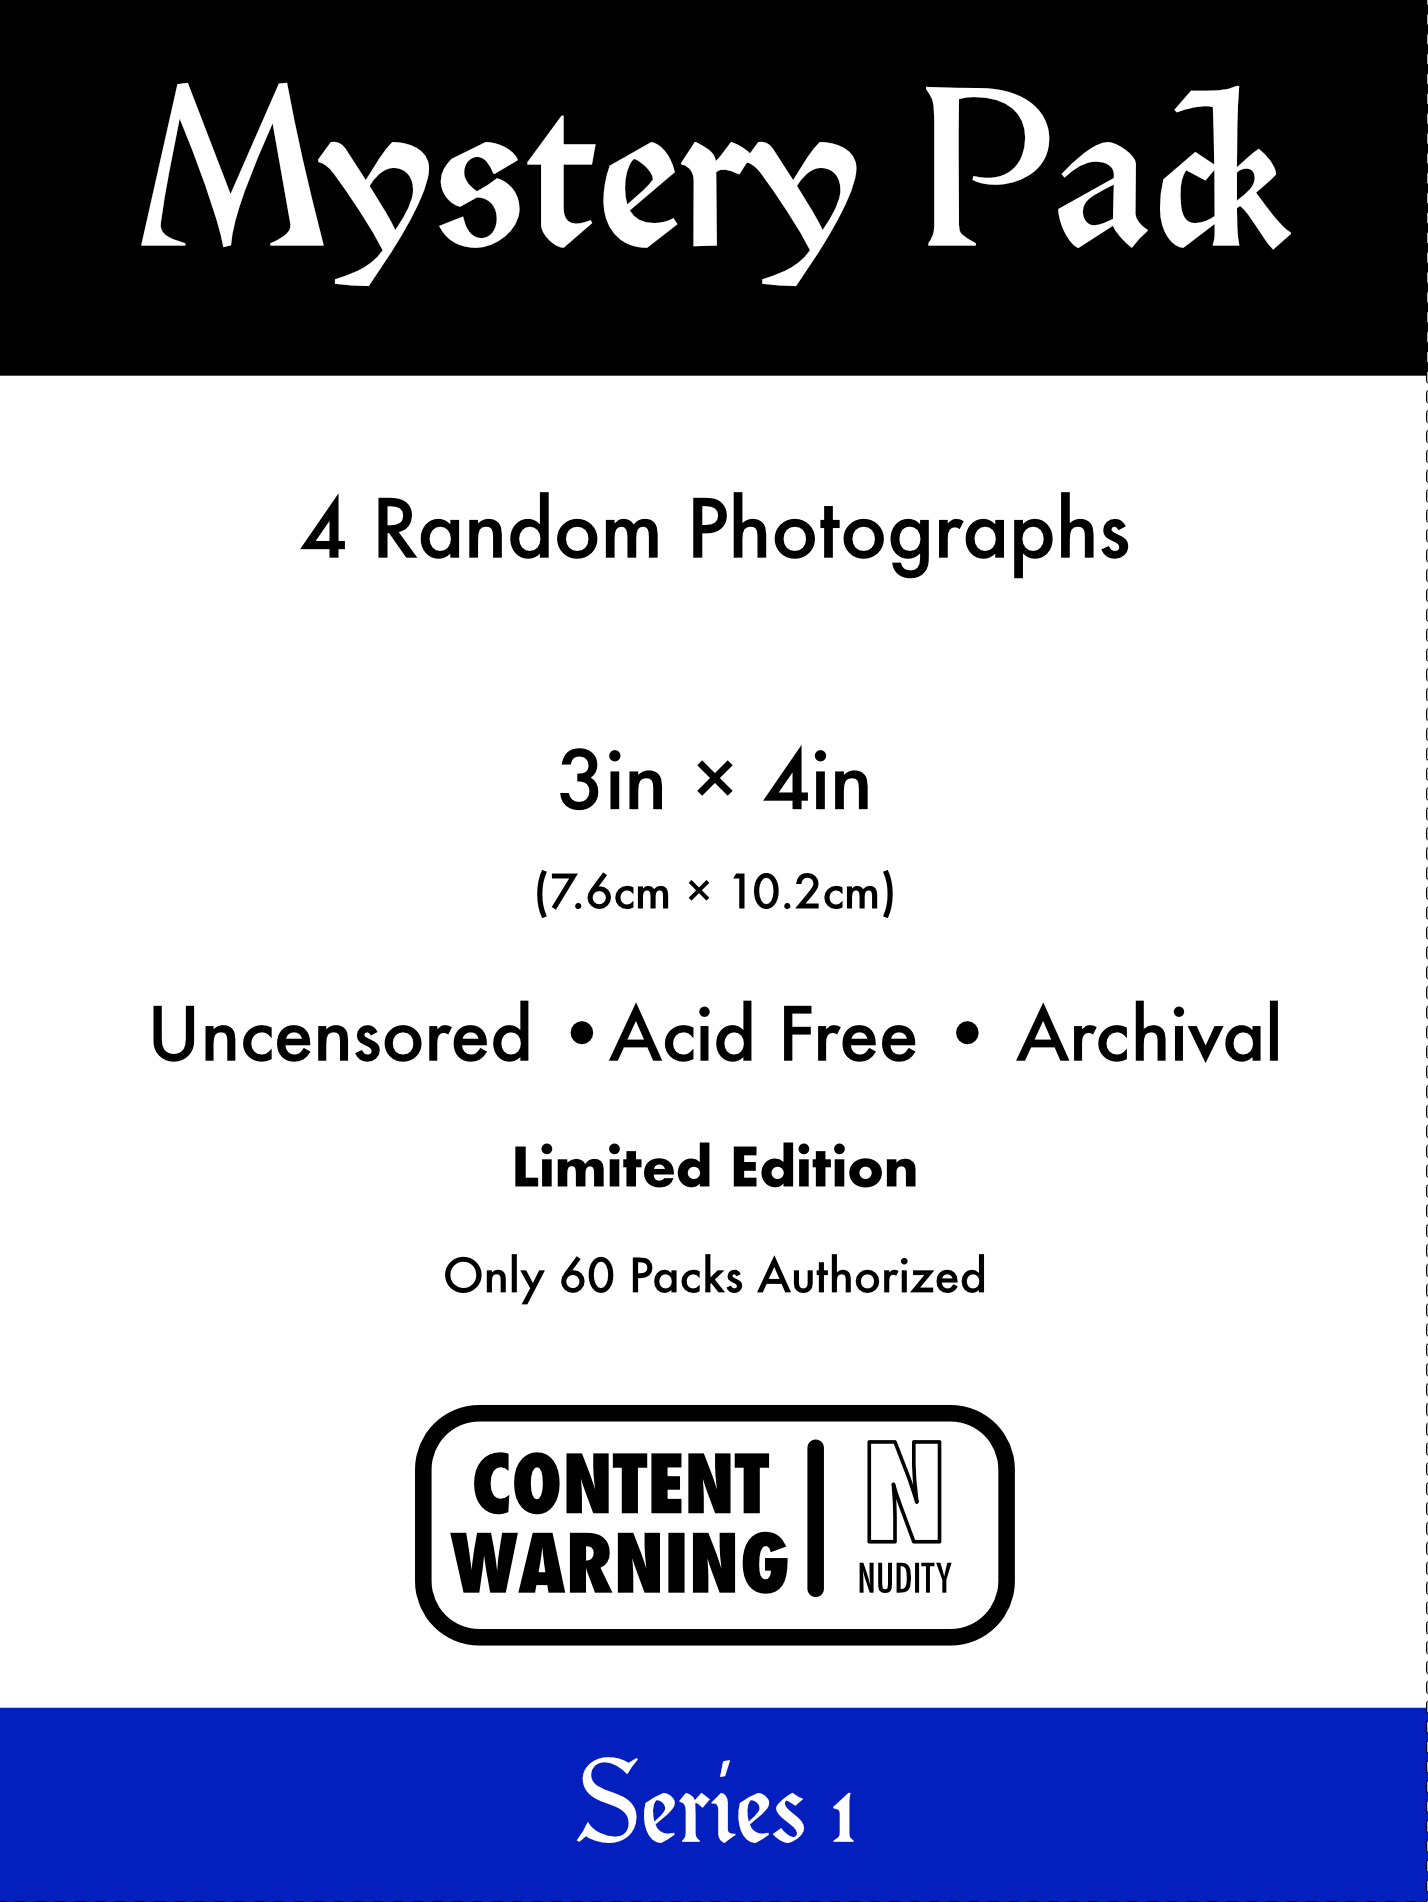
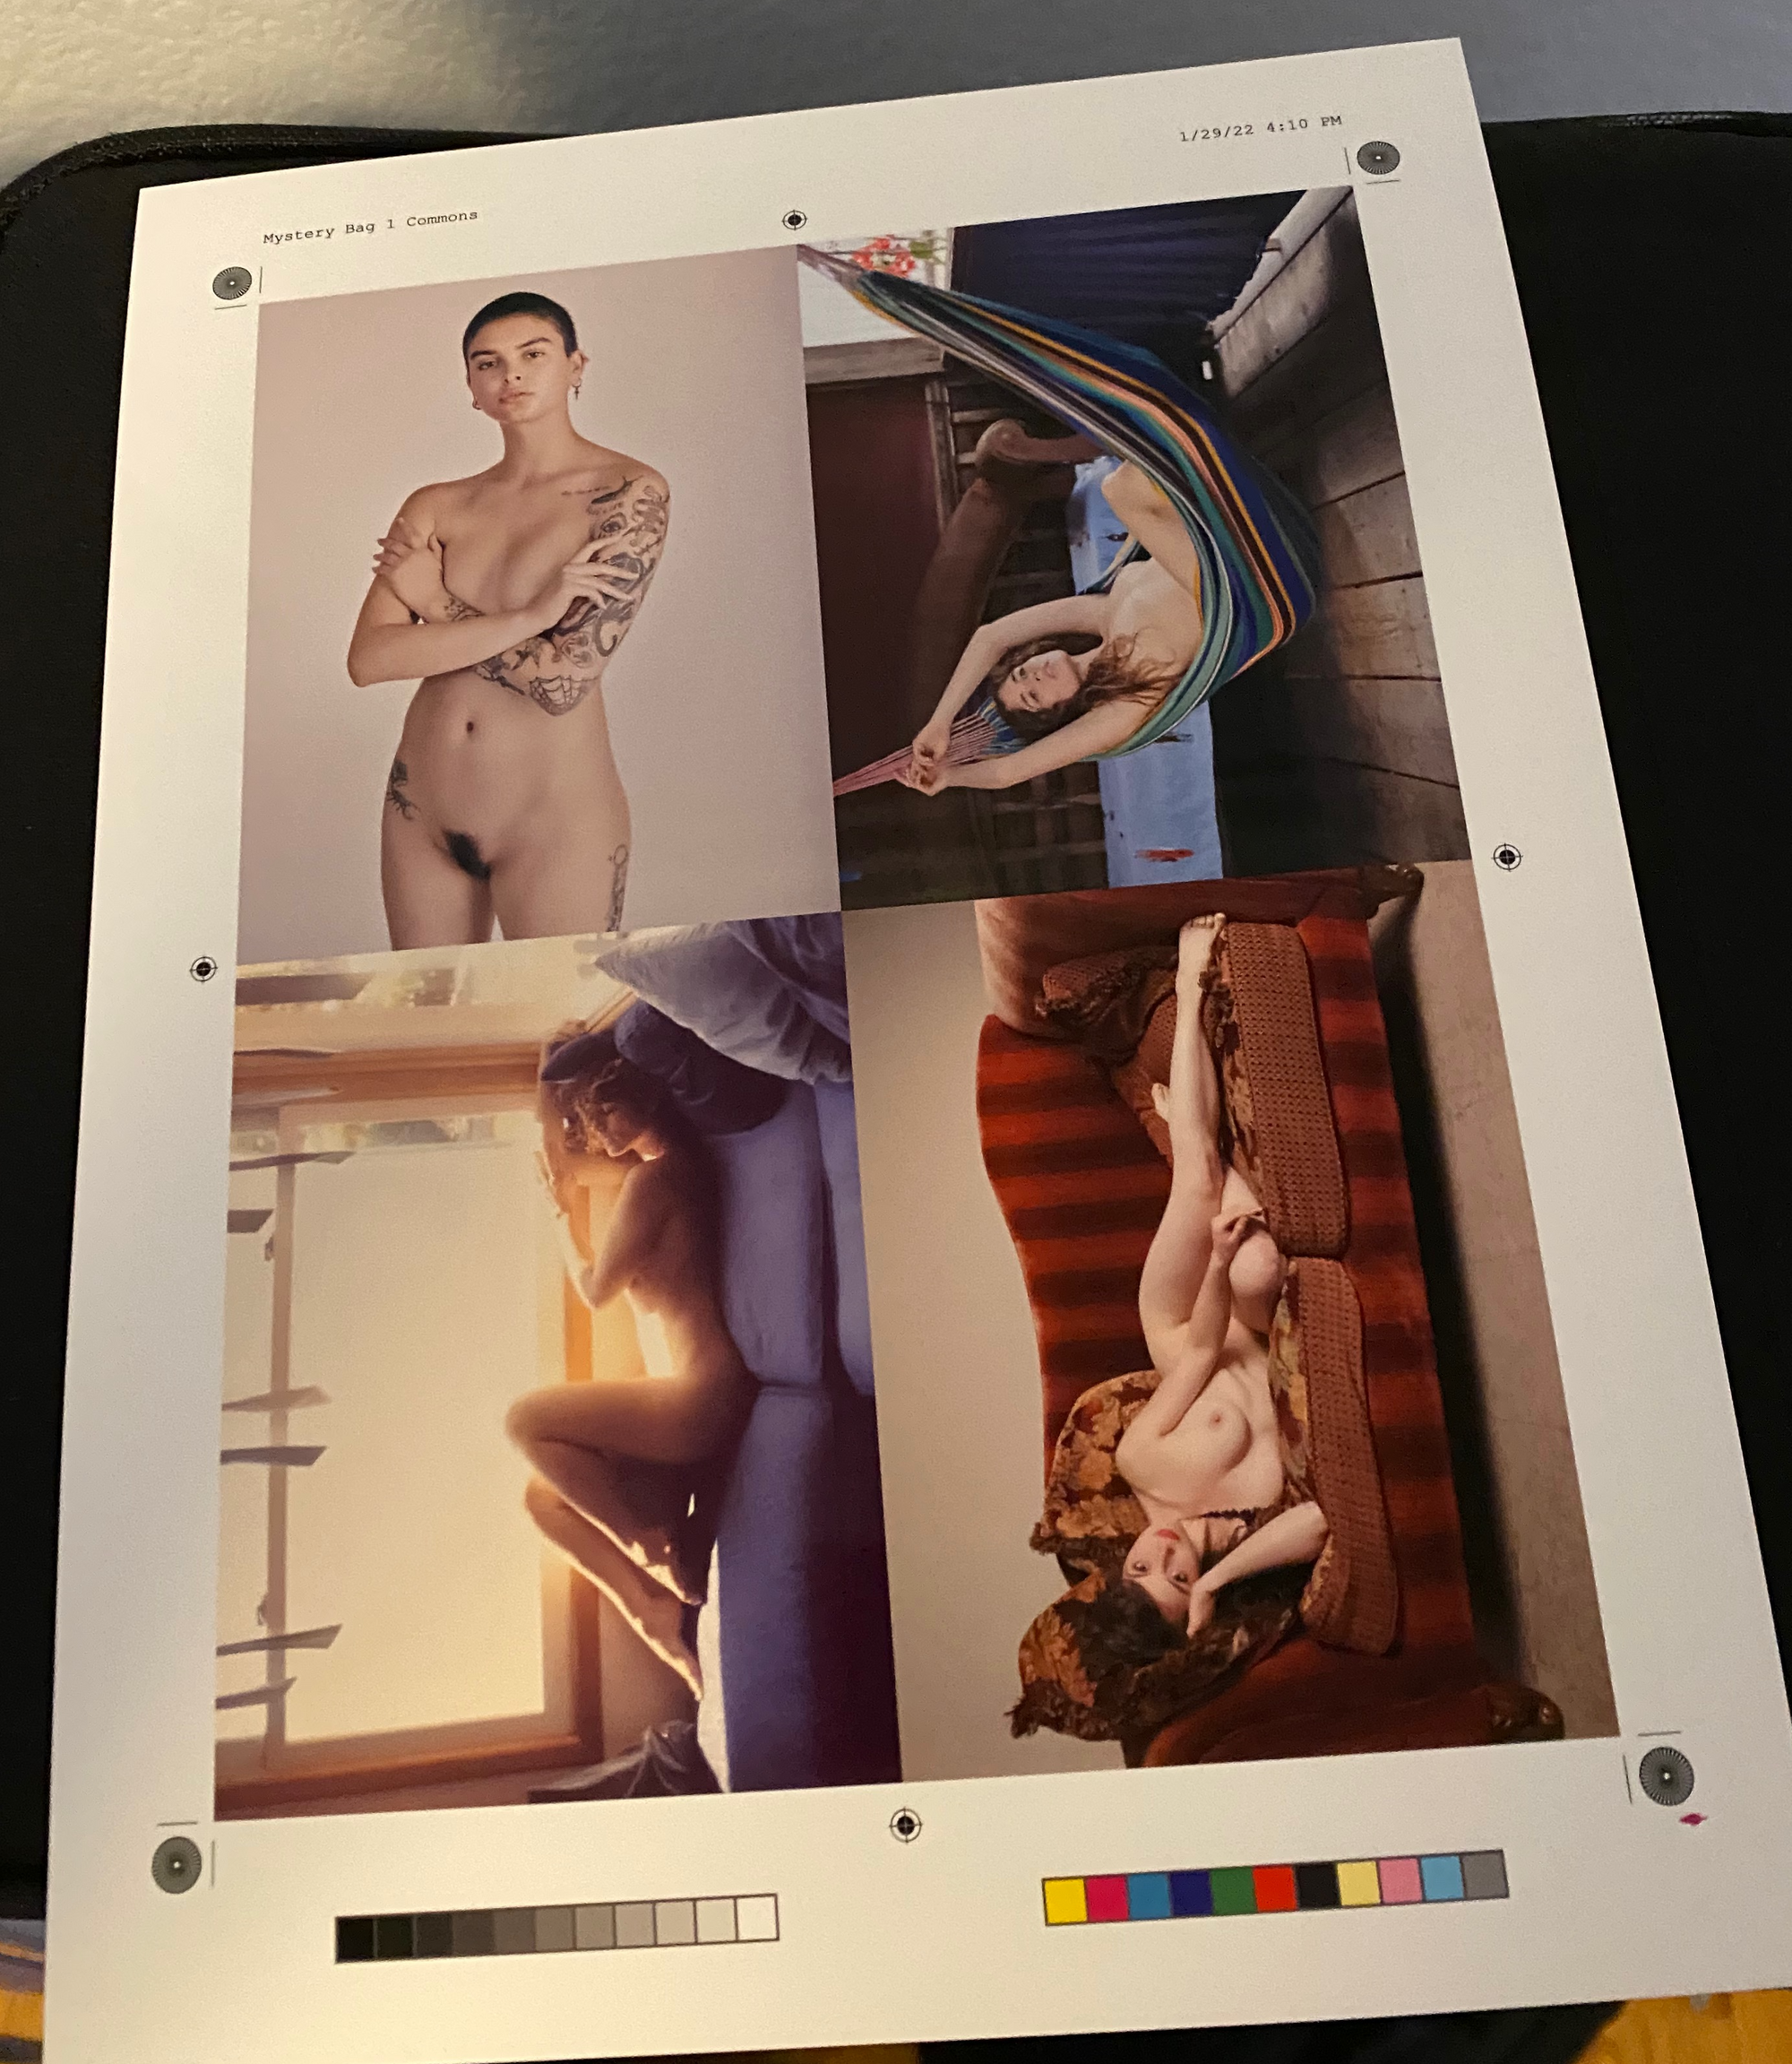
I’ve been thinking about ways to make that idea work as a giveaway. I’ve been prototyping sealed packages of 3×4 archival photographs. Each pack has four uncensored prints of my images, mostly shots that I’ve posted (censored) to Instagram over the years. Several of the photos, however, aren’t available online and won’t ever be.
I realized pretty quickly that I can make and ship these pretty inexpensively, so I can afford to give away a bunch of them, rather than having to choose just a couple people, so I’m moving forward with making them in anticipation of crossing over 10k.
Here’s a bit about how I’m making them.
Packaging
The first order of business was to find some kind of packaging I could use for the mystery packs. The only real requirements I had is that the packages need to be sealable and that you can’t tell what’s inside once they’re sealed. Mystery bags don’t need to be fancy. I’ve seen them created using paper bags with black sharpie writing on them, but I didn’t want to go quite that DIY for this.
The mystery bags of dice come in heat-sealed mylar zip bags. They look nice, so that seemed like a possible contender if it wasn’t too expensive. Turns out: it isn’t.
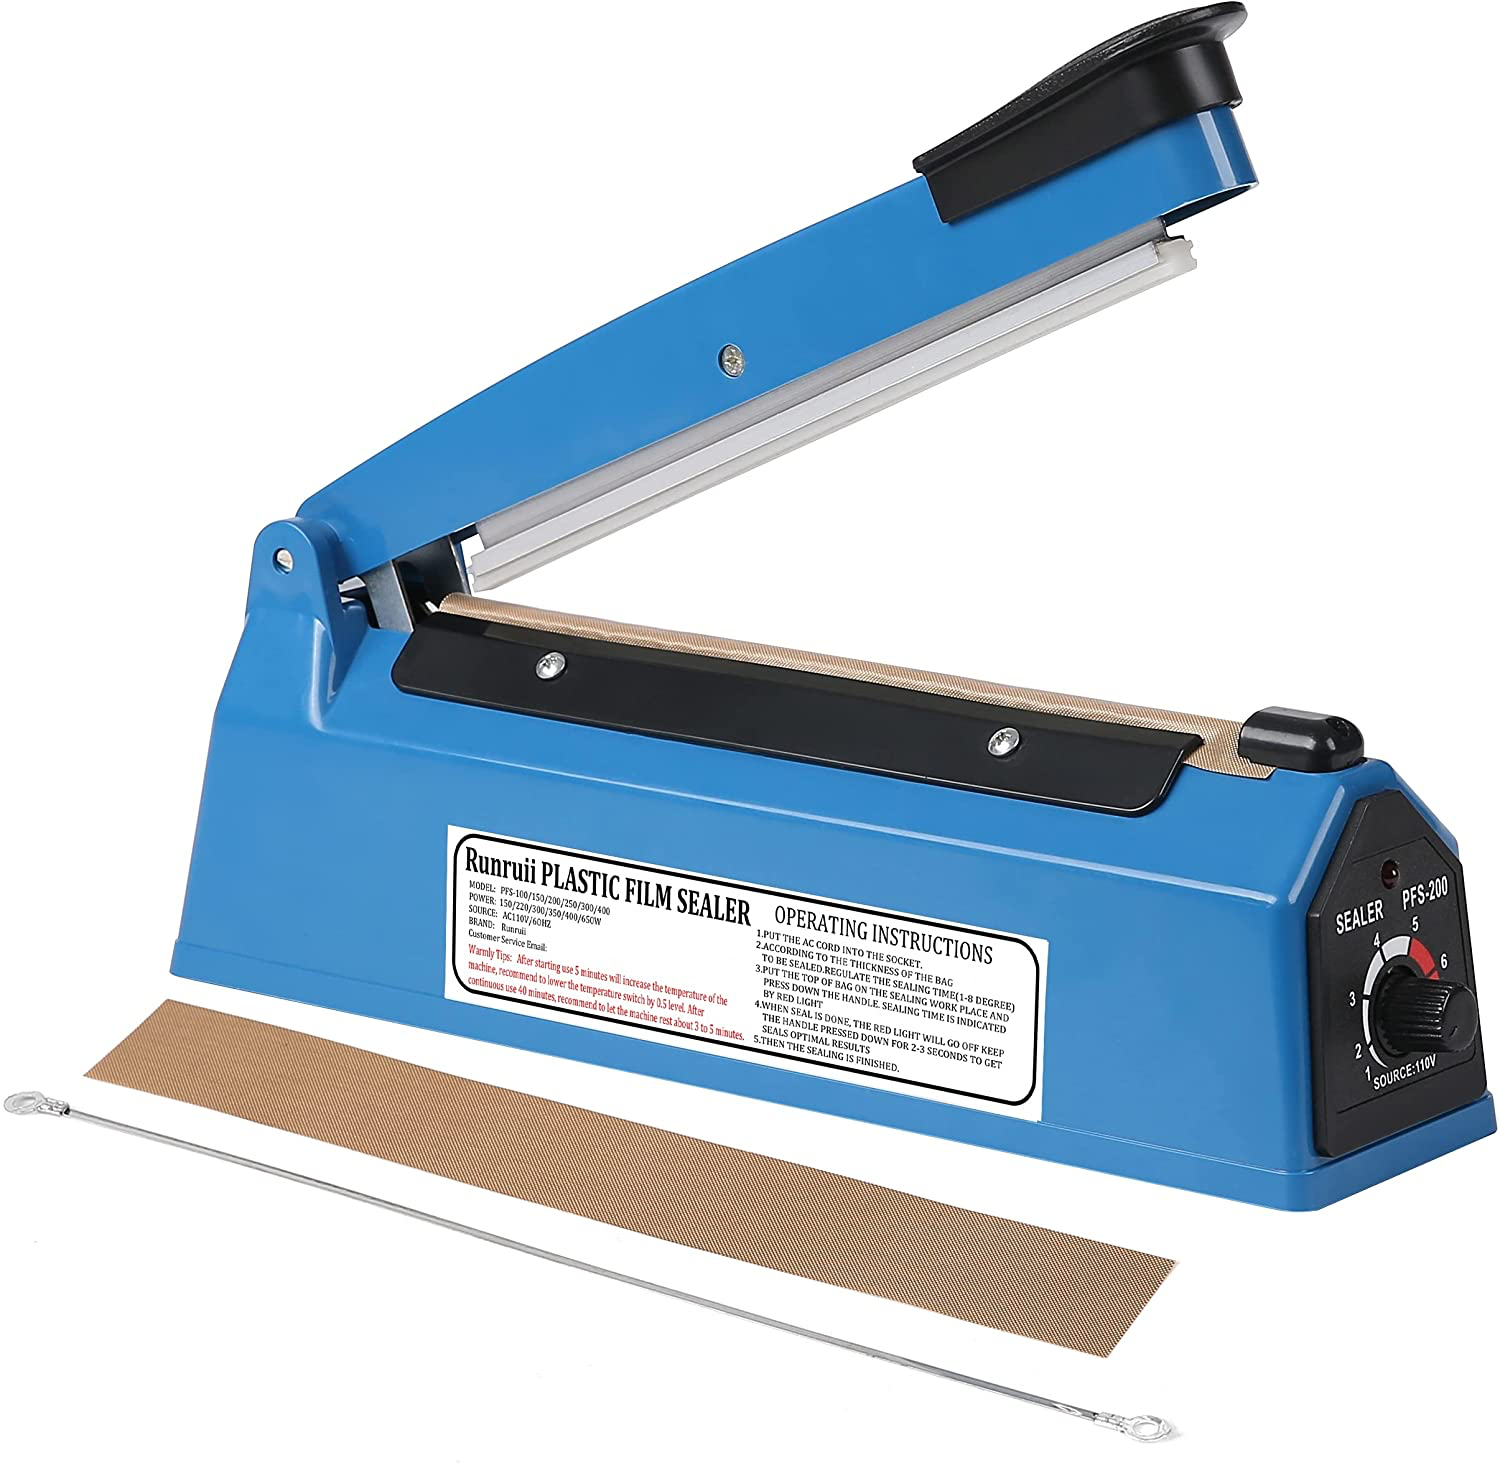
Heat-seal mylar bags are a surprisingly inexpensive form of packaging that can look pretty professional. You can find decent heat sealers for about $25 on Amazon, like this one that I bought:
The heat sealer I picked up. It’s not exactly industrial grade, but it works well.
You could also use something like a Foodsaver to seal the bags if you happen to already have one of those in your kitchen. The individual bags are also fairly cheap. I ordered a sampling of different bags that seemed like they might work, and they ranged from about 5¢ to about 15¢ each in small quantities, depending on style and size.
After creating several prototype packs using different options, I settled on these 15cm×10cm bags which cost 7¢ each. They fit the prints well. They’re not snug, but also don’t have too much extra space, either. The prints are easy to put in, and to take out after opening. They’re fully opaque, so you can’t see what’s inside, and once sealed, the only way to find out what’s inside is to tear it open.
Creating an Insert
Some of the bag options I played with had a clear front panel, so I designed an insert to go inside those to act as a label and to obscure wht prints behind it. I made the inserts in Affinity Publisher (a really good, but very affordable desktop publishing program). Unlike the prints, which are going to be archival and high-quality, I just printed these 4-up on my color laser printer. Even though I eventually settled on a fully opaque bag, I decided to keep the inserts.
Since my laser printer can print double-sided, I also wrote a little thank-you note for the back that has details about the edition and links to all of my photography-related social media accounts.
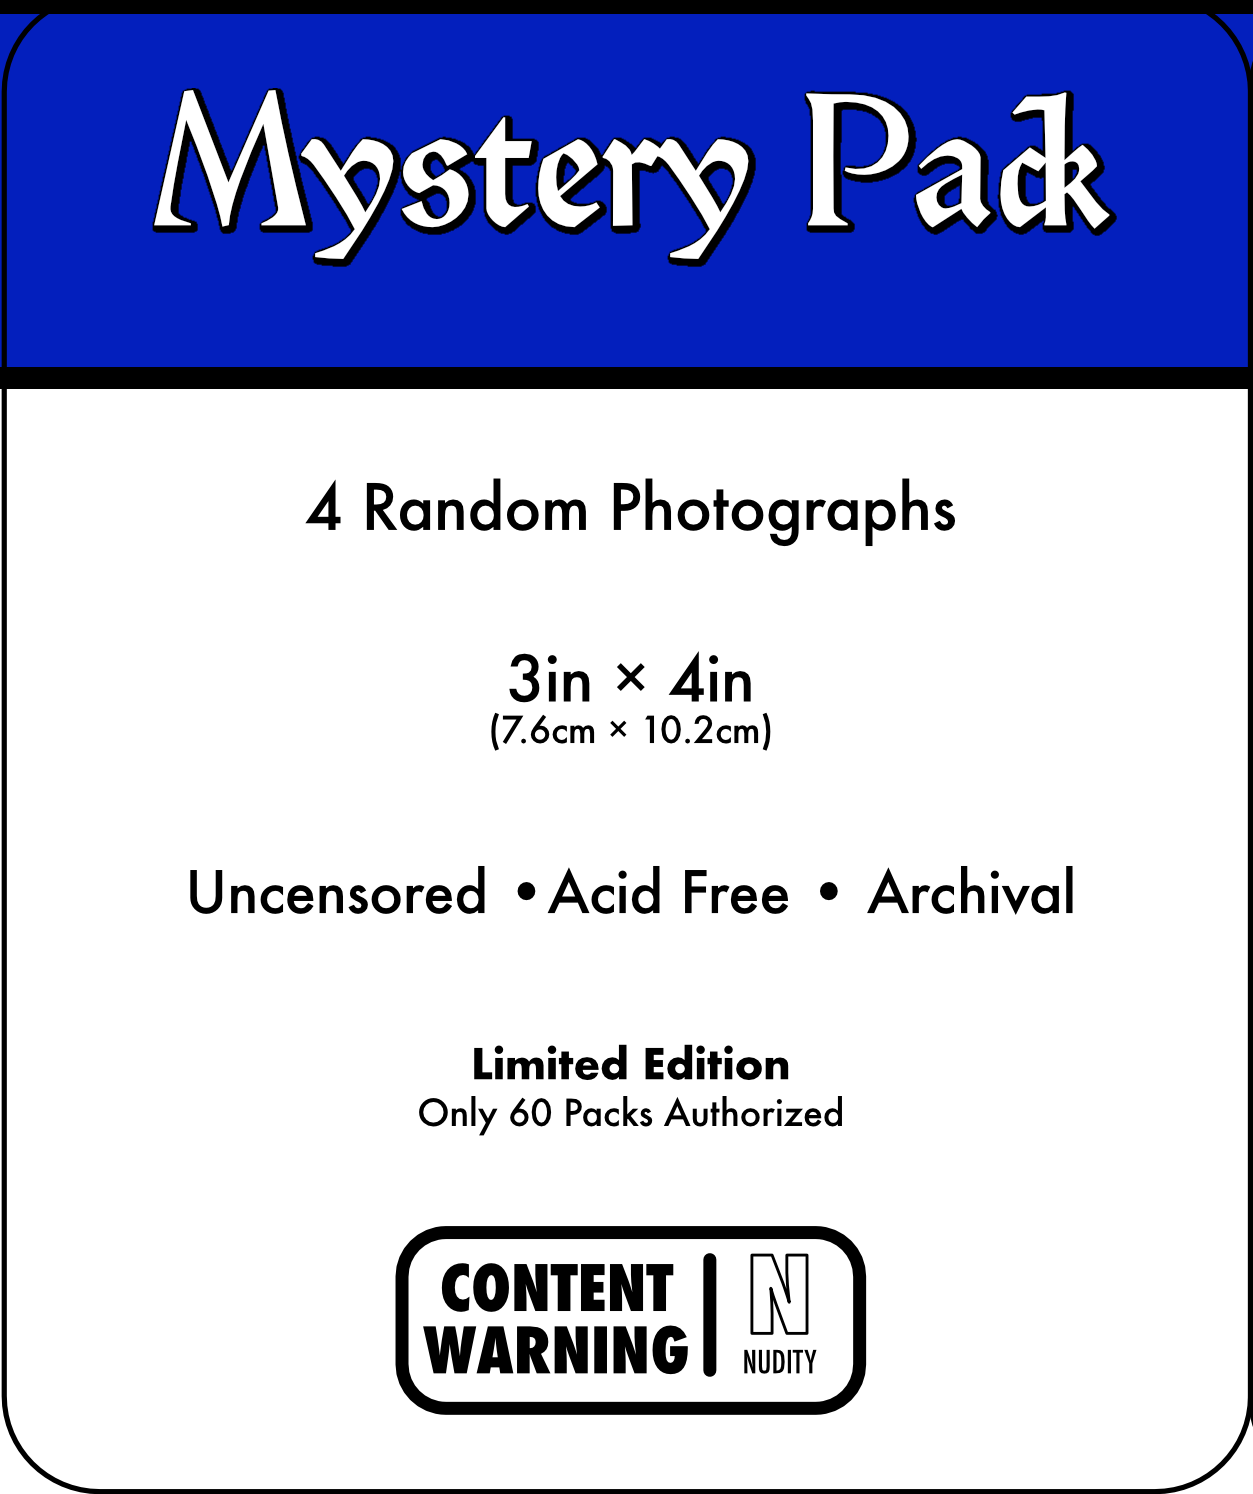
Printing Labels
For the exterior label, I went looking for pre-cut laser printer labels that are not quite as big as the 10cm × 15cm bags. The best option I found were these labels that print 6-up. I kept the labels fairly simple and graphic. After a few rounds of experimenting, I settled on this design.
Making the Prints
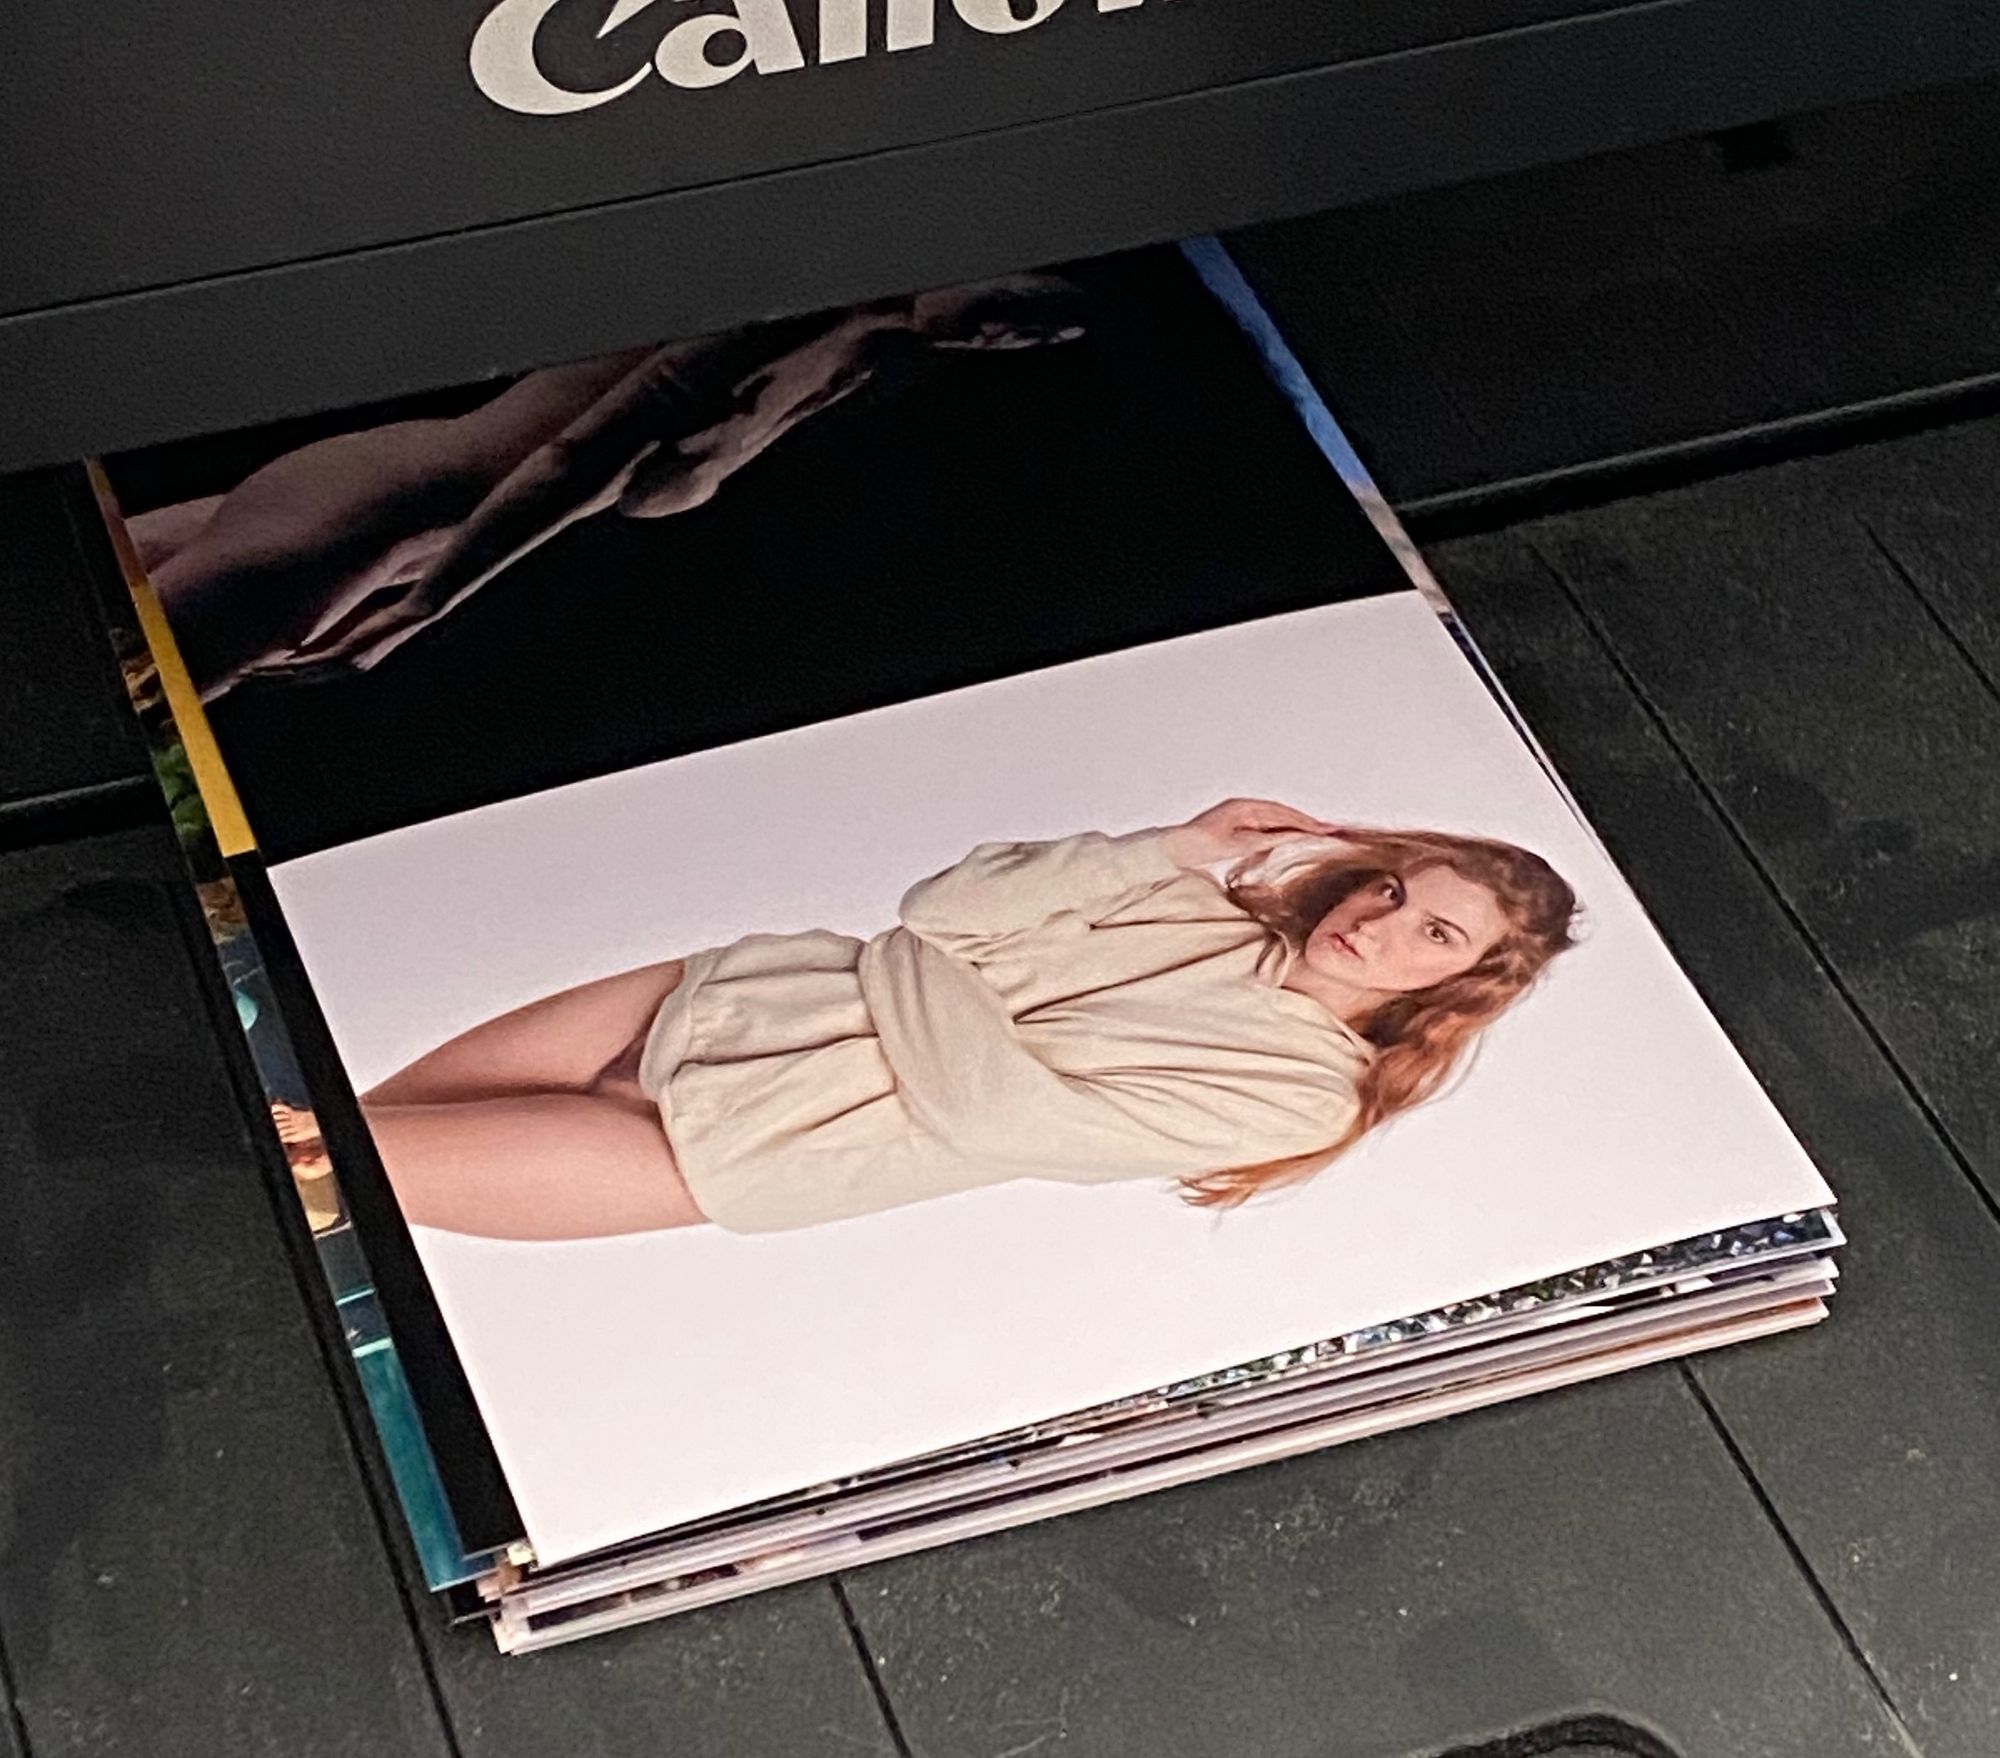
If you’ve followed this blog at all, you know I love printing. I currently use a Canon PIXMA PRO-100 printer with archival dyes and paper. It’ll do borderless prints up to 13″x19″, but I initially decided to do these prints 4-up on letter-size paper. Photo paper gets exponentially more expensive as you move to larger sizes so, while it would be more convenient to be able to print a whole bunch of 3×4 prints on a couple of 13″x19″ sheets, it ended up being considerably more cost-effective to print on smaller sheets of paper. The smaller paper is also easier to work with when cutting out the prints.
One of the 12 different sheets of common prints..
This worked well, but still involved a lot of cutting, which I wasn’t thrilled about, since I’m creating four sets of 60 prints, and this approach requires 6 separate cuts per sheet of four images. I realized that I have a lot of 4×6 archival photo paper and that two 3×4 prints exactly fit on one 4×6 sheet of paper. Since my printer can do borderless 4×6 printing, that means I only have to make one cut for every two prints. That’s a lot less cutting, so moving to 4×6 paper was a no-brainer.
Here’s what the finished packs look like:
The first 30 mystery packs completed and ready to go.
All in, these cost me less than 60¢ to make each pack. The four 3×4 prints cost me about 12¢ each to make (for a total of 40¢ per pack), the packaging costs about 7¢ per, and the label adds maybe another couple of cents. That doesn’t include my time or the cost of the heat sealer, though. Because these packs are small and light, I can send them using first class mail for $0.58 or $1.30 international. That’s pretty affordable for a physical giveaway.
My plan is to create 45 packs to give to Instagram followers on a first-come-first-served basis once I reach 10k followers. I’m not planning to sell any packs, nor am I planning to re-print the edition. I may create additional series when I hit other milestones (25k maybe?), and I’m contemplating creating a single “XL” version of the set made up of larger prints, but haven’t made a decision about that yet.
Release Date
I have no release date yet. I won’t send out any mystery bags until I have more than 10k followers on Instagram. Most likely, I will start sending them out about a week or two after crossing over, but it will depend on what’s going on in my life when I reach the milestone. I have a trip planned toward the end of the month, so if I cross over while I’m out of town, it will be a little while before I’m able to start sending them out.
Getting a Mystery Pack
Follow me on Instagram if you’re interested in getting one of the mystery packs. I will announce how to sign up to get them over there, on a first-come-first-served basis. They will be completely free, and there will only be three requirements to get one:
You must be following me when I reach 10k. The 10,001st follower will have to wait for the next milestone.
You must be over the age of 18 and must also be a legal adult where you live if the age of majority there is higher than 18.
You must not live in somewhere where censorship laws make fully nude photographs illegal to own or to import.
Please don’t DM me about getting a pack before I cross 10k followers. I’m not accepting sign-ups until I’ve gotten there.
A few decades back, I worked in magazine production. That was back when digital tools were just starting to displace traditional paste-up techniques. Even though digital tools were shaking up the publishing industry, much of the process back then was still using old technology. You’d run film, and then make plates from the film, and then go do a press check before they started printing to make sure everything looked right. Even if you calibrated your monitors, it often took a few tries to get everything looking right.
Digital presses were just starting to become a thing when I was in that field, but back then, they were basically glorified laser printers. There were better technologies being developed, but they weren’t widely available yet and the on-demand technology tht was widely available just couldn’t match the quality or finish of traditional printing. Unfortunately, traditional printing methods have a significant up-front cost, which meant it usually wasn’t practical for small print runs, let alone individual one-offs.
Given that my knowledge of the field was was more than two decades out of date, I assumed that on-demand printing had become cheaper and higher quality, but I just didn’t know.
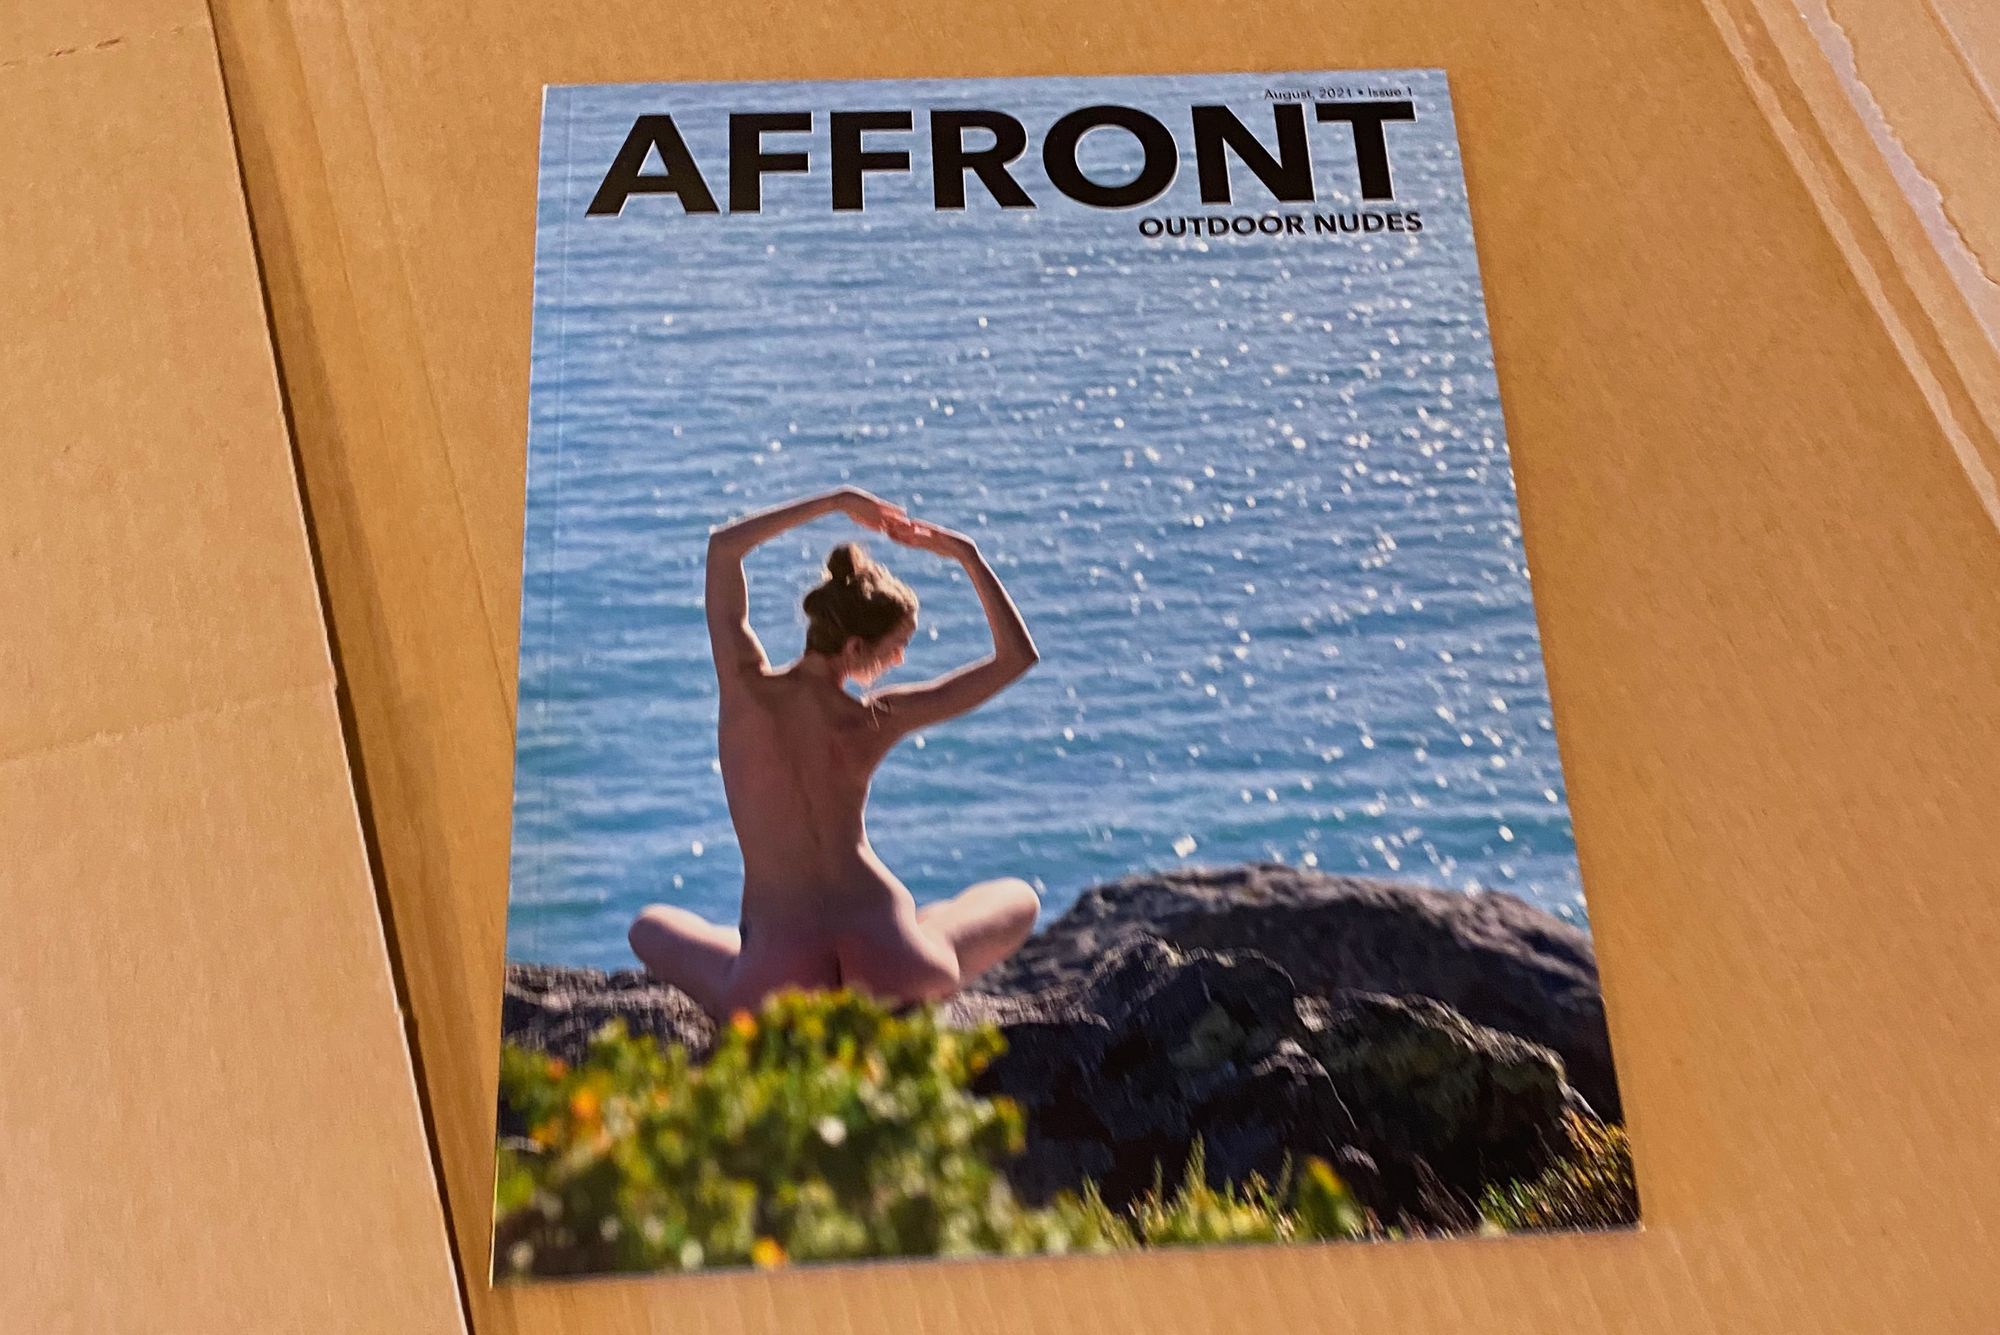
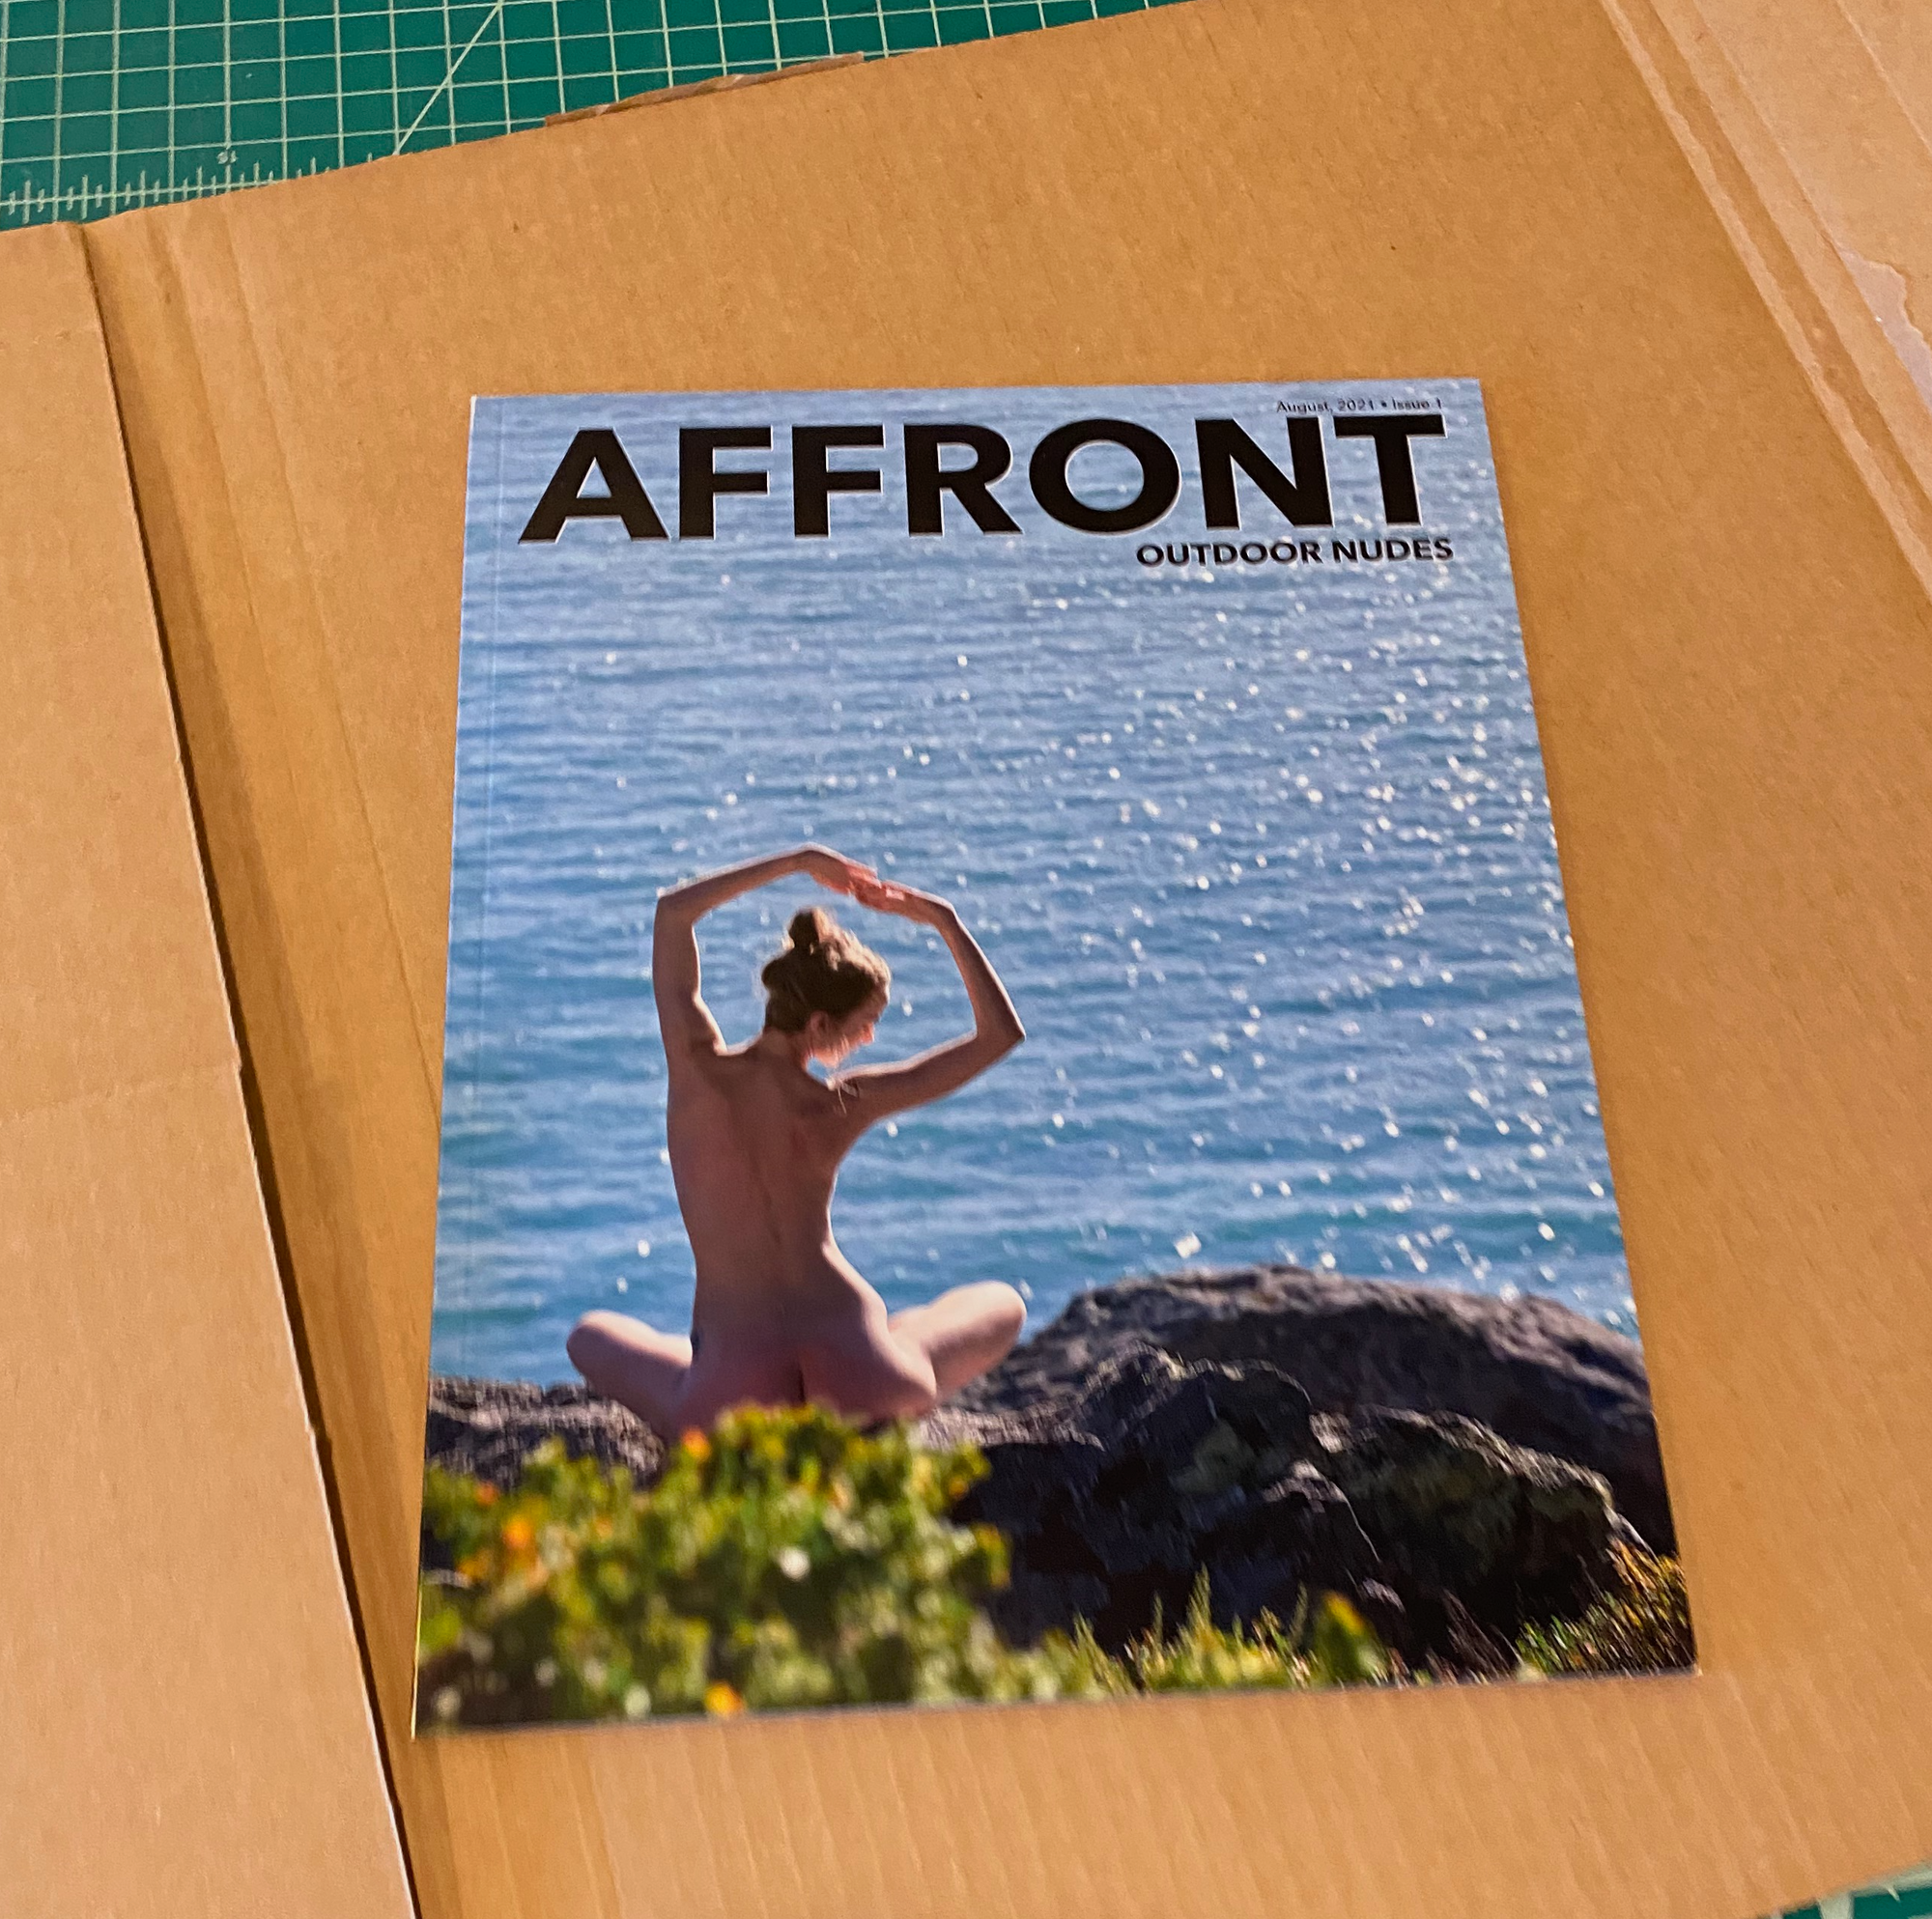
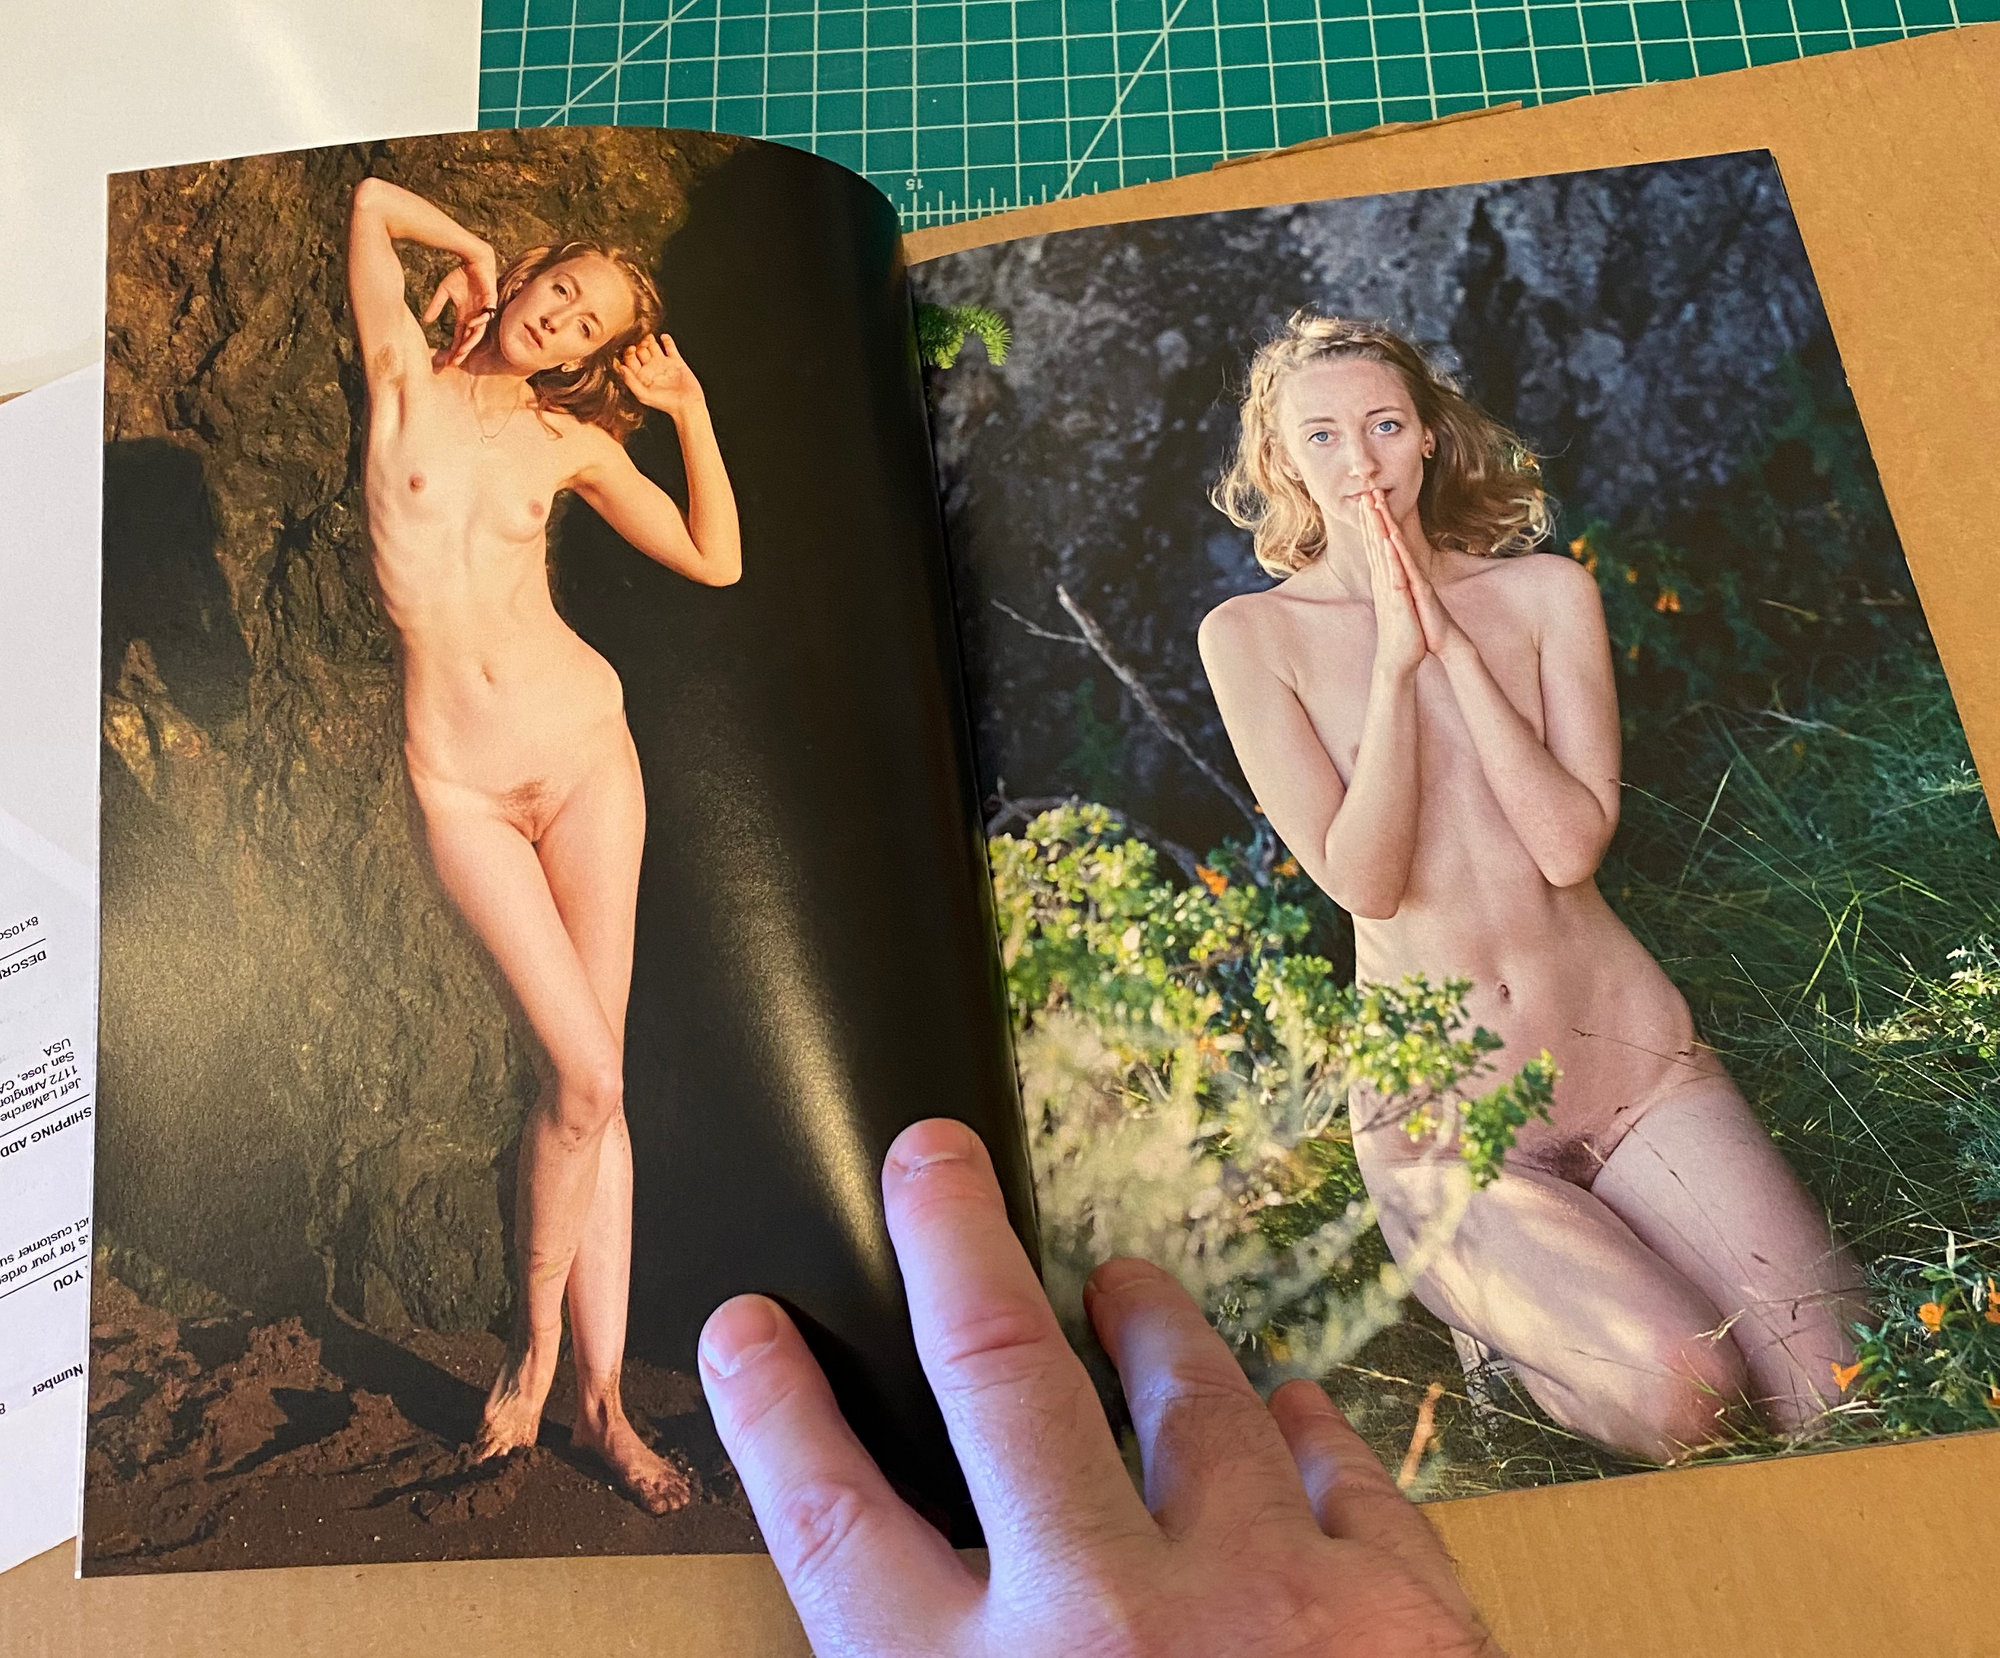
I have a few projects rattling around the old brain that are only practical if on-demand printing has achieved the same level of quality as traditional offset printing, so I threw together a 48-page “magazine” using a bunch of my outdoor nude images and printed it using Blurb to see where things are.
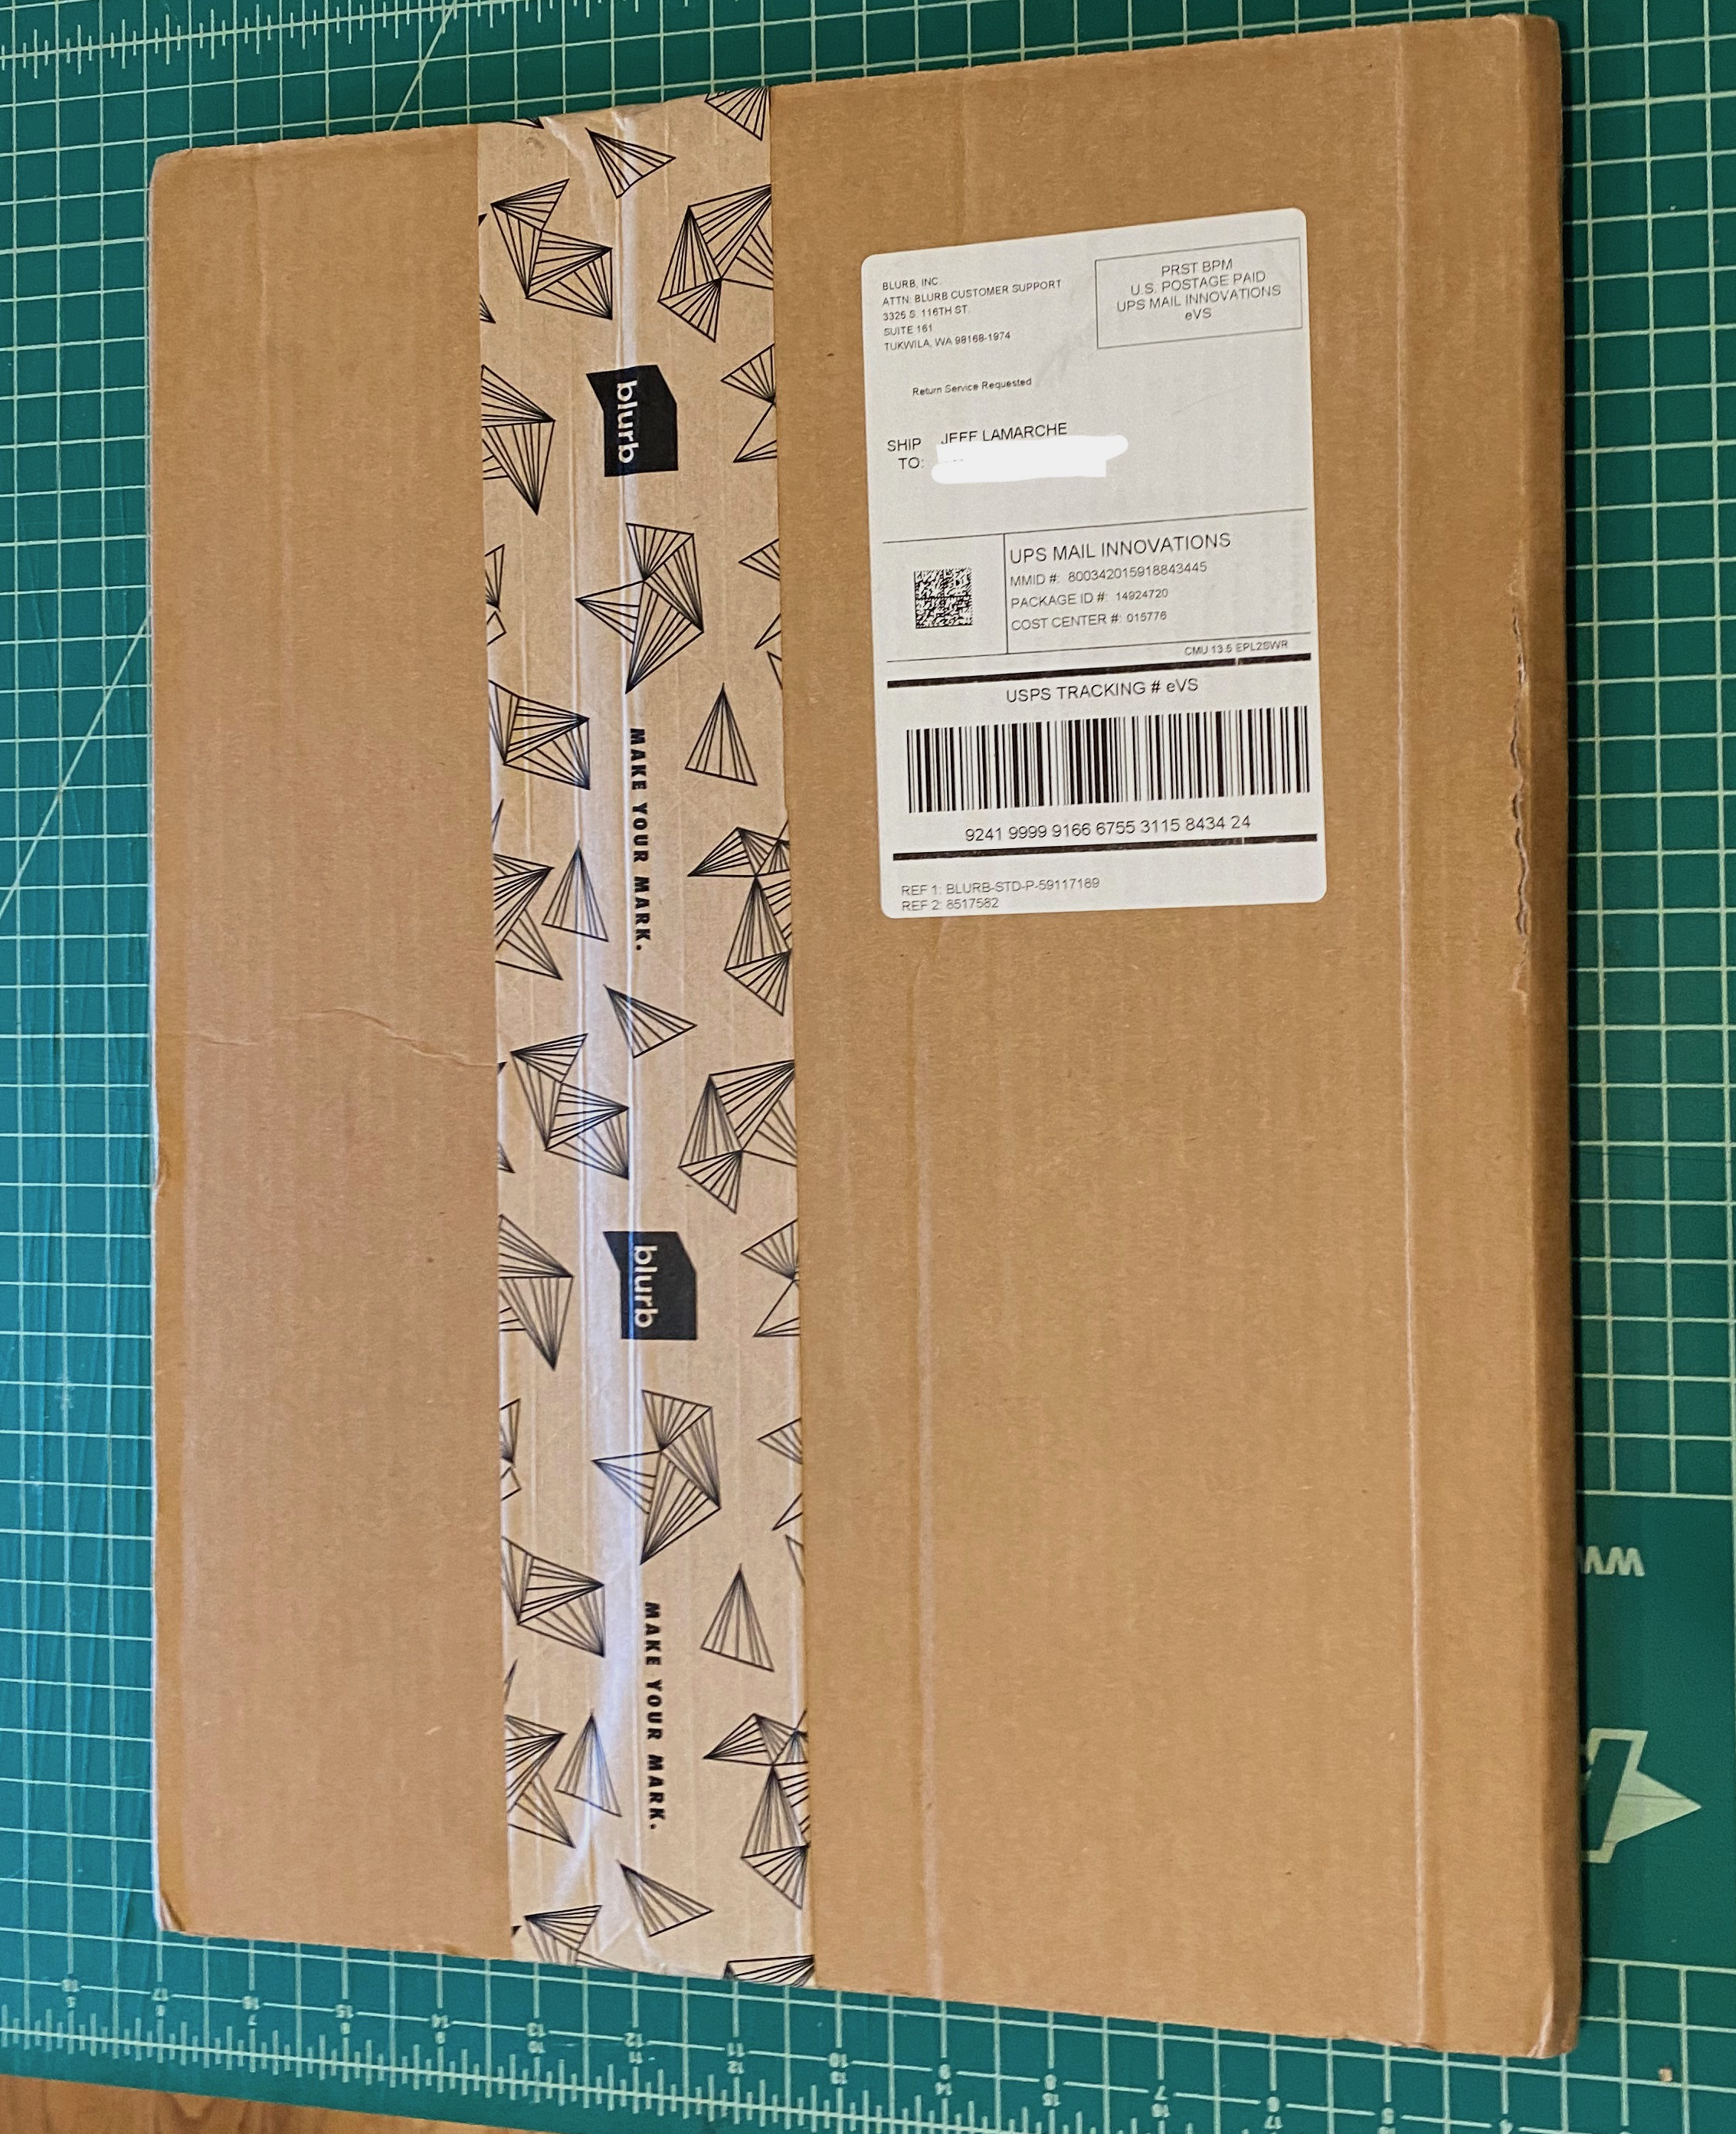
It arrived today.
The first impression from the packaging was very positive. The custom cardboard sleeve kept the magazine in great shape. The turnaround was also quick: This arrived exactly one week after I ordered it, and less than two weeks from when I decided to create it.
I have no plans to sell this, but if I were going to, I’d only have to make a few minor tweaks to a handful of images. Probably not more than five of them need adjustments, and those only need very minor tweaks… which is kind of crazy to me, since I’m comparing it to press-checks I would go to back in the 90s. Despite always sending out to service bureaus for proofs multiple times, we almost always had to re-do at least a few of the plates.
To have the images be so close to what was on my screen with so little work is just mind blowing to me.
It’s amazing to me that one person spending a few hours on a couple of evenings can produce something of this quality. My cost to produce this, including shipping, was about ten bucks. The quality of the paper and the printing are excellent. The only issues are things I could easily fix by tweaking my images or my Affinity Publisher file.
Here’s a short video where I flip through the pages.
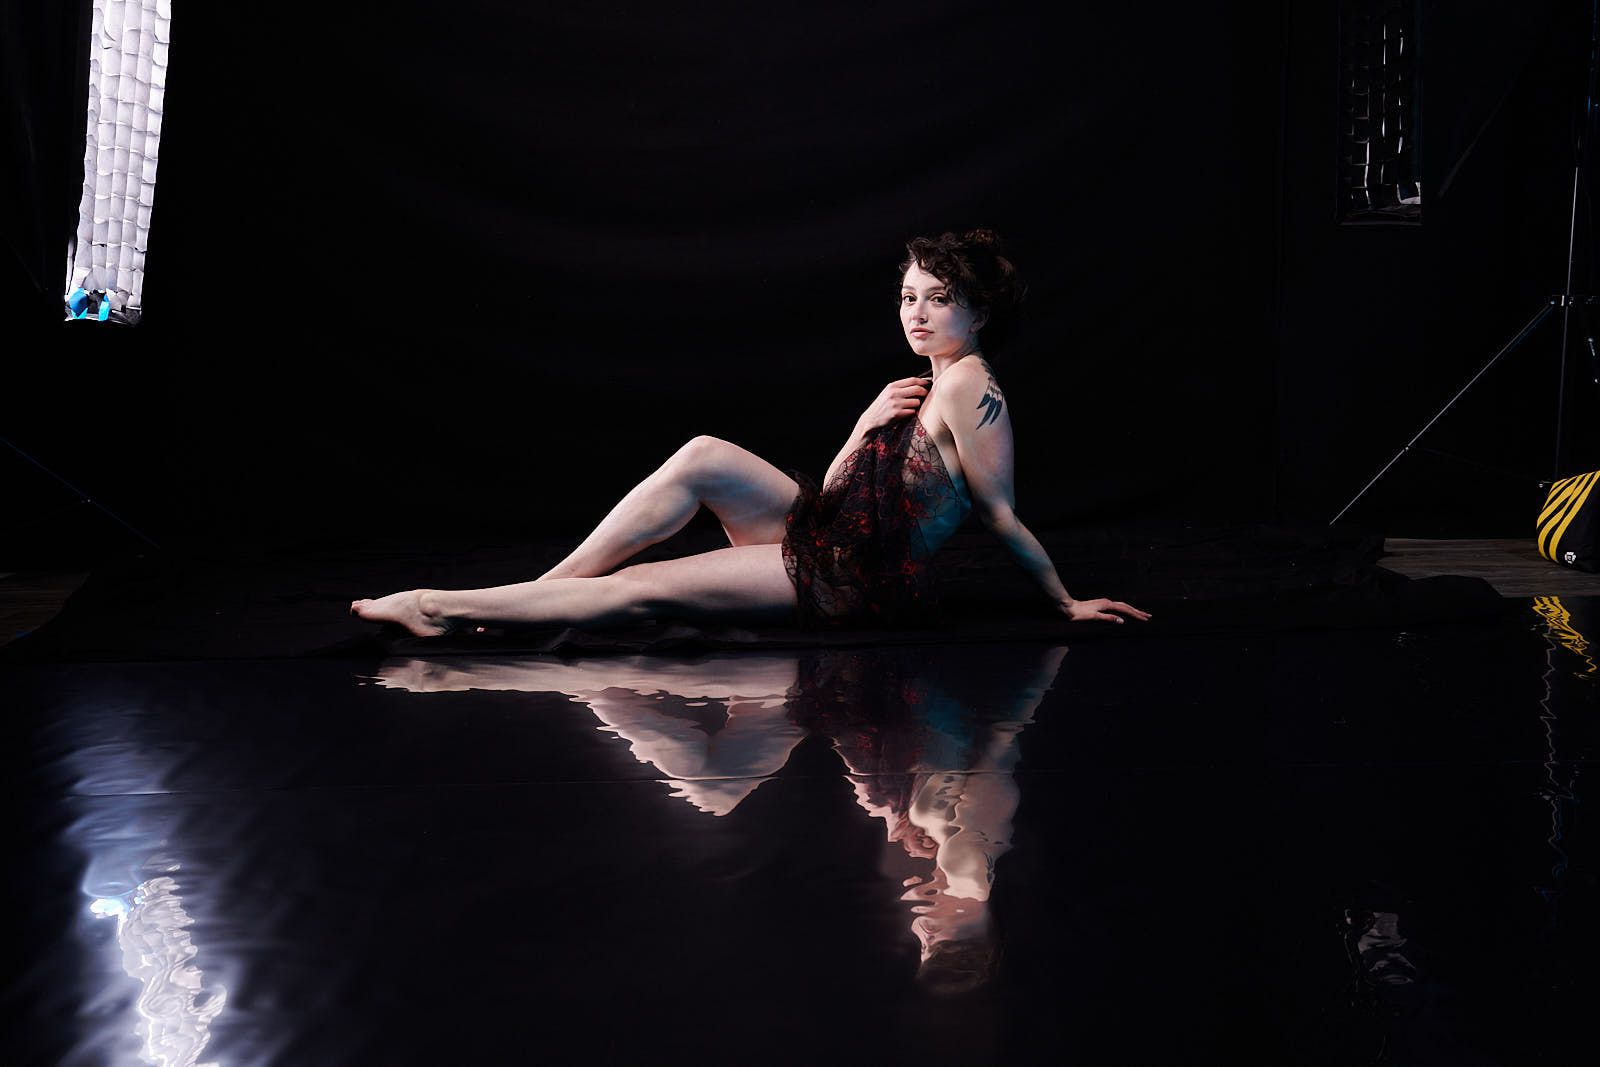
I posted this picture of Rose to social media recently and got a few questions about how it was accomplished. This seemed like a better venue to discuss it than trying to cover it using a bunch of tweets or Instagram posts.
The reflection in the shot is provided by highly reflective mylar foil designed for grow-houses and hydroponics. I taped it down on the floor in front of the model. There are many options for doing reflections, including plexiglass, water, and actual mirrors, but I didn’t want a perfect reflection. The flexible mylar provided exactly the amount of softness and subtle distortion I was looking for without the potential mess or problems of using water in the studio.
This is what the studio looked like when we were shooting:
The studio setup. A fourth strobe is just off the right of this view.
The overhead softbox is the key light in this setup. I metered it for ISO 200 at ƒ8 then underexposed slightly by shooting at ƒ9. The strip lights shine on the model from behind and provide separation from the background and were also metered at ƒ8. There’s a fourth light in this setup that isn’t visible in the shot above.
The fourth was a gelled strobe with a 5″ zoom reflector that I pointed down at the foil, angled so it threw blue water-like caustic reflections onto the model. You can see those reflections on the model’s torso, left arm, and right leg.
Most of this shot was achieved in-camera, but I did do a little bit of post work to get to the final image. The strip lights and their reflections were in-frame, so I Photoshopped those out to give myself some breathing room around the model. I didn’t want to crop in too tightly, but also didn’t want the strip lights in the shot.
There was also a slightly noticeable seam where the two pieces of foil came together, which I removed in Photoshop, and I cropped it in just a little bit to bring it to a 4:5 aspect ratio. Here’s what the image looked like coming out of the camera.
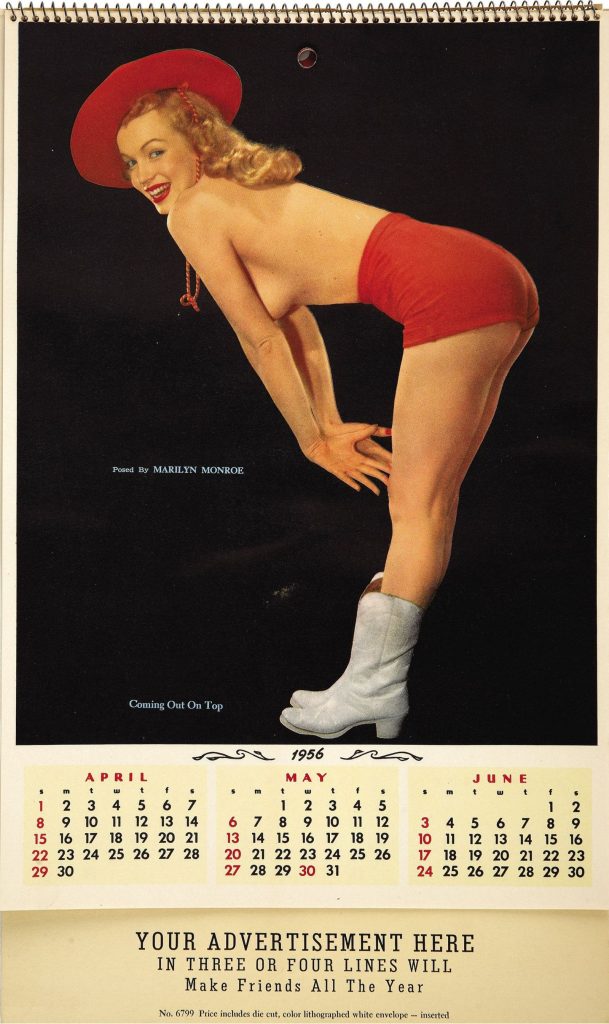
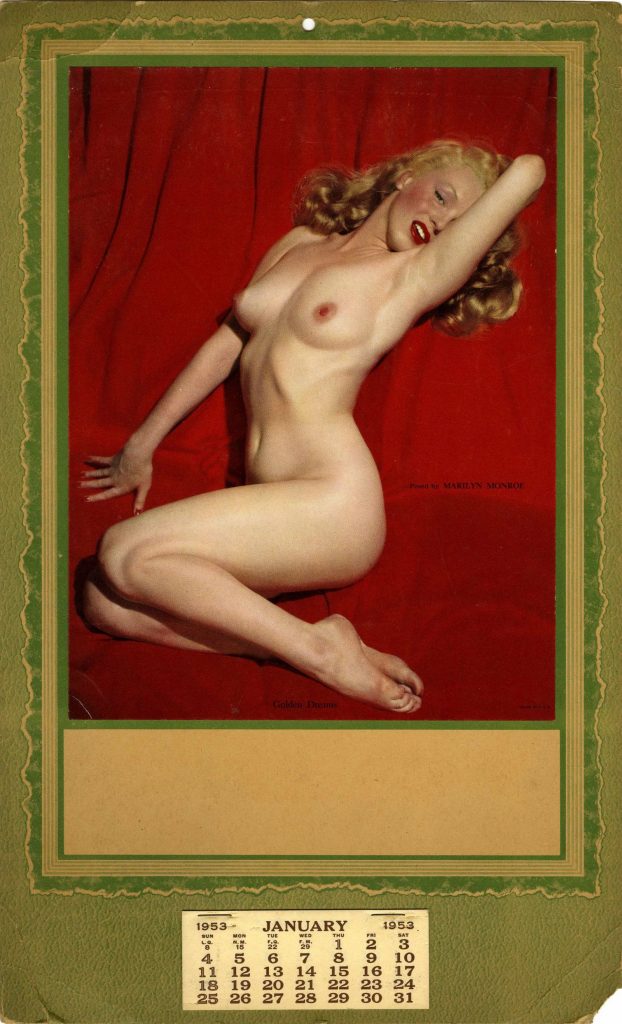
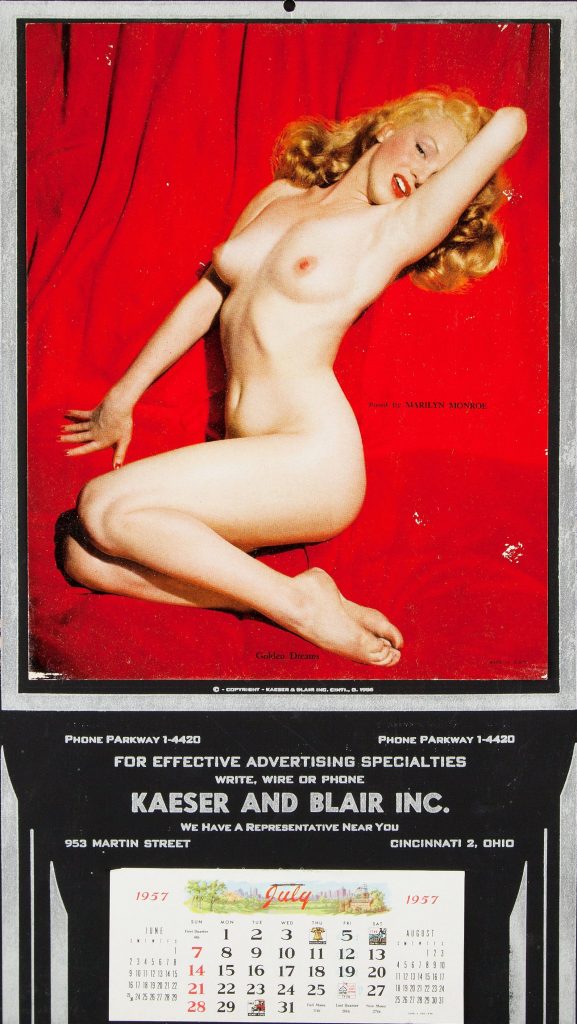
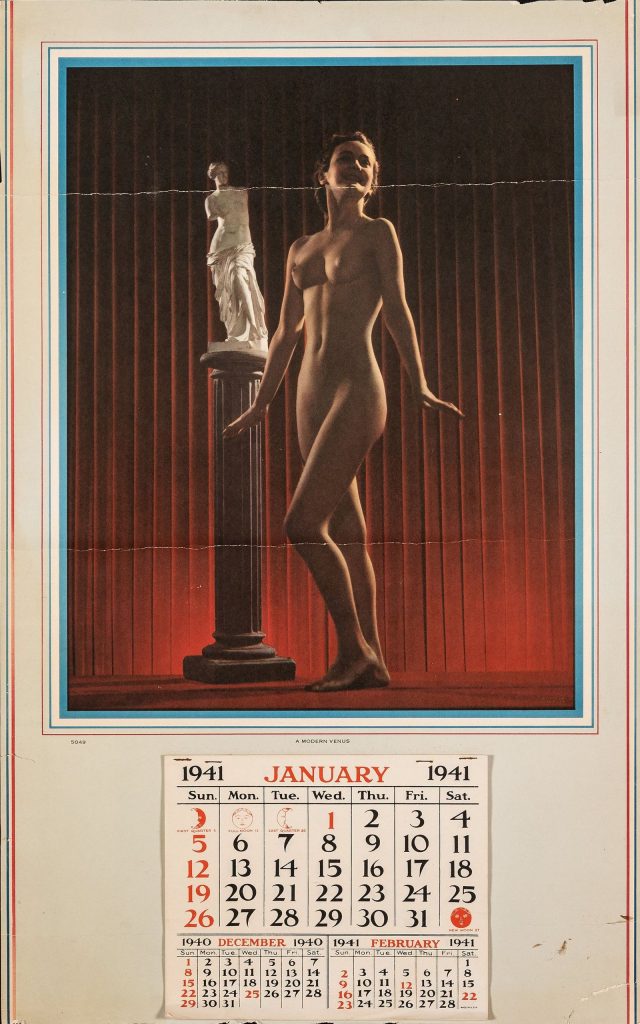
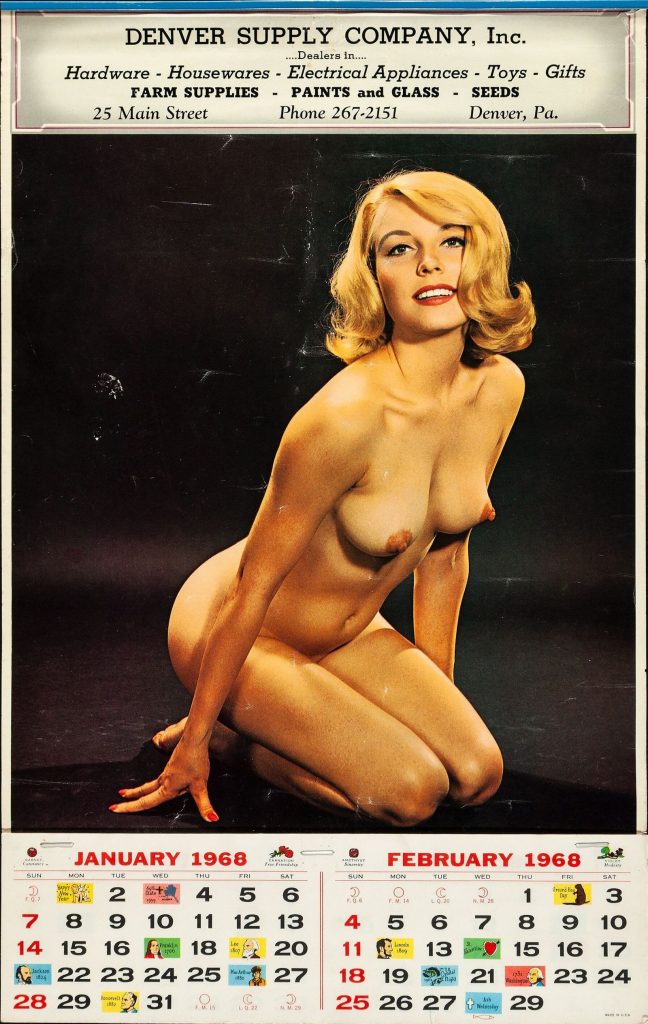
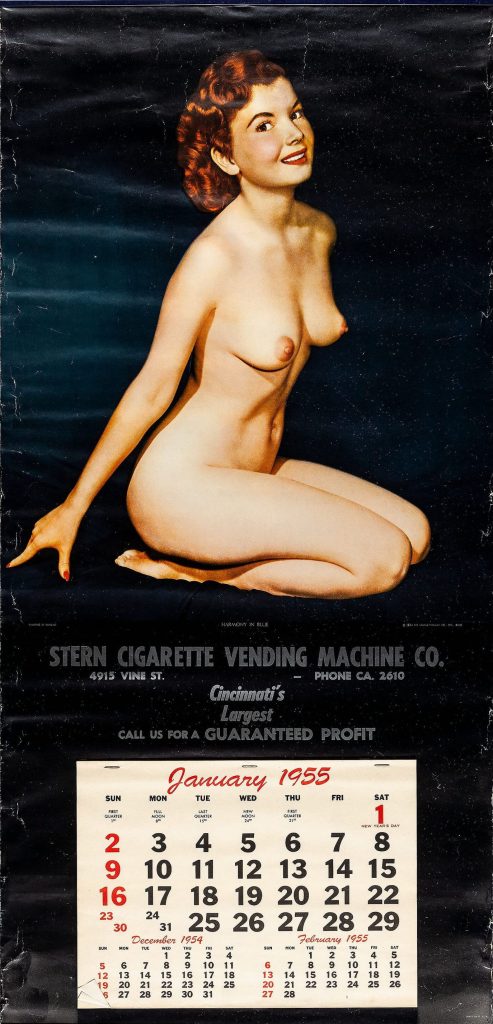
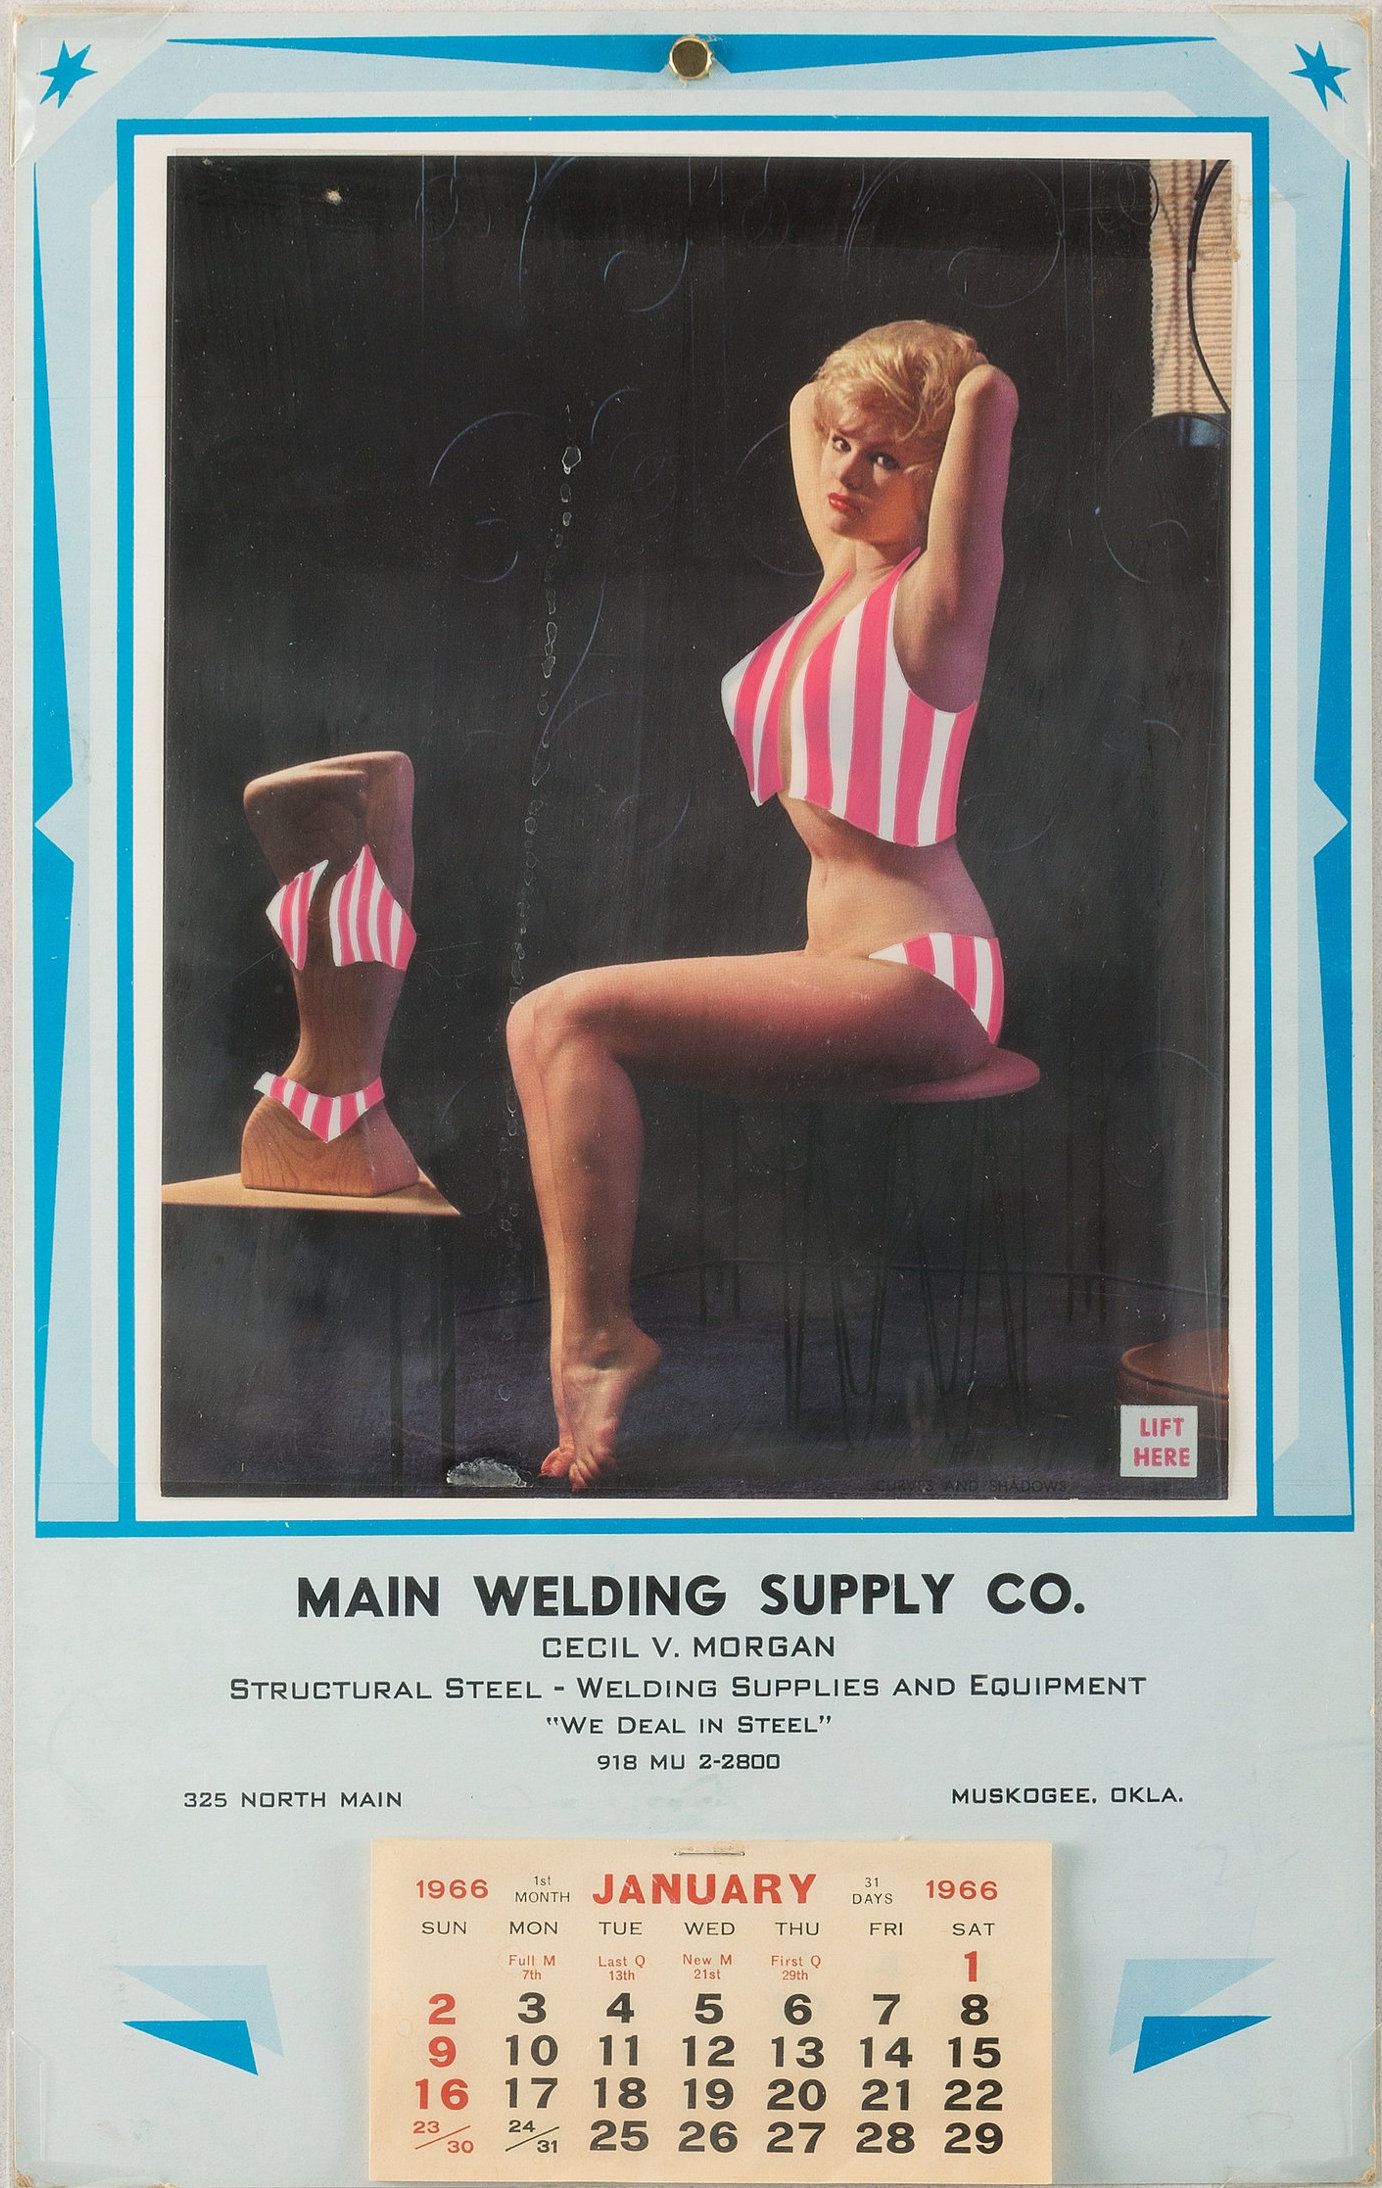
I’ve long been fascinated by the pin-up calendars from the 1950s and 1960s. For reasons I don’t pretend to understand, they were one of the only socially tolerated — if not exactly socially acceptable — outlets for nude imagery in the US at that time. The most famous calendar girl model, of course, was Marilyn Monroe, who had posed for one of the calendar companies before she became famous.
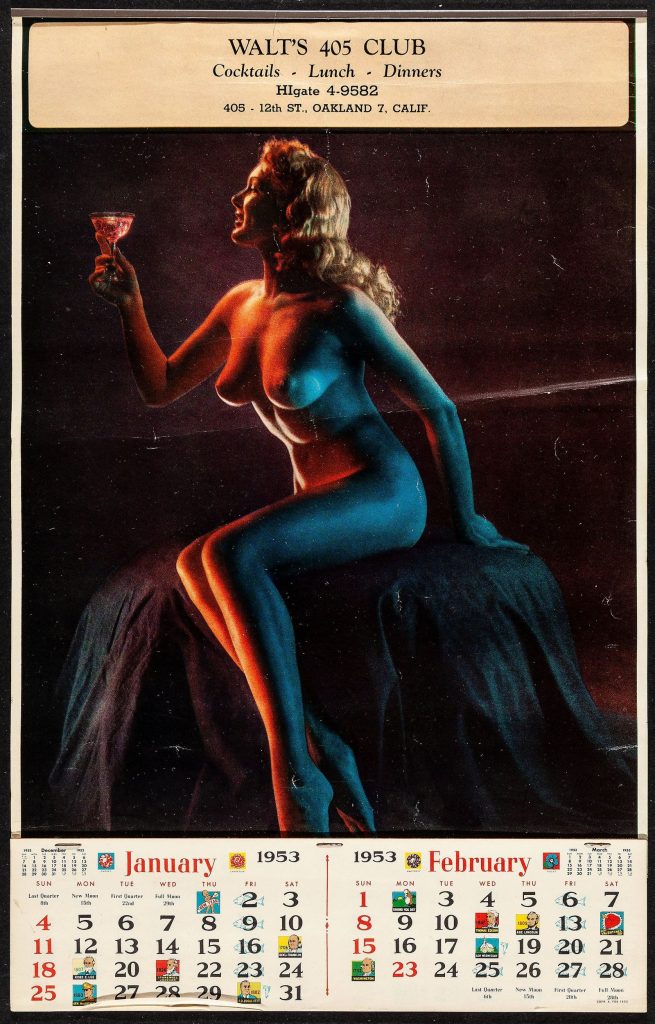
Here are some examples of calendars from that era:
Calendar companies would custom print a company’s name and information on calendars that they could give away as promotional items. Most of the companies had a substantial catalog of images to choose from, with both nude and non-nude images. There were also many styles, but the most popular featured a single image with tear-off calendar sheets at the bottom. The popularity was probably due to the fact that it would have been fairly cheap to produce.
There were even some companies that produced nude calendars that came with an acetate sheet on them with a drawn-on bathing suit that could then be peeled off to reveal the nude image beneath. I assume this was to get around some kind of censorship law or to make the calendars more socially acceptable when delivered. I suppose it could have also added to the percieved naughtiness of the calendar, though.
A nude calendar with a drawn-on bathing suit that could be peeled off. I won’t be attempting this.
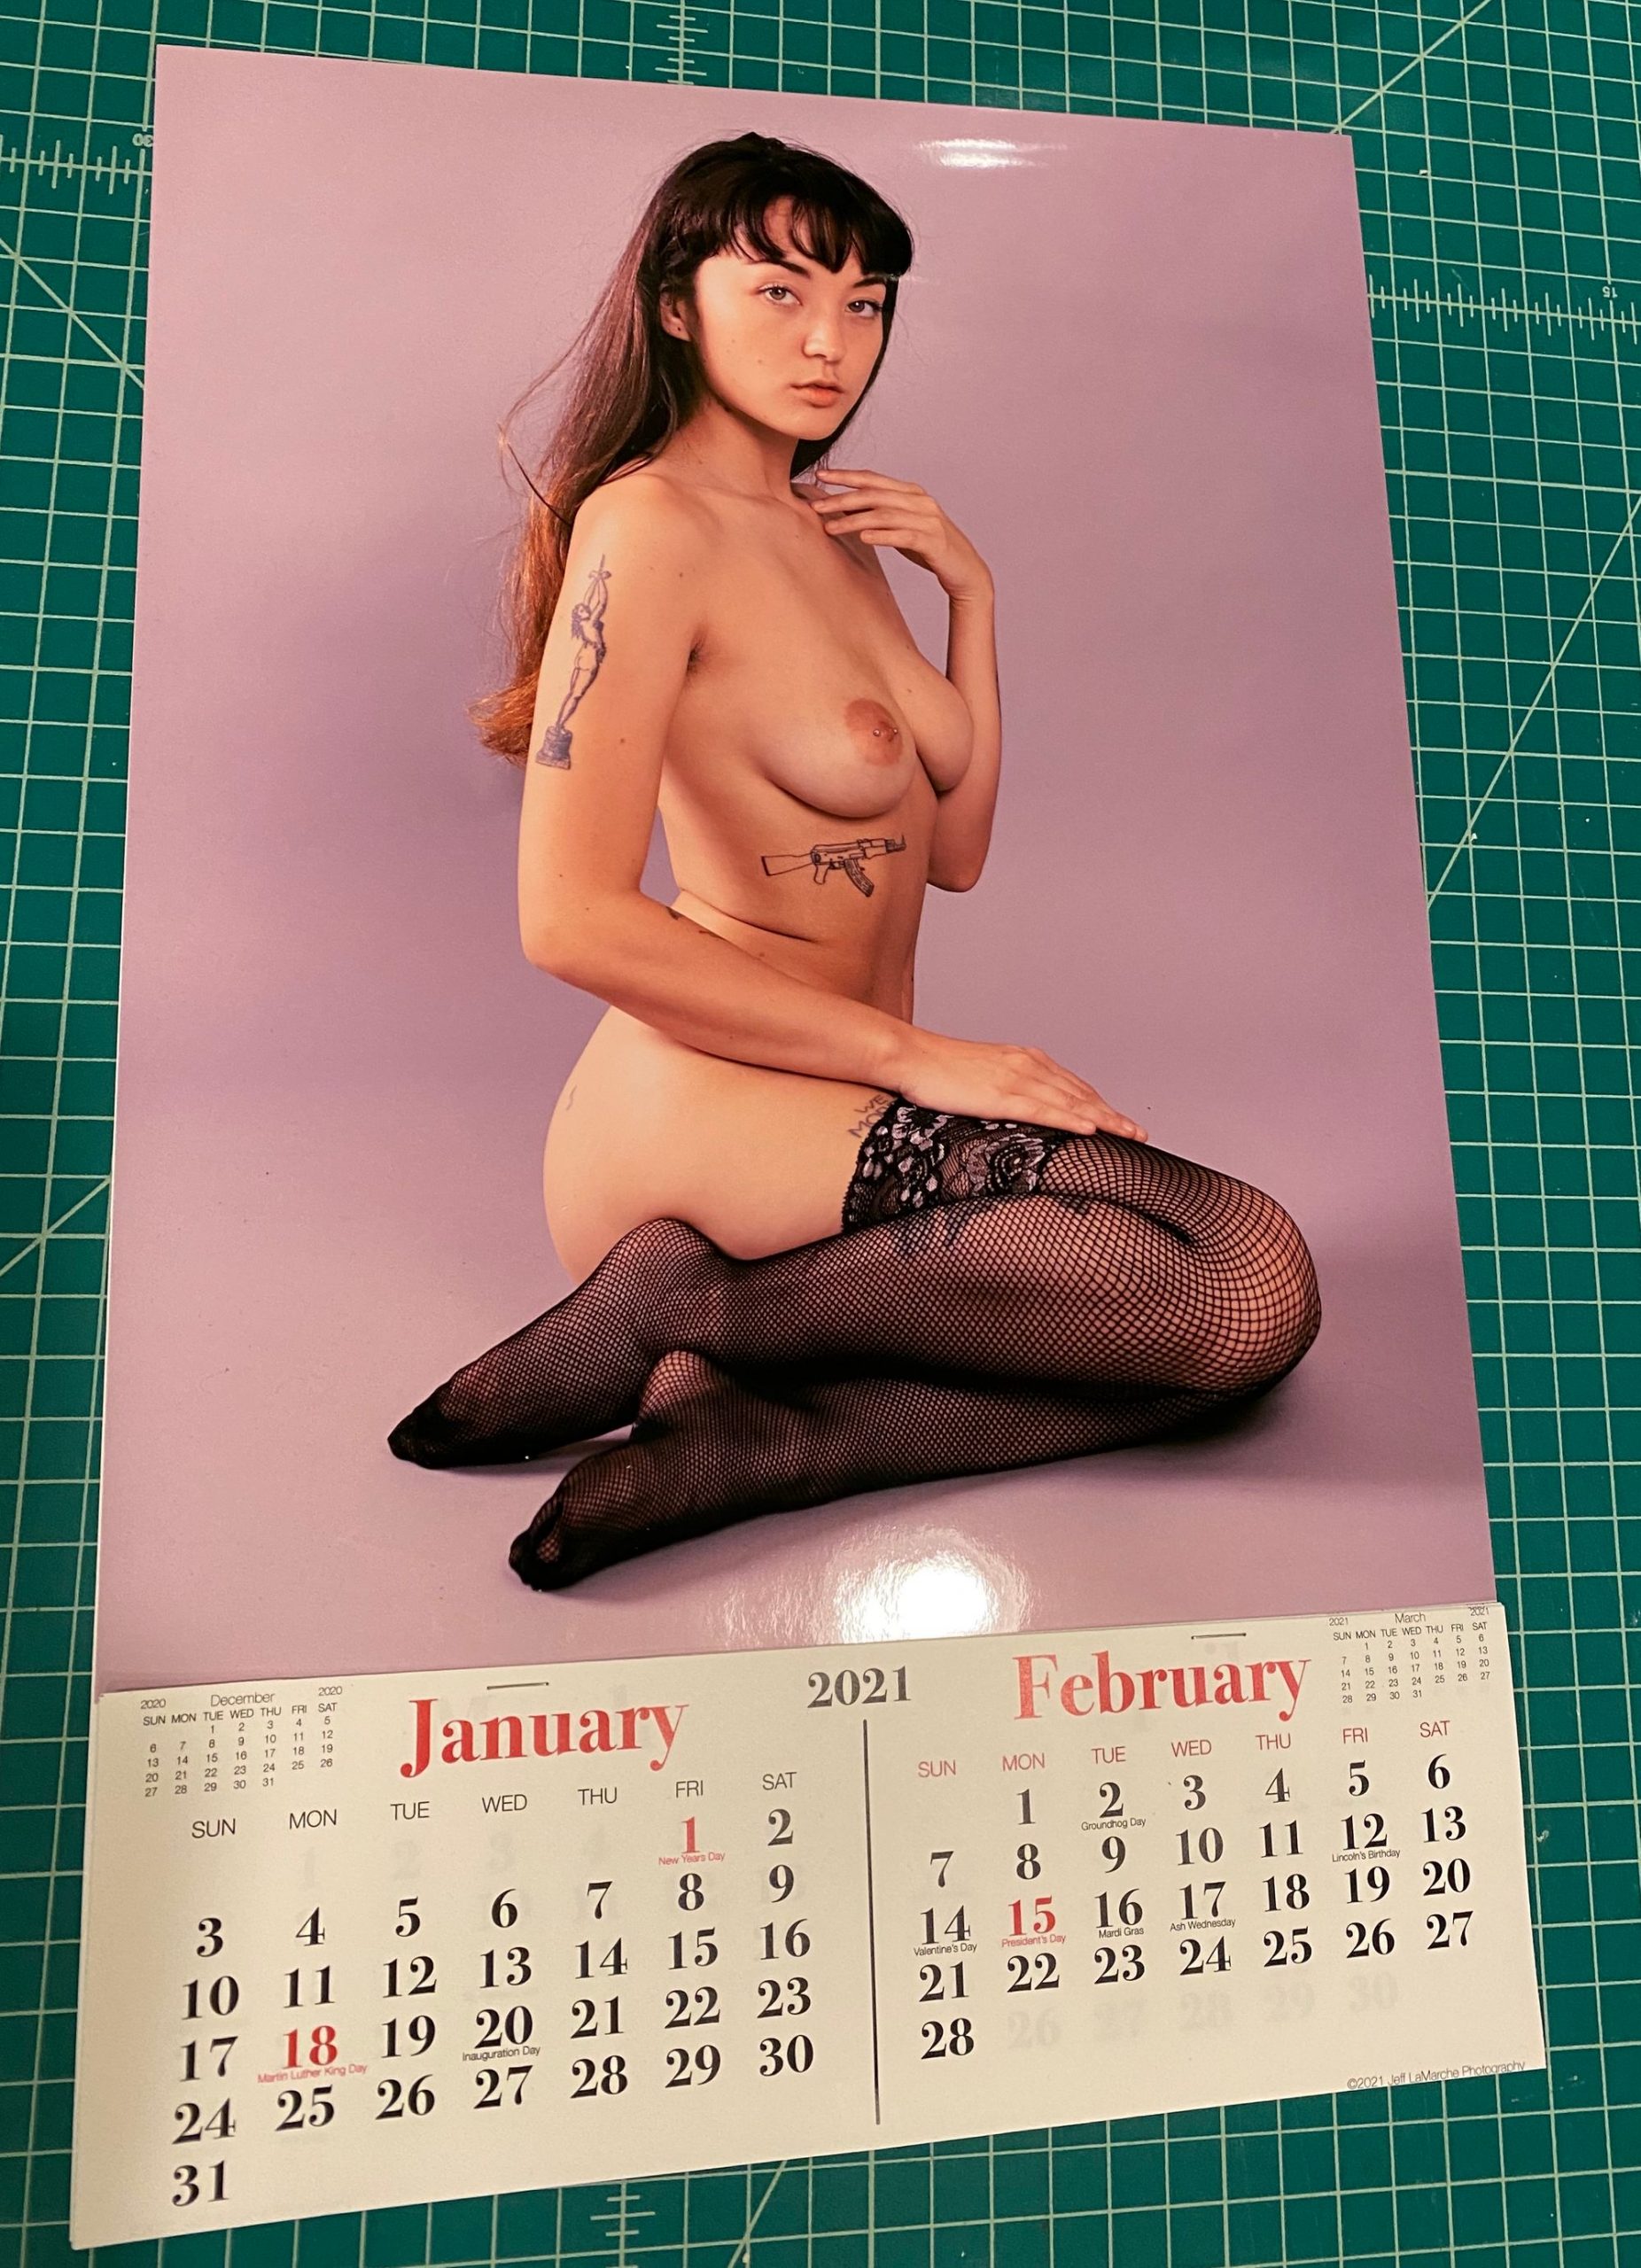
Recently, I decided it would be fun to do an homage to the calendars from this era. I’m not sure why the idea took me all of a sudden. A week into the new year is really not the ideal time for starting a calendar project, but… once it occurred to me, it just seemed like a good quarantine project.
My original thought was to set up a shoot specifically to create images in the style of some of the old calendars, but almost on accident, I stumbled across a series of photos in my library that already had the right feel:
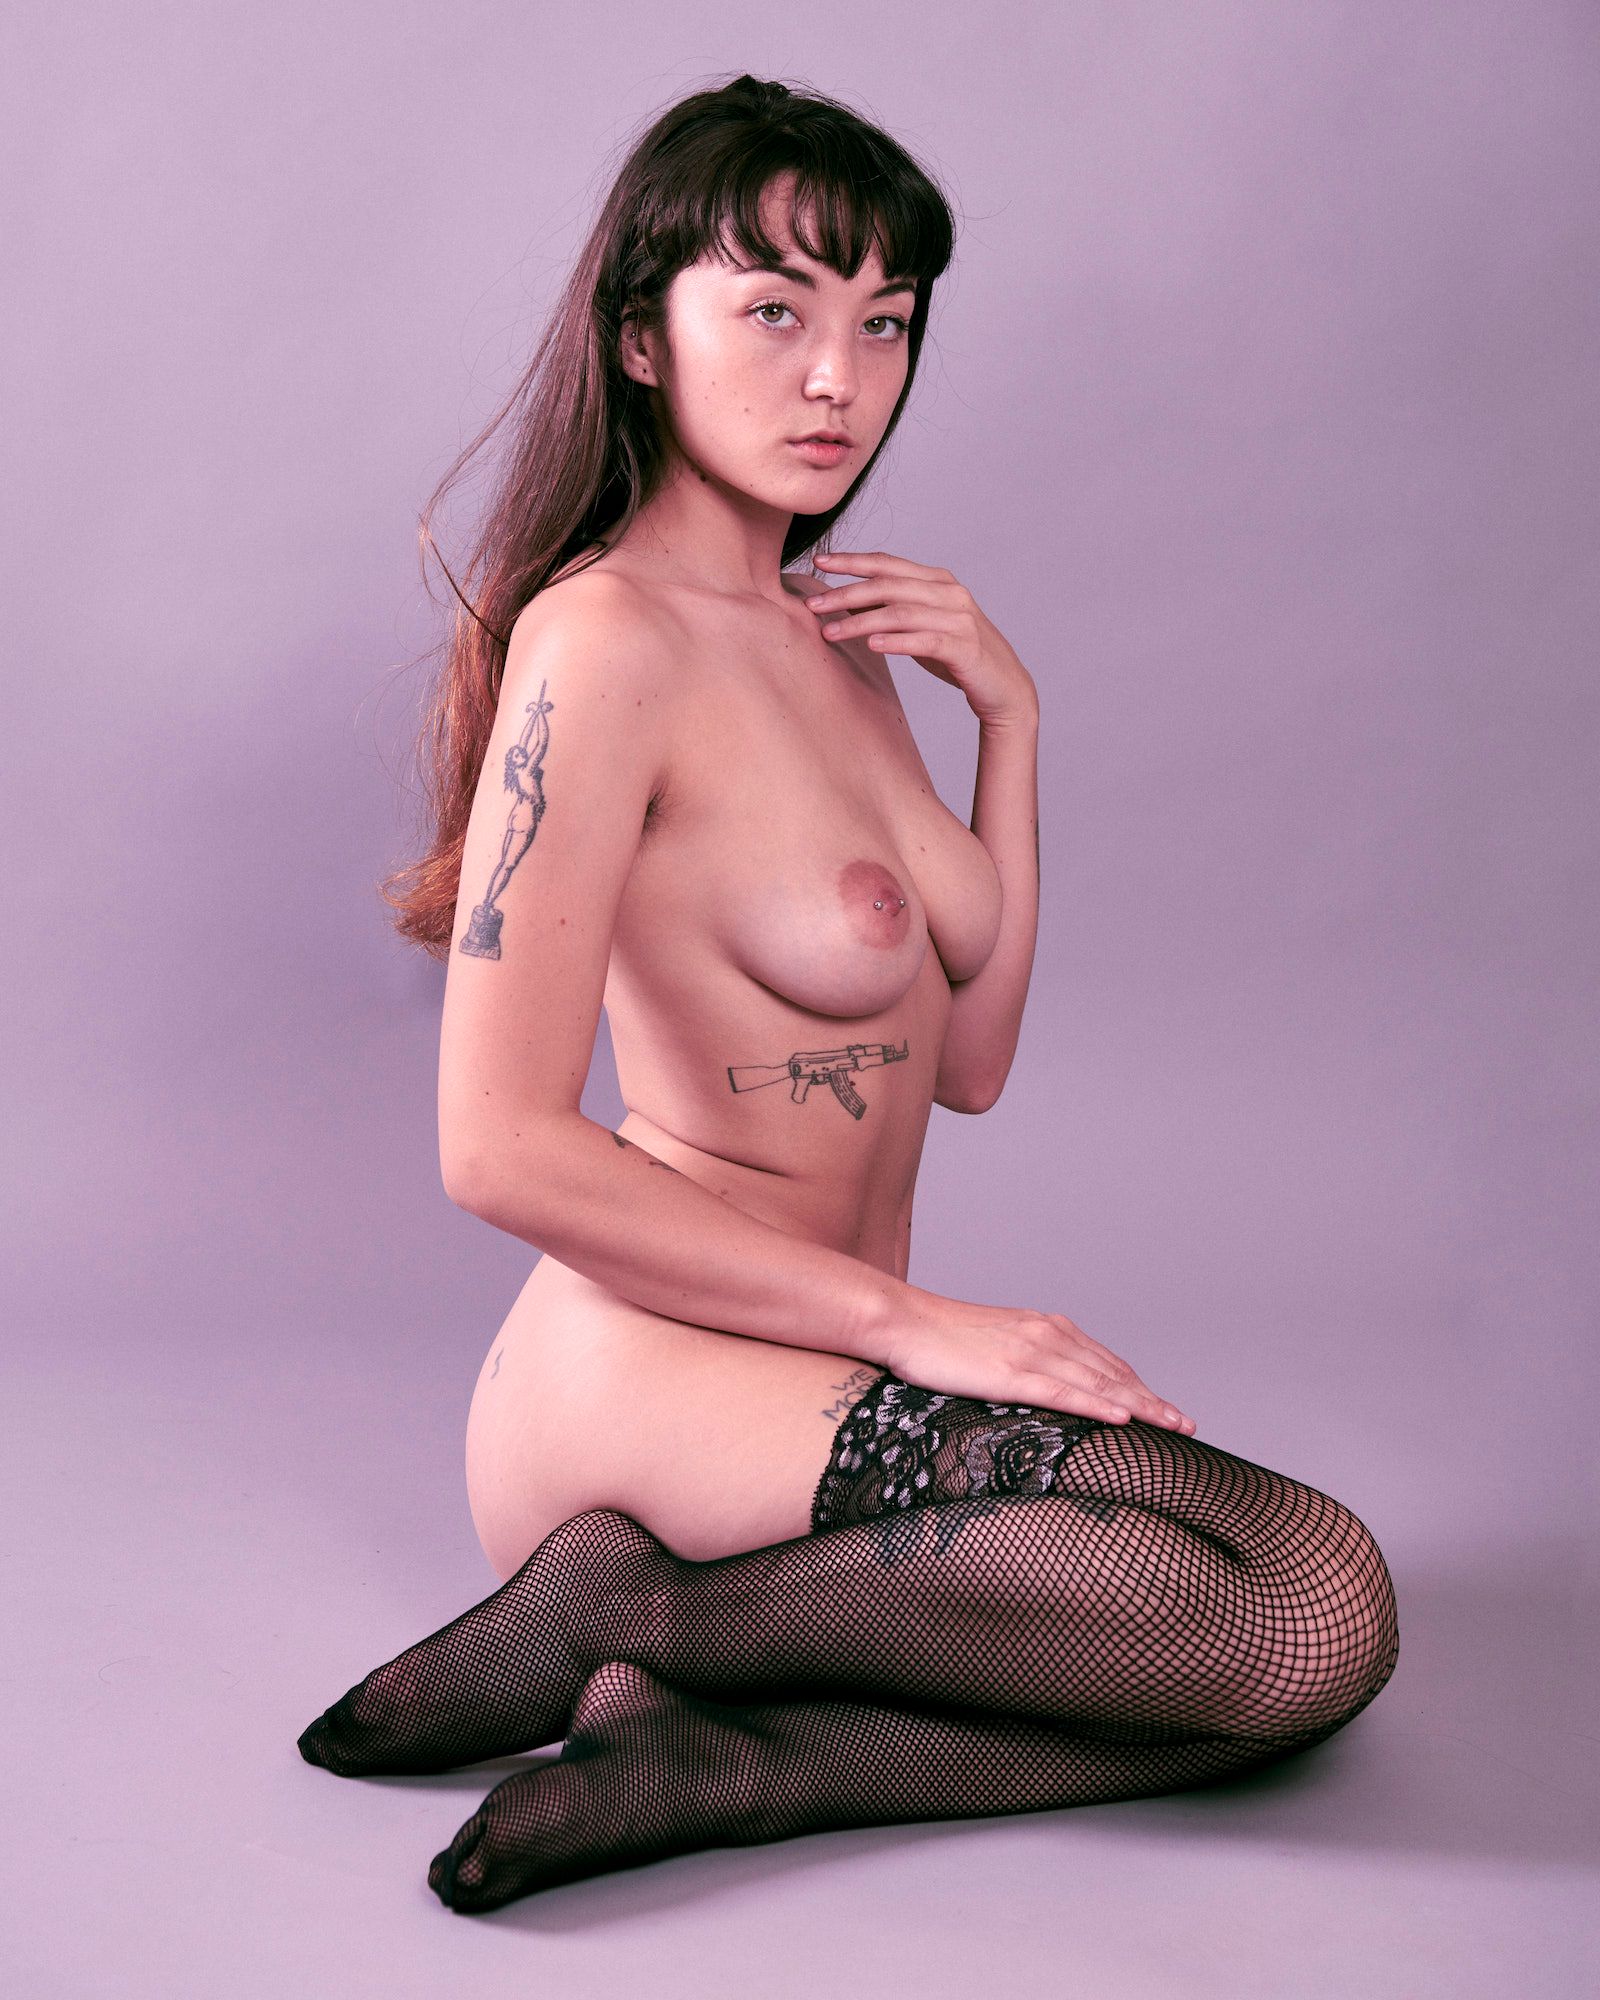
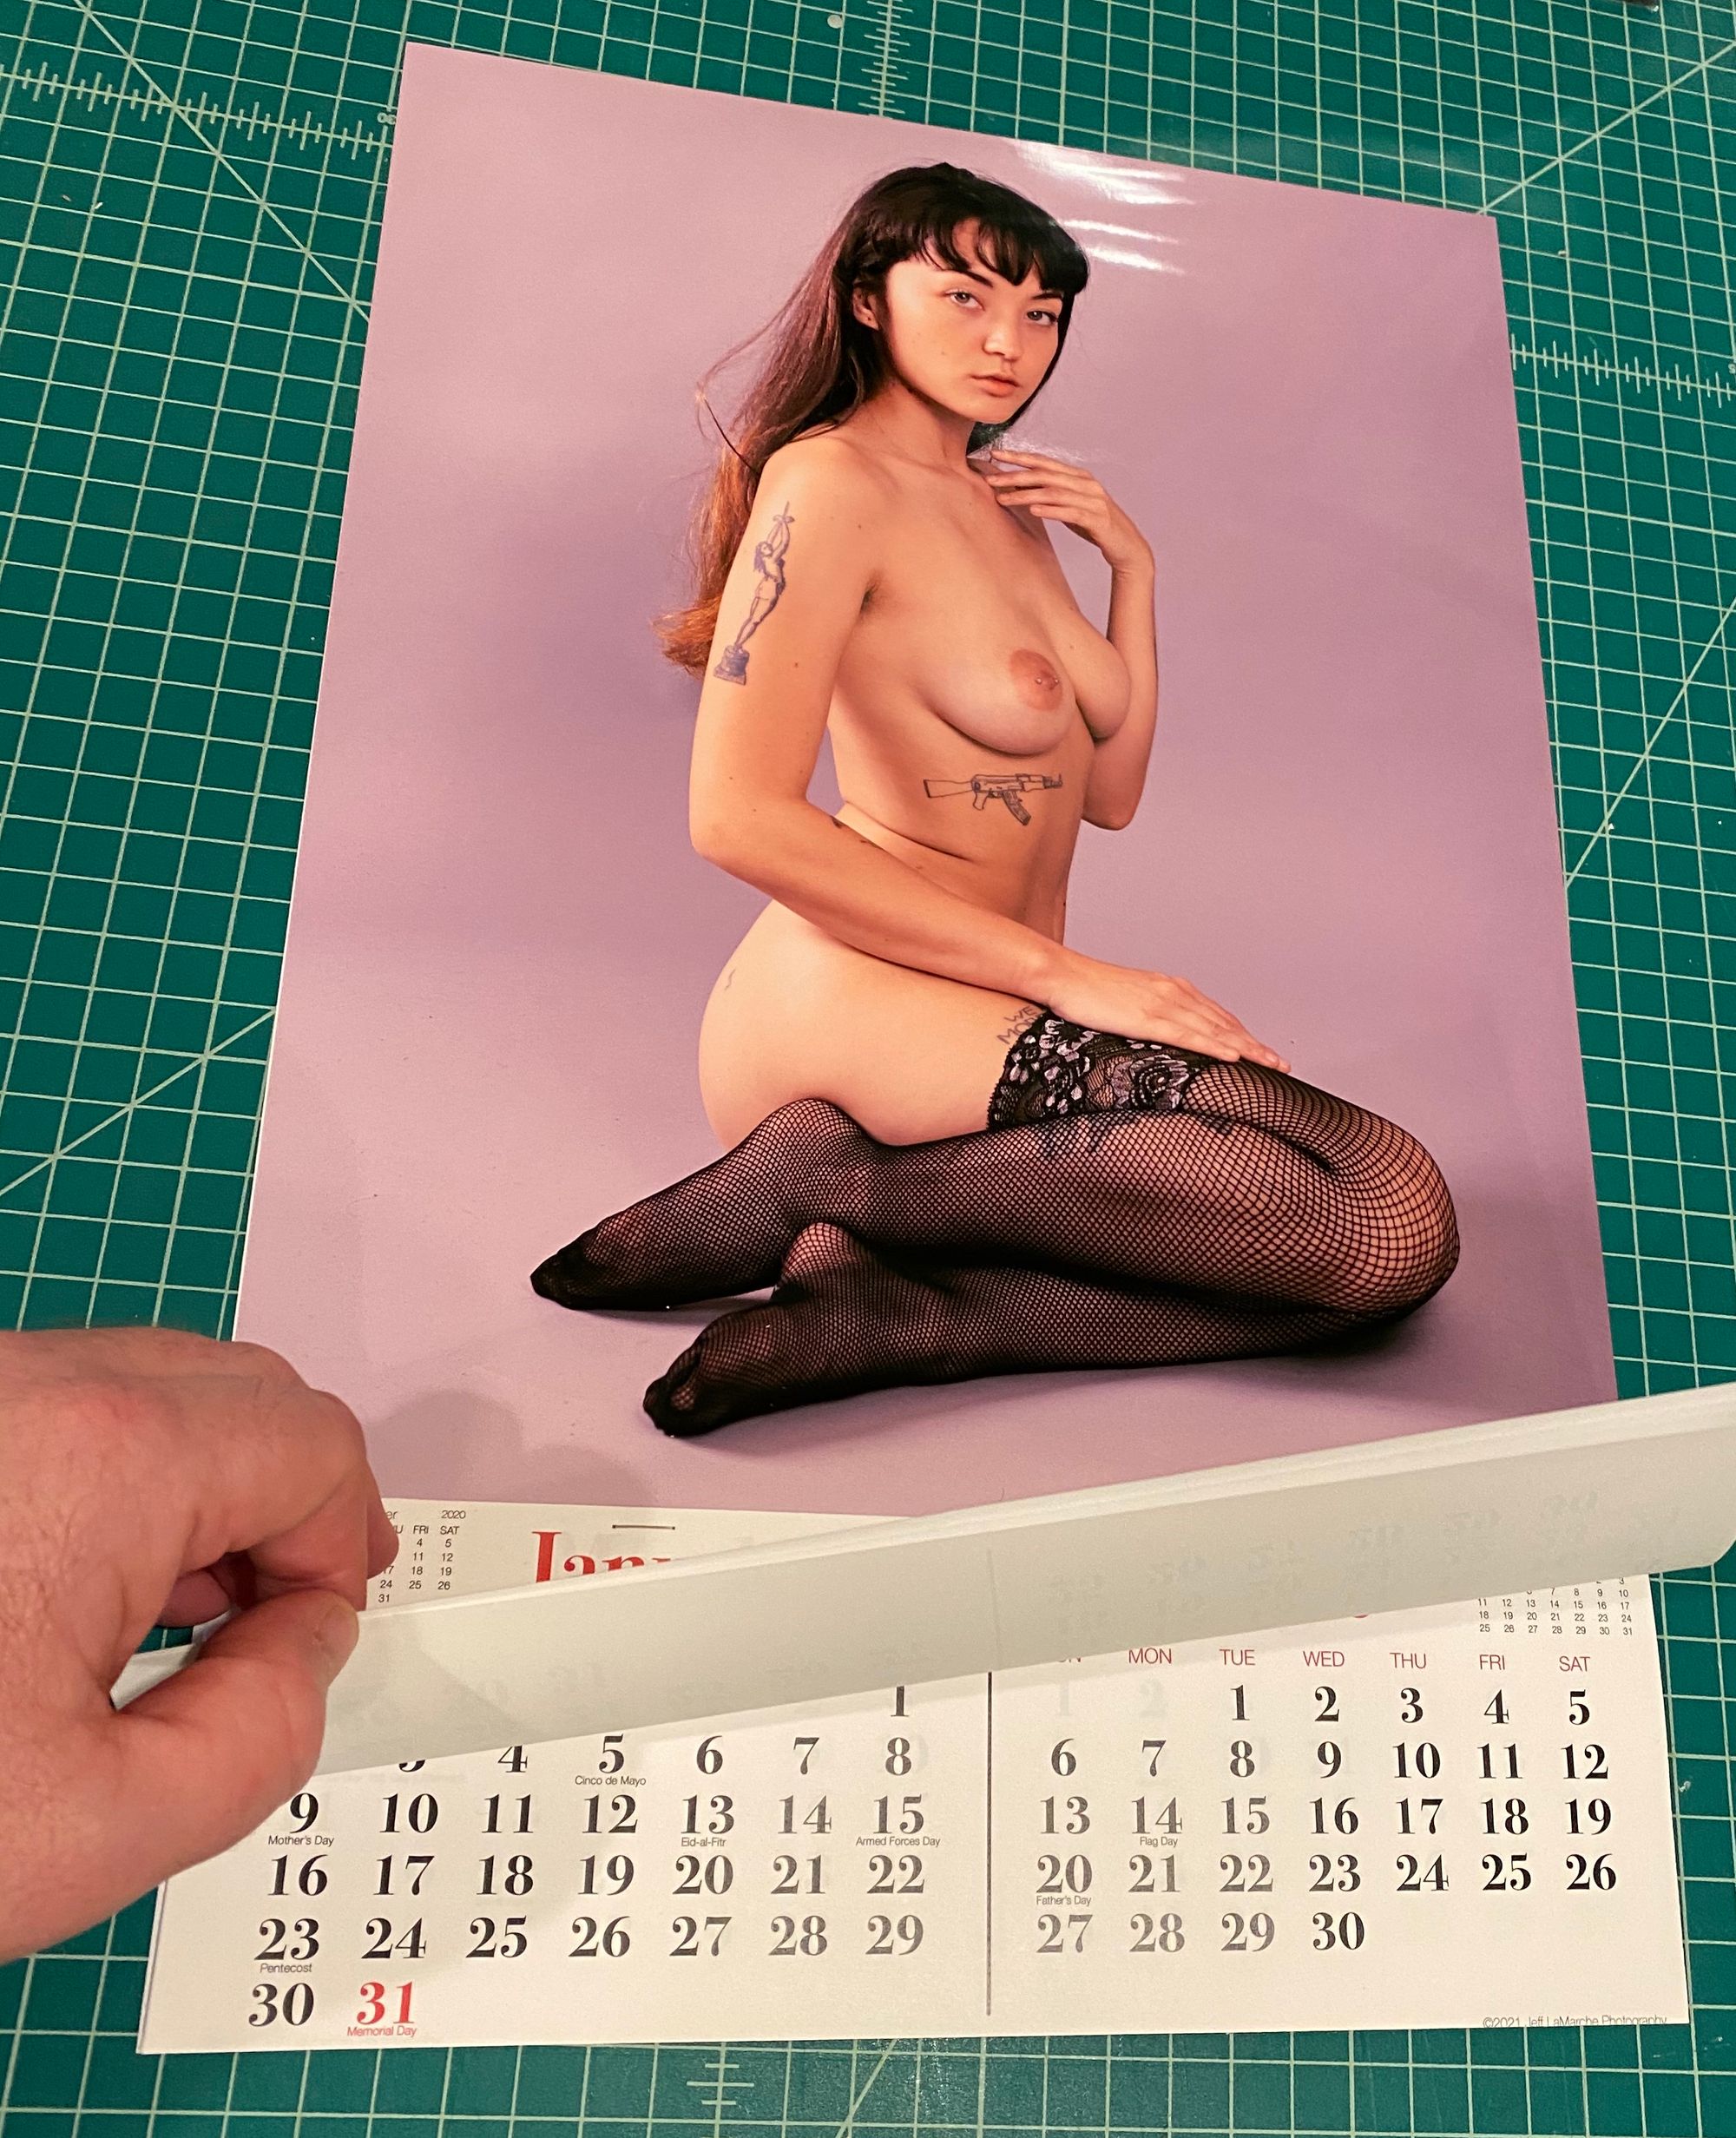
Other than her tattoos, this shot of Juno could easily be from the 1950s or 1960s. The pose, her haircut, everything felt pretty on the nose with almost a Bunny Yeager feel to it. This was a perfect picture for prototyping the idea and saved me the expense of setting up a new shoot, at least for now.
Designing the Calendar
I didn’t want to exactly mimic any of the existing calendars, but rather create a modern calendar reminiscent of and inspired by those older ones. My main inspirations for the calendar portion were the Walt’s 505 Club and Denver Supply Company, Inc. calendars in the gallery above. I opted not to use the graphics honoring historical figures, though, and stick with just numbers to keep them less cluttered feeling.
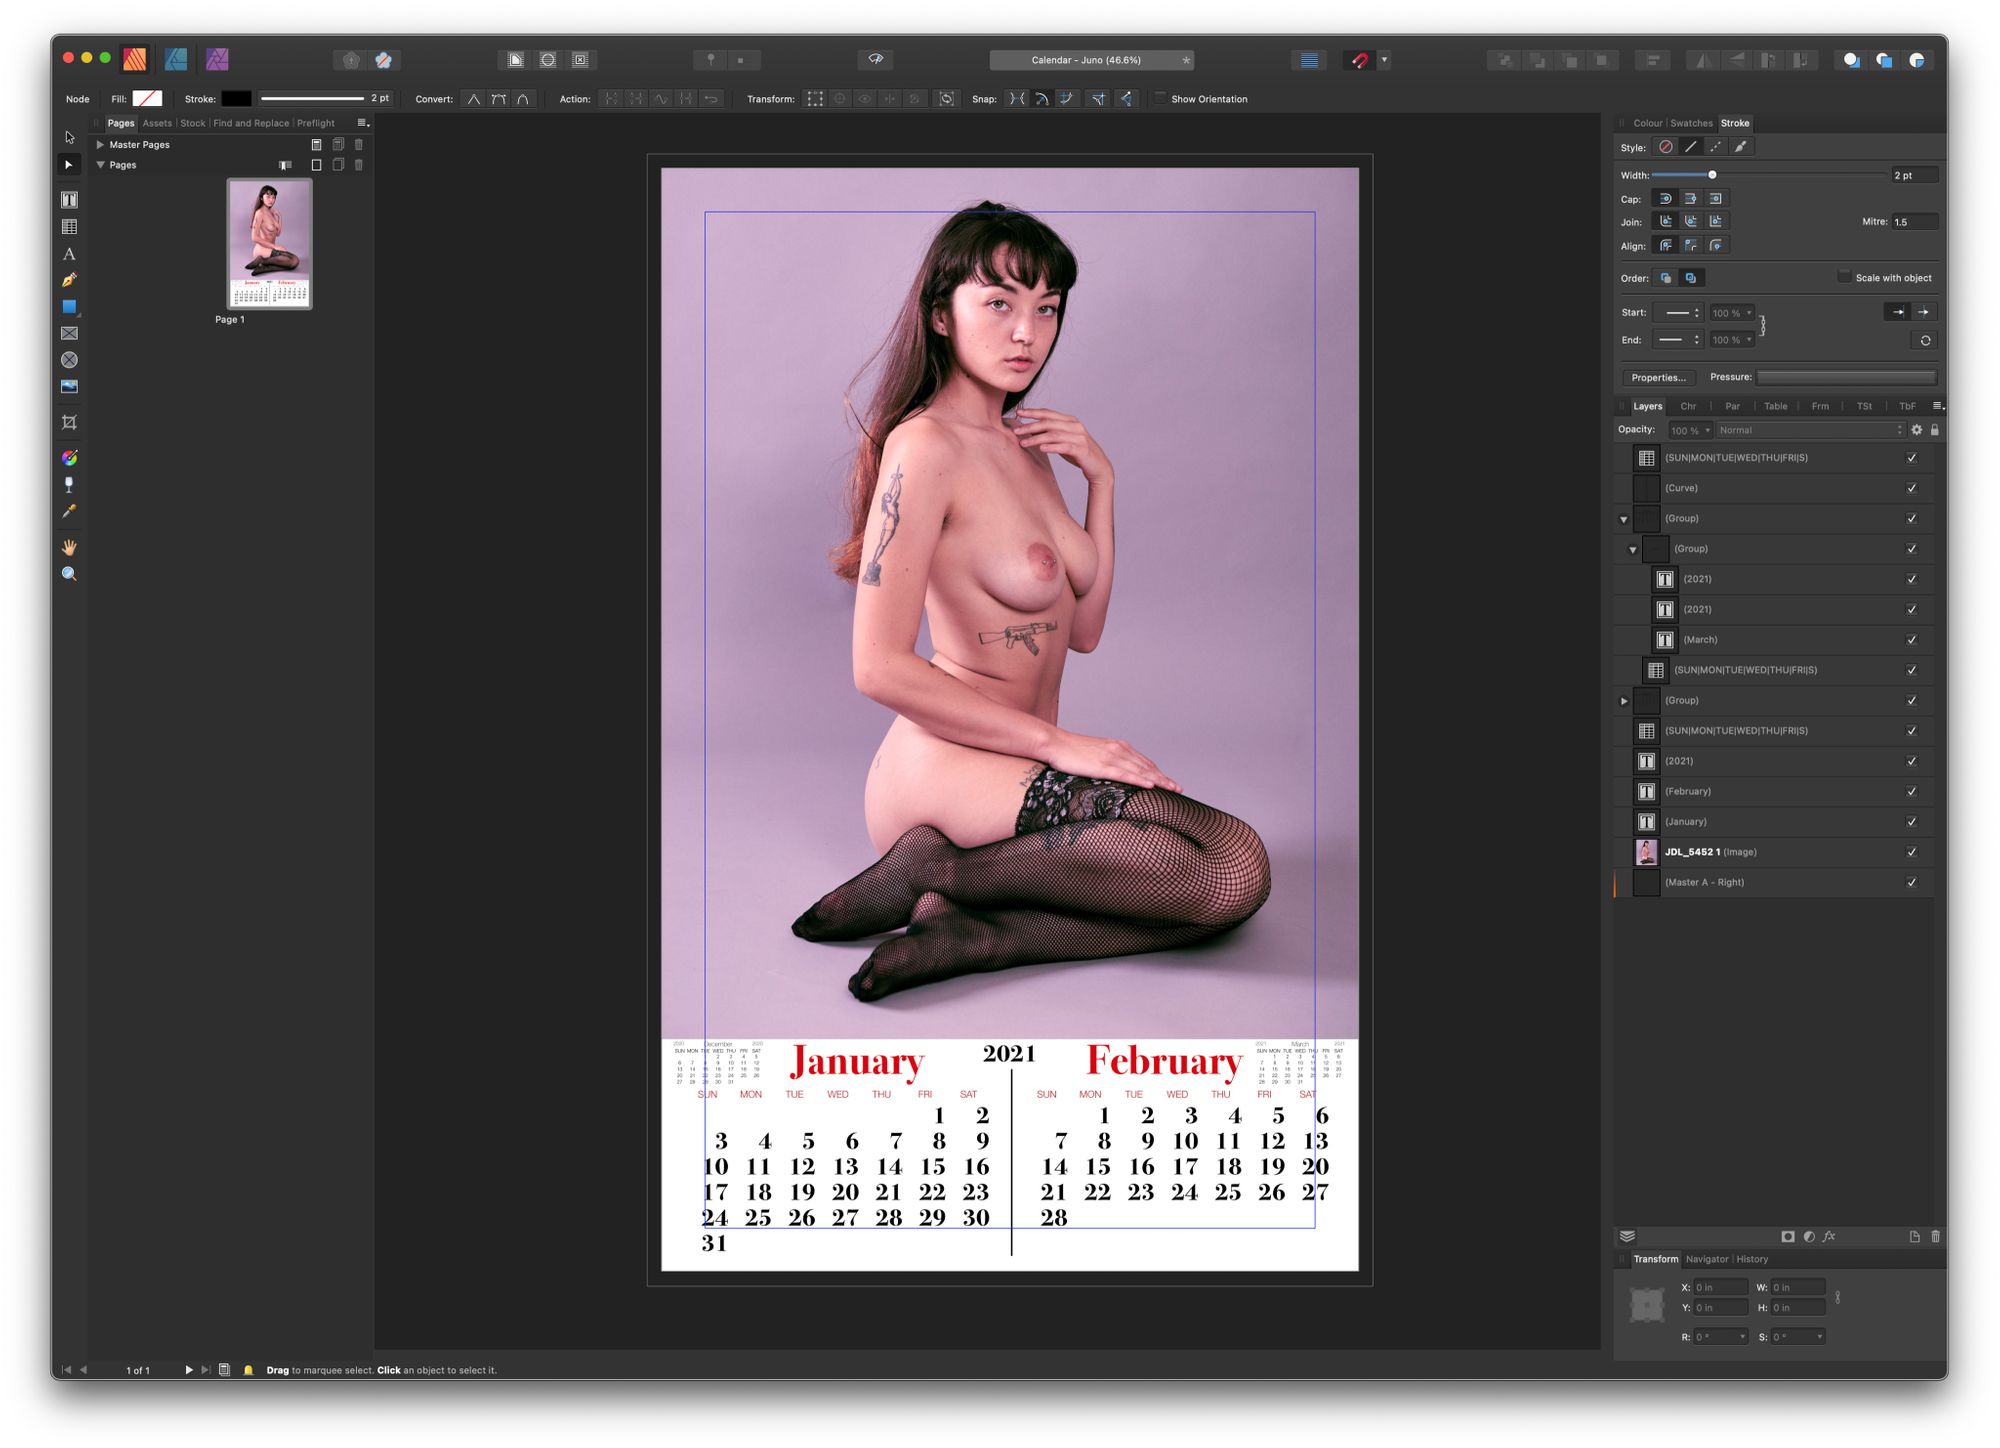
I worked in Affinity Publisher to create my first design prototype. For this first version, there were no tear-off sheets and it was intended to simply show what the final calendar would look like.
Font Choice
For the calendar numbers and month names, I used Bodoni 72, which appears to be what the the Walt’s 505 Club calendar uses. For the rest of the text, I opted for Helvetica Neue. It’s anachronistic, since that font didn’t exist until the early 1980s, but I tried both Helvetica and Helvetica Neue and just thought it looked better with Helvetia Neue. As I said earlier, I’m not trying to exactly replicate those historical calendars.
Layout
The calendars from that era I’ve found come in a few different sizes. The most common size for the tear-off style of calendar seems to be 12″ x 19″, which works out well, because my photo printer maxes out at 13″ x 19″ borderless. That means I can print full page and then just trim a half inch off of each side.
I went with a two month calendar layout and played around with a lot of different design and font options until I landed on this, which feels sufficiently reminiscient of classic pinup calendars for me.
The one common element of the original calendars that I’m missing is the promotional text. I tried a few options, but I just like the simplicity of not having it. I also don’t have anything I really need to promote right now. While I do occasionally take paying gigs, photography is mostly a creative outlet for me and not something I’m trying to make a living off at the moment.
From Prototype to Calendar
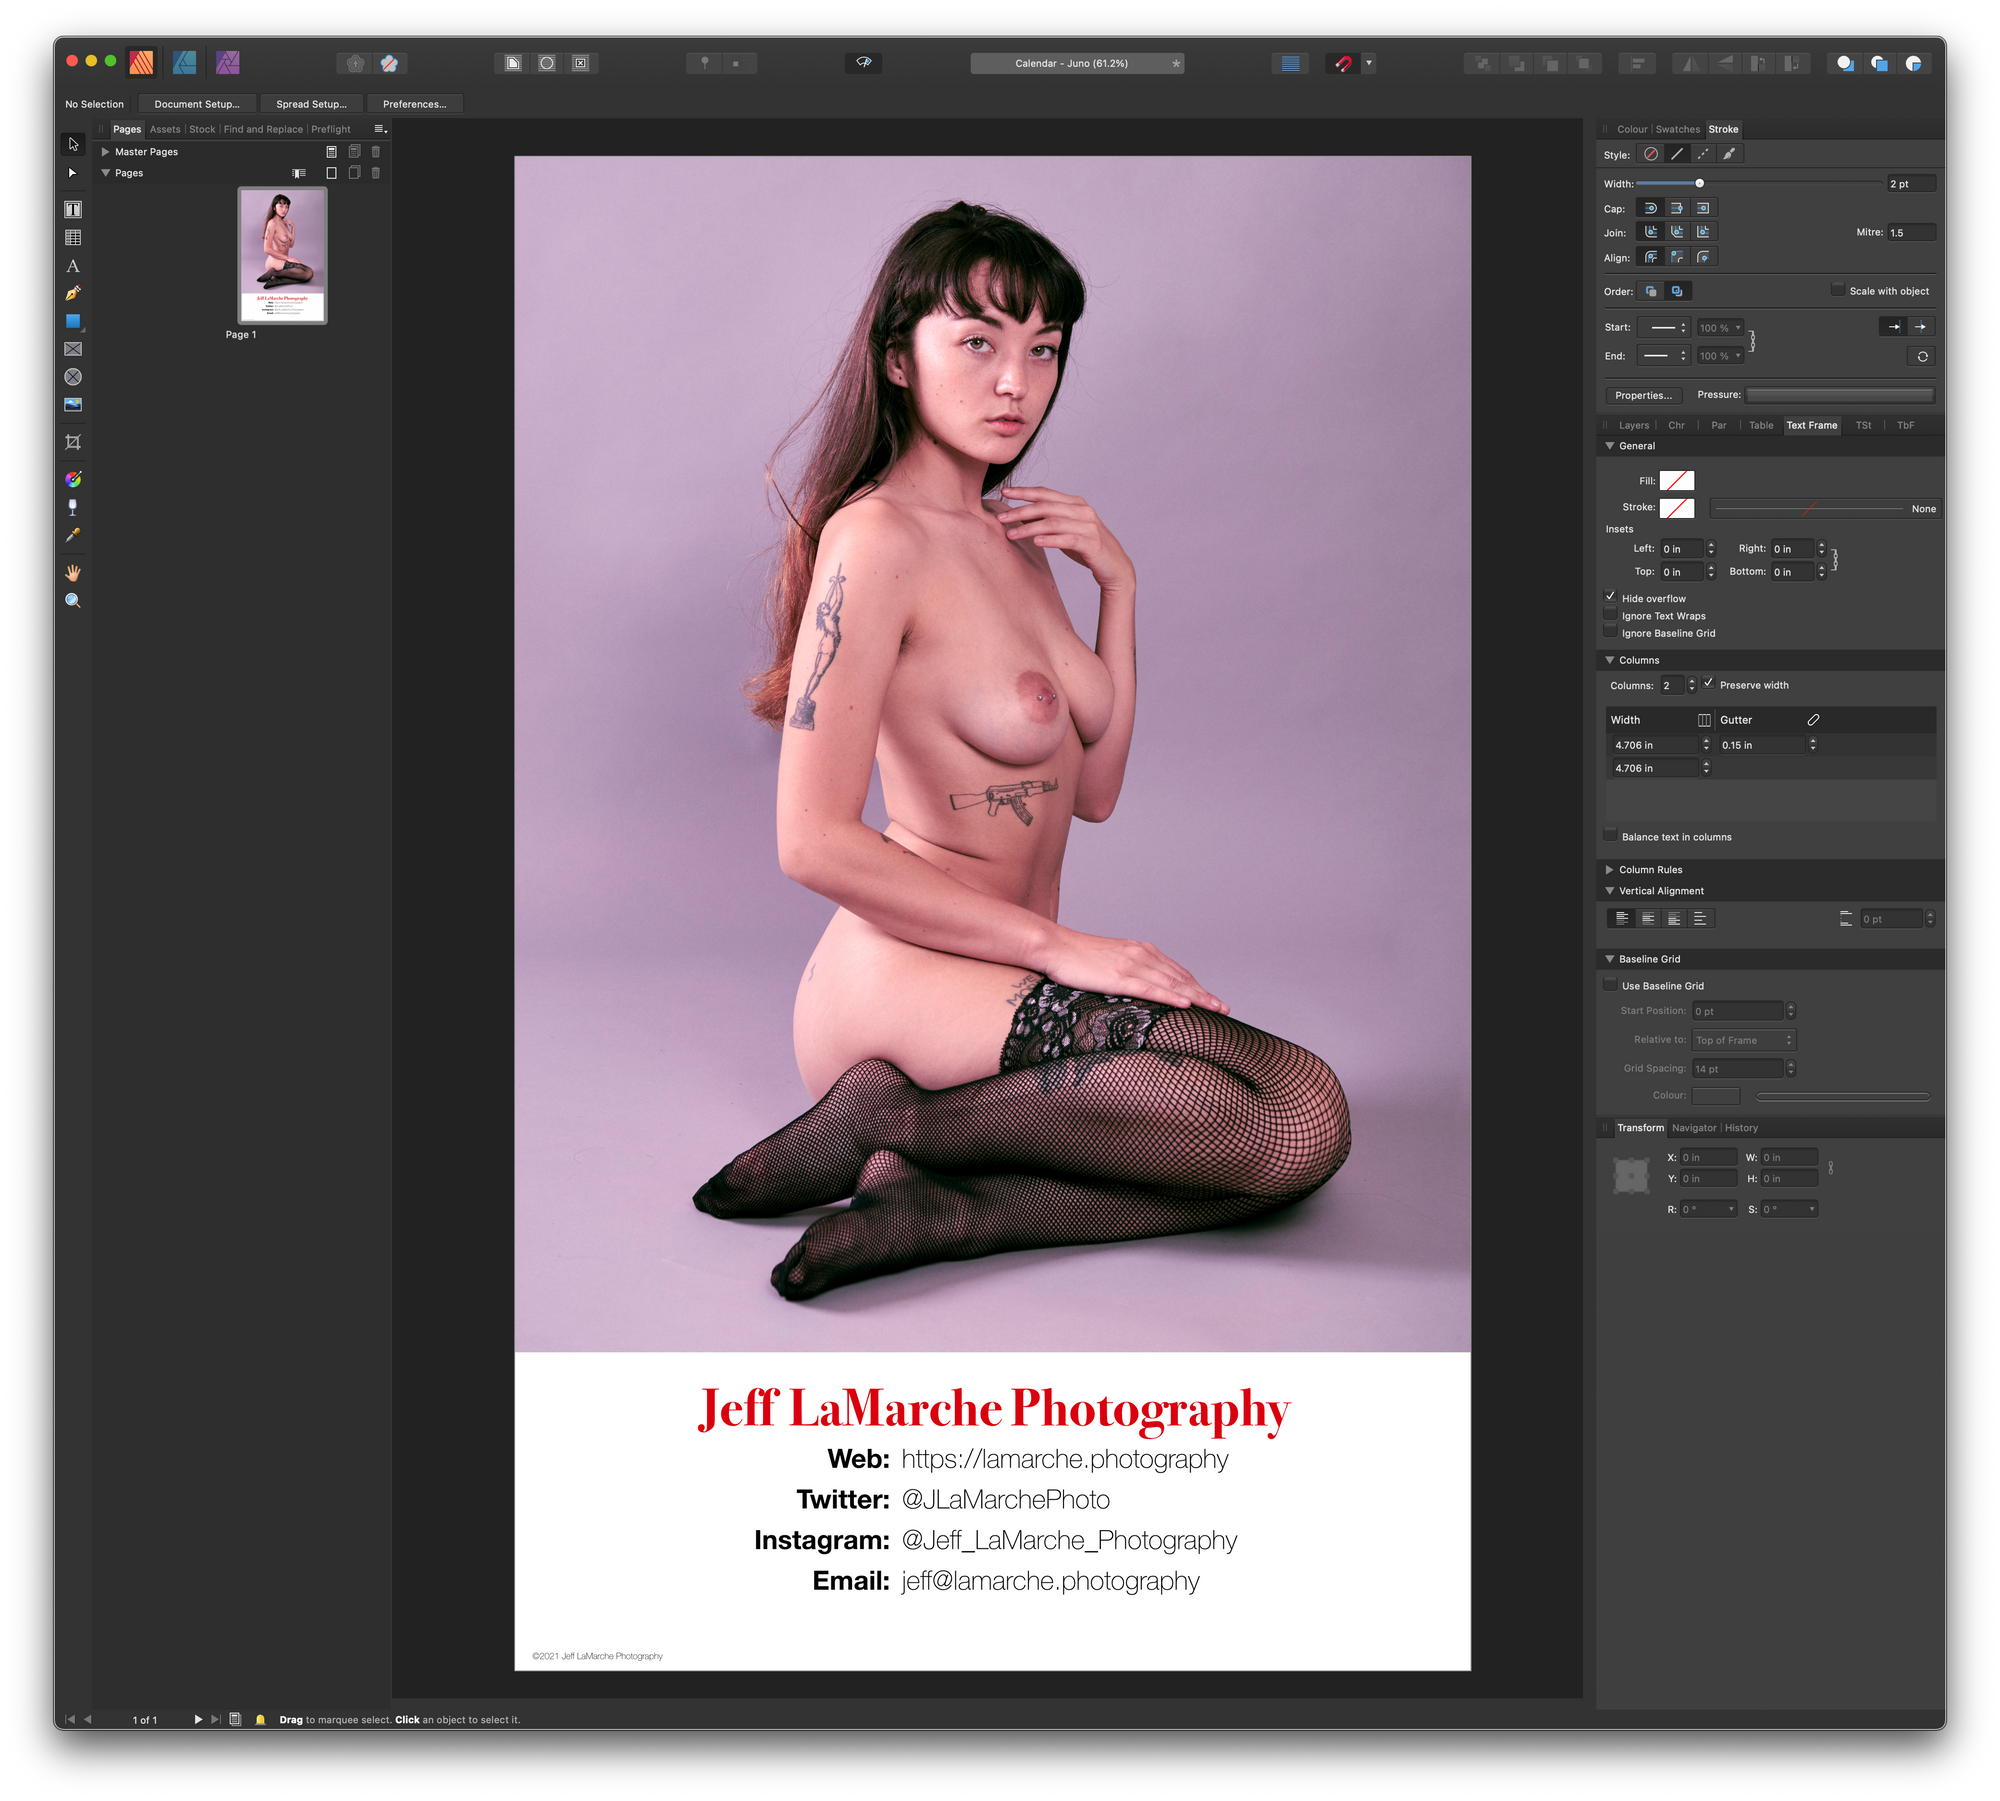
Once I was happy with the design, the next step was to actually turn it into a physical calendar with tear-off sheets. I removed the calendar content from my digital prototype, and turned it into the calendar backboard. I replaced the calendar with a little promotional text. This text will never be visible unless somebody rips off the last month, but if they do, they’ll know how to contact me to find out if I’m doing another calendar for next year.
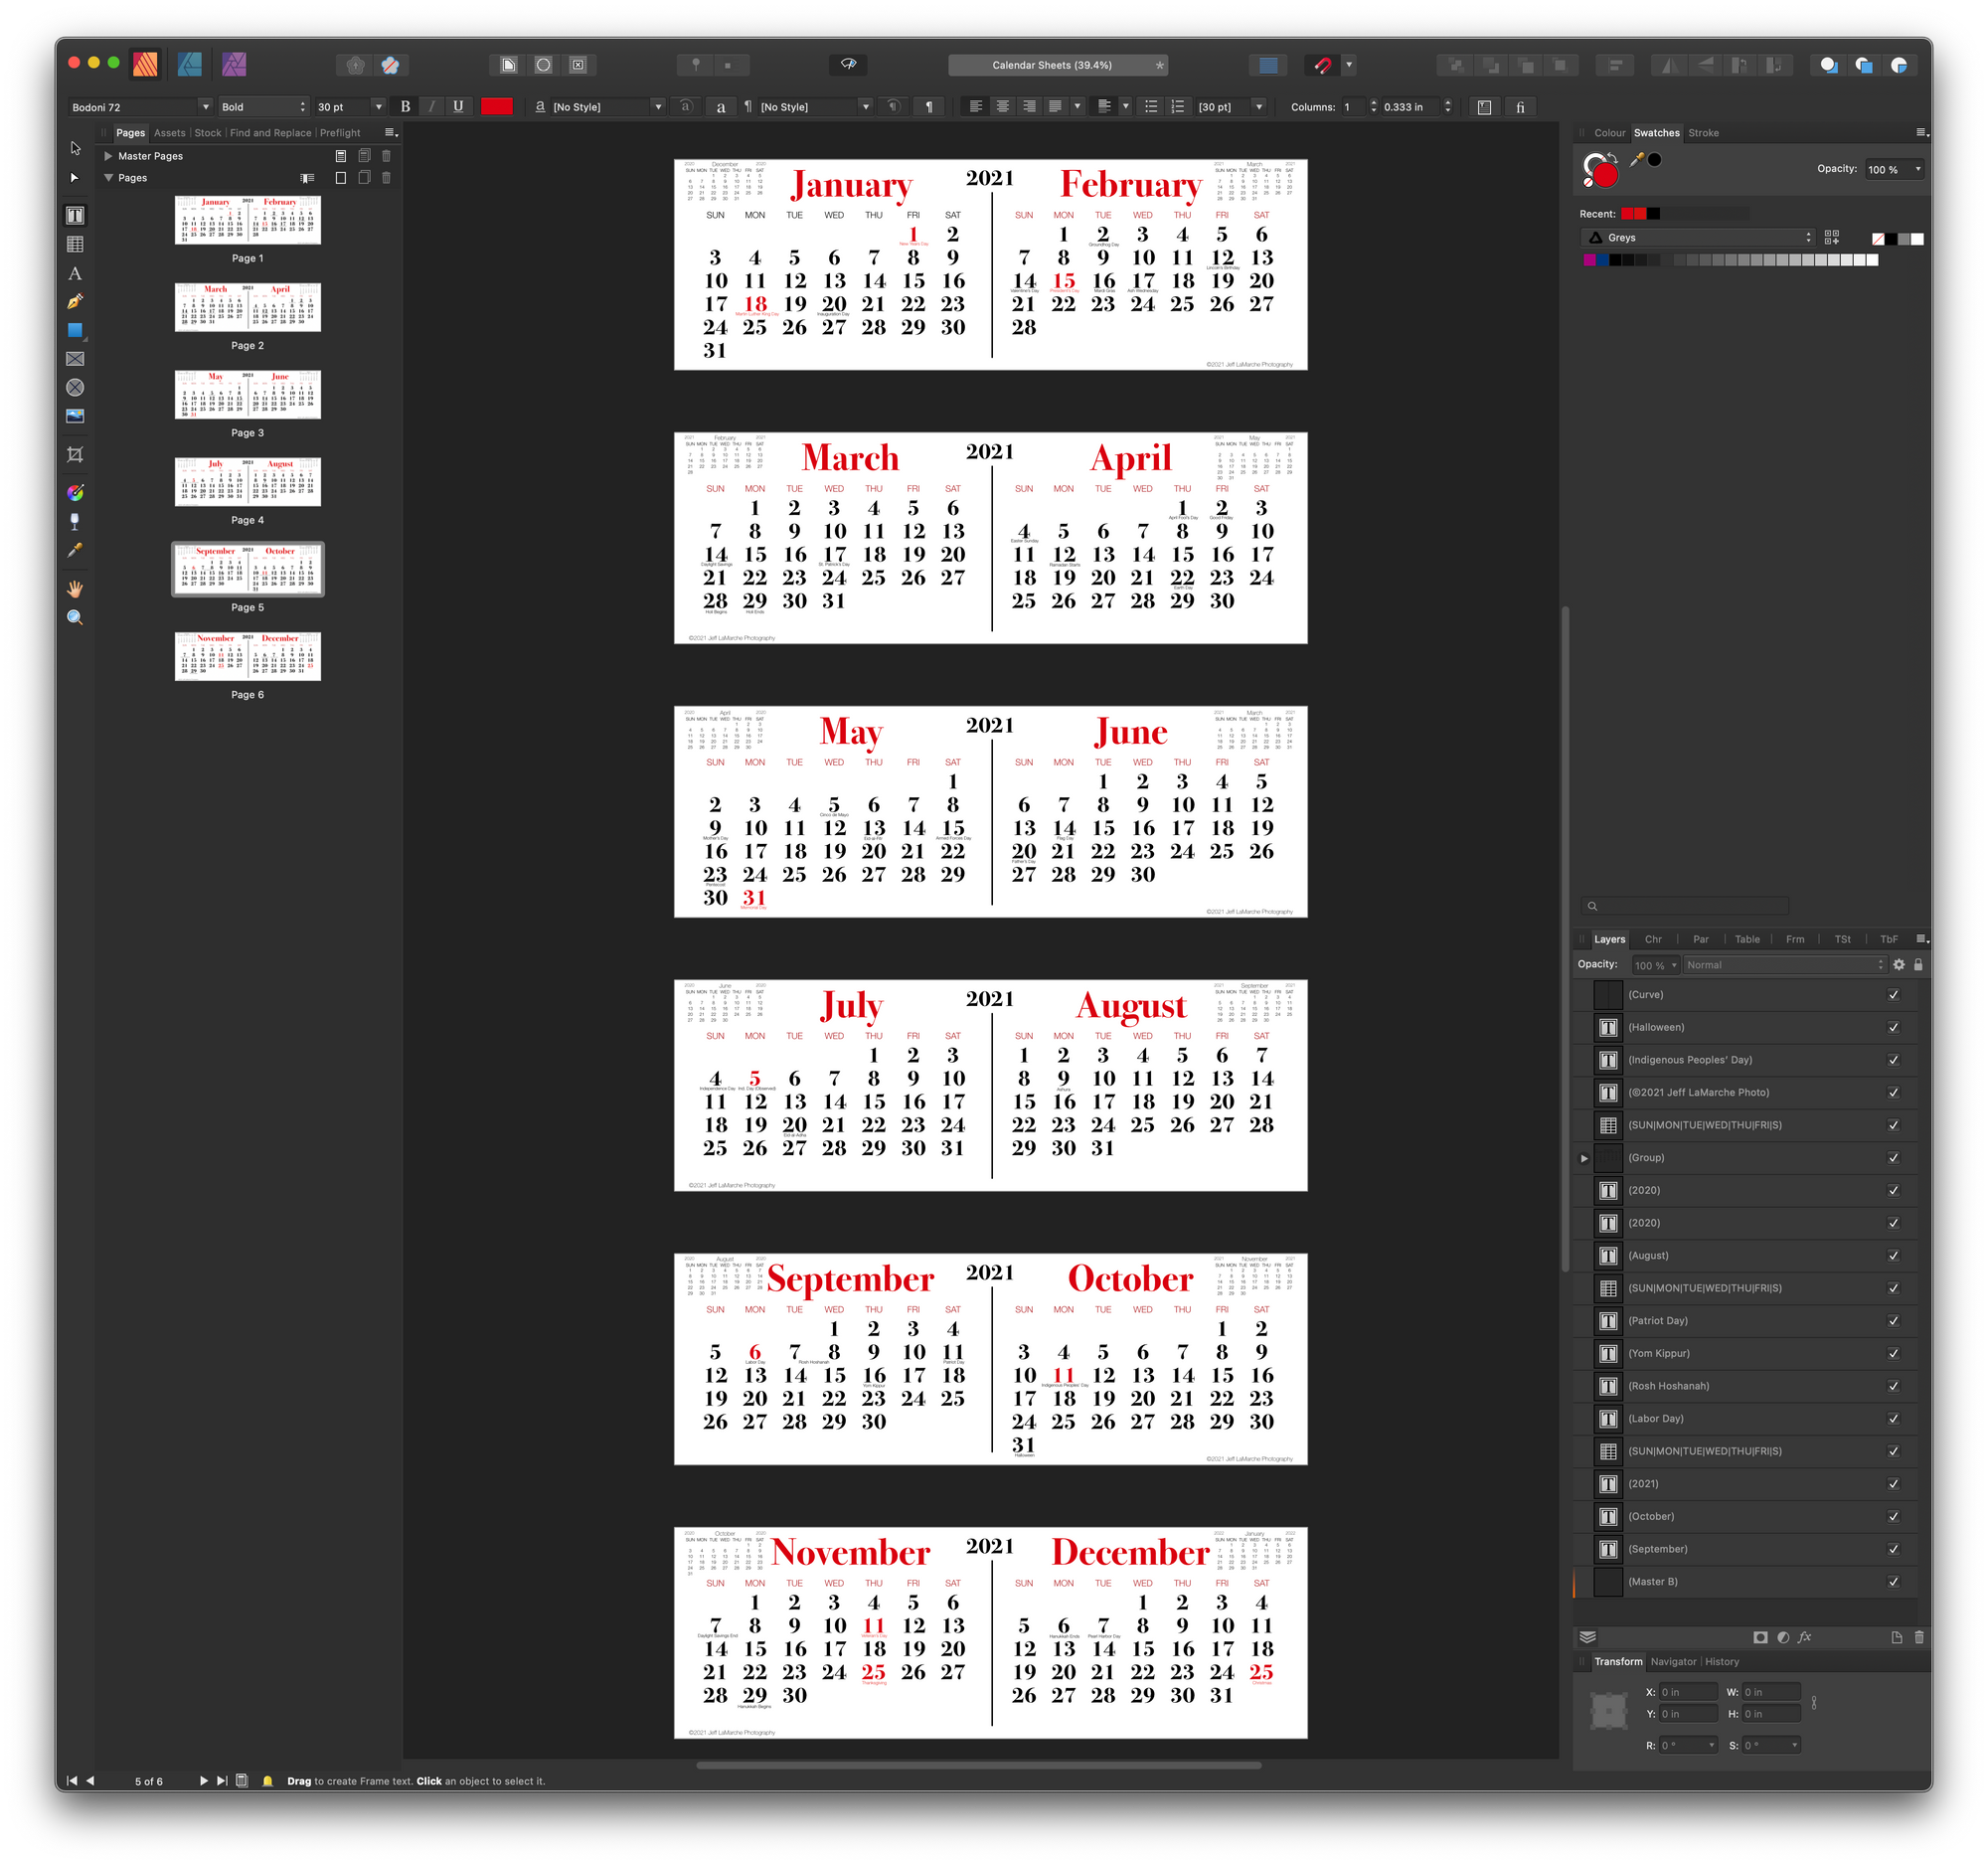
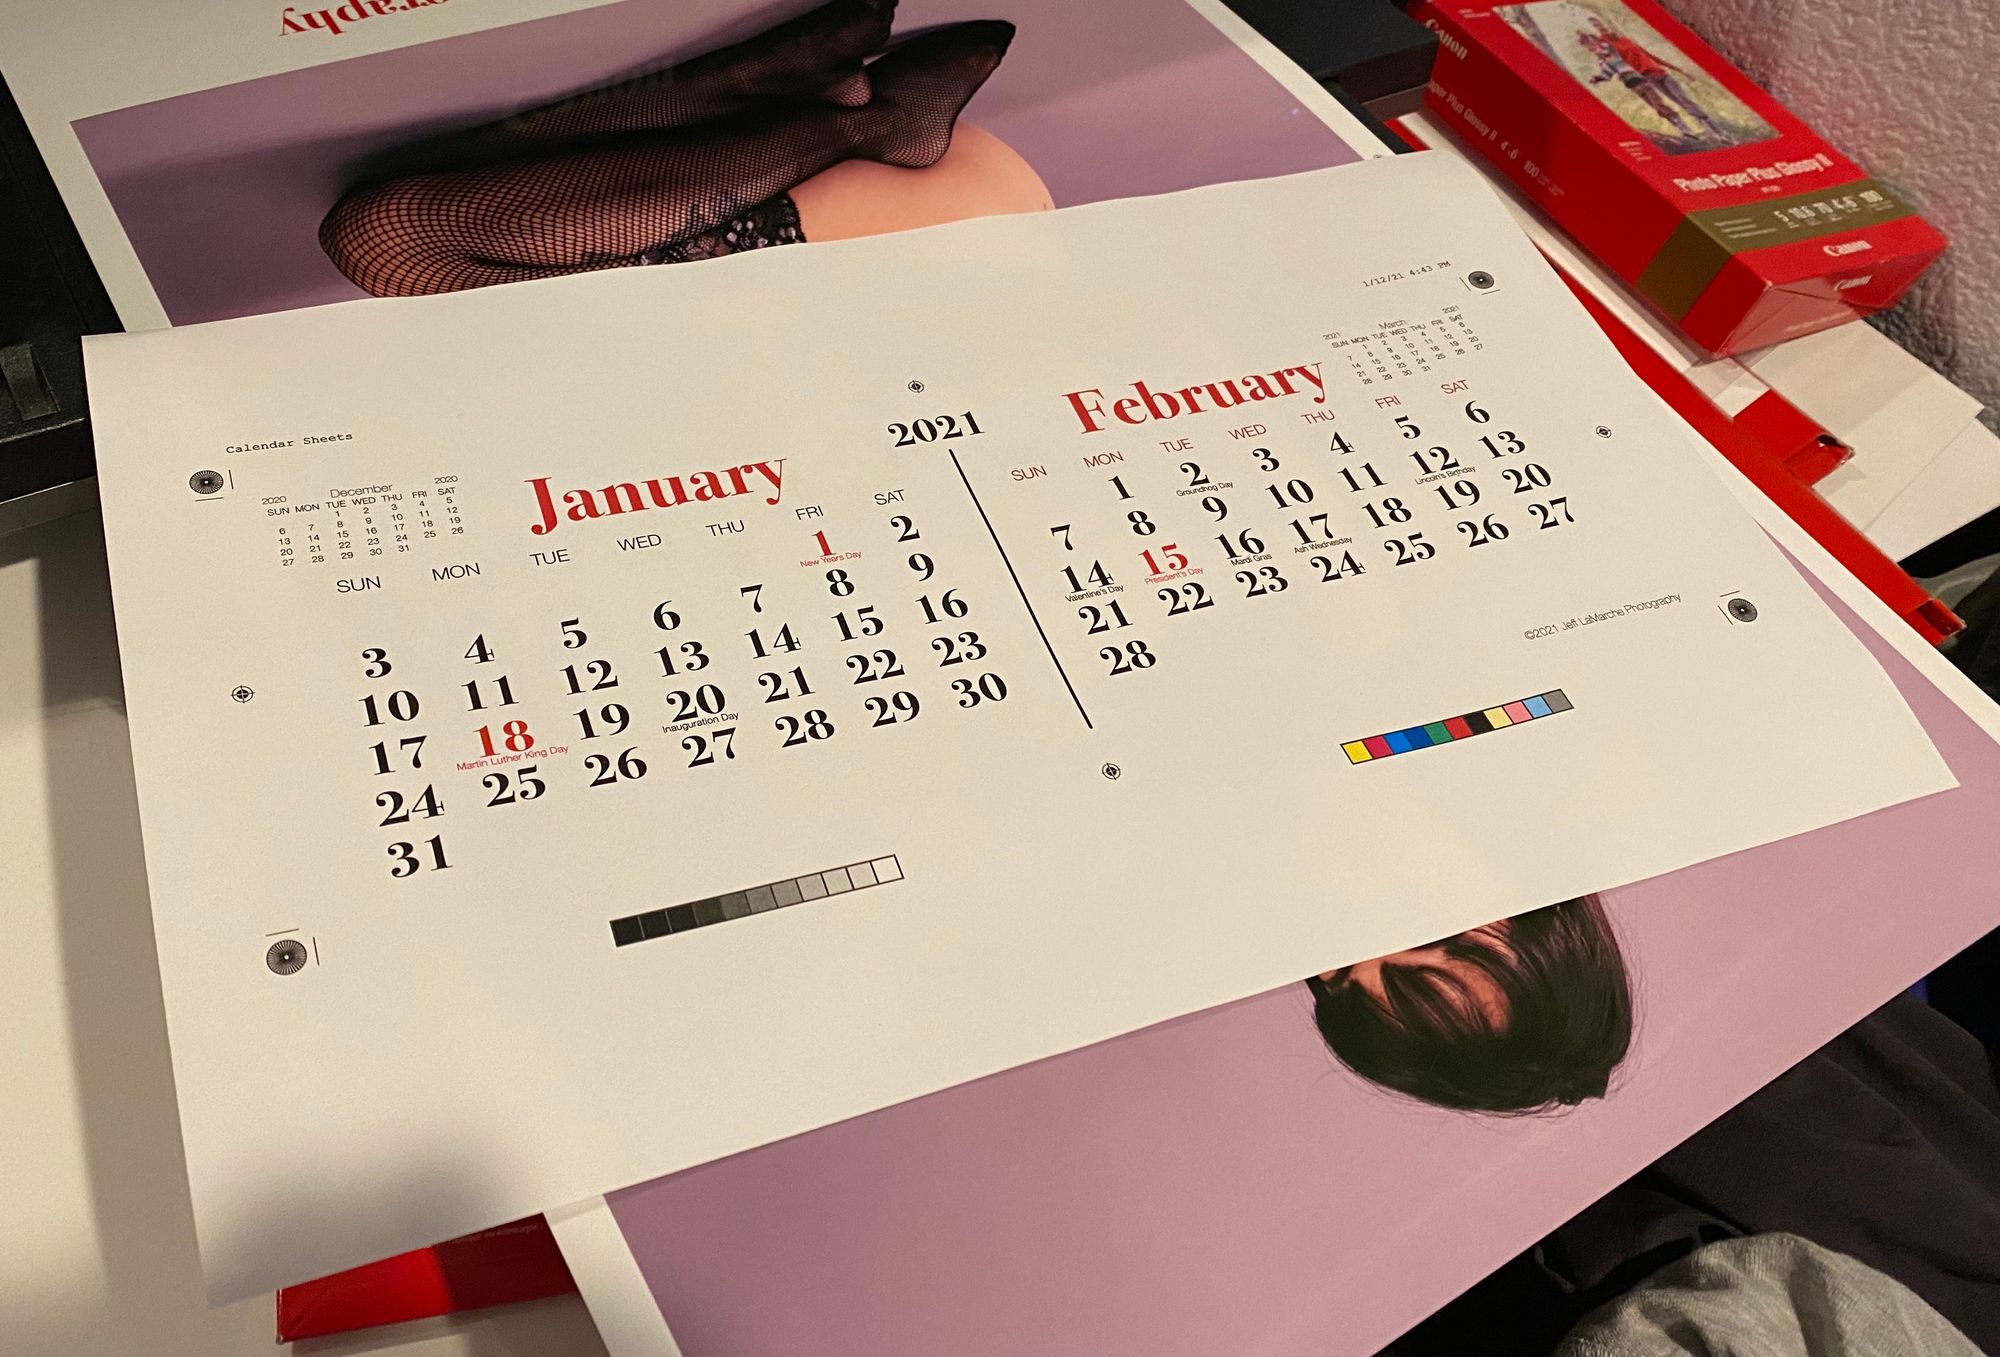
I moved the calendar content to a separate 4″ x 12″ document and then laid out all the months of 2021. I included all US federal holidays (in red), as well as many other major holidays. Space in this format is tight, so I couldn’t include every holiday, but I tried to include the major ones from the major religions. I did boot Columbus Day in favor of Indigeneous Peoples’ Day (they’re the same day), because I only had room for one and, well… fuck Columbus.
Unfortunately, the decision to go with a two-up layout means I can’t print them on normal letter size paper and had to order a ream of legal size paper for the project.
Laying out a calendar is a surprisingly tedious task. 😬
Construction
Once all the digital files were created and proofed, it was time to create the first calender to see if it works. There’s two parts here: the backboard, which I printed on my photo printer, and the calendar sheets, which I printed on my color laser printer.
Printing the Backboard
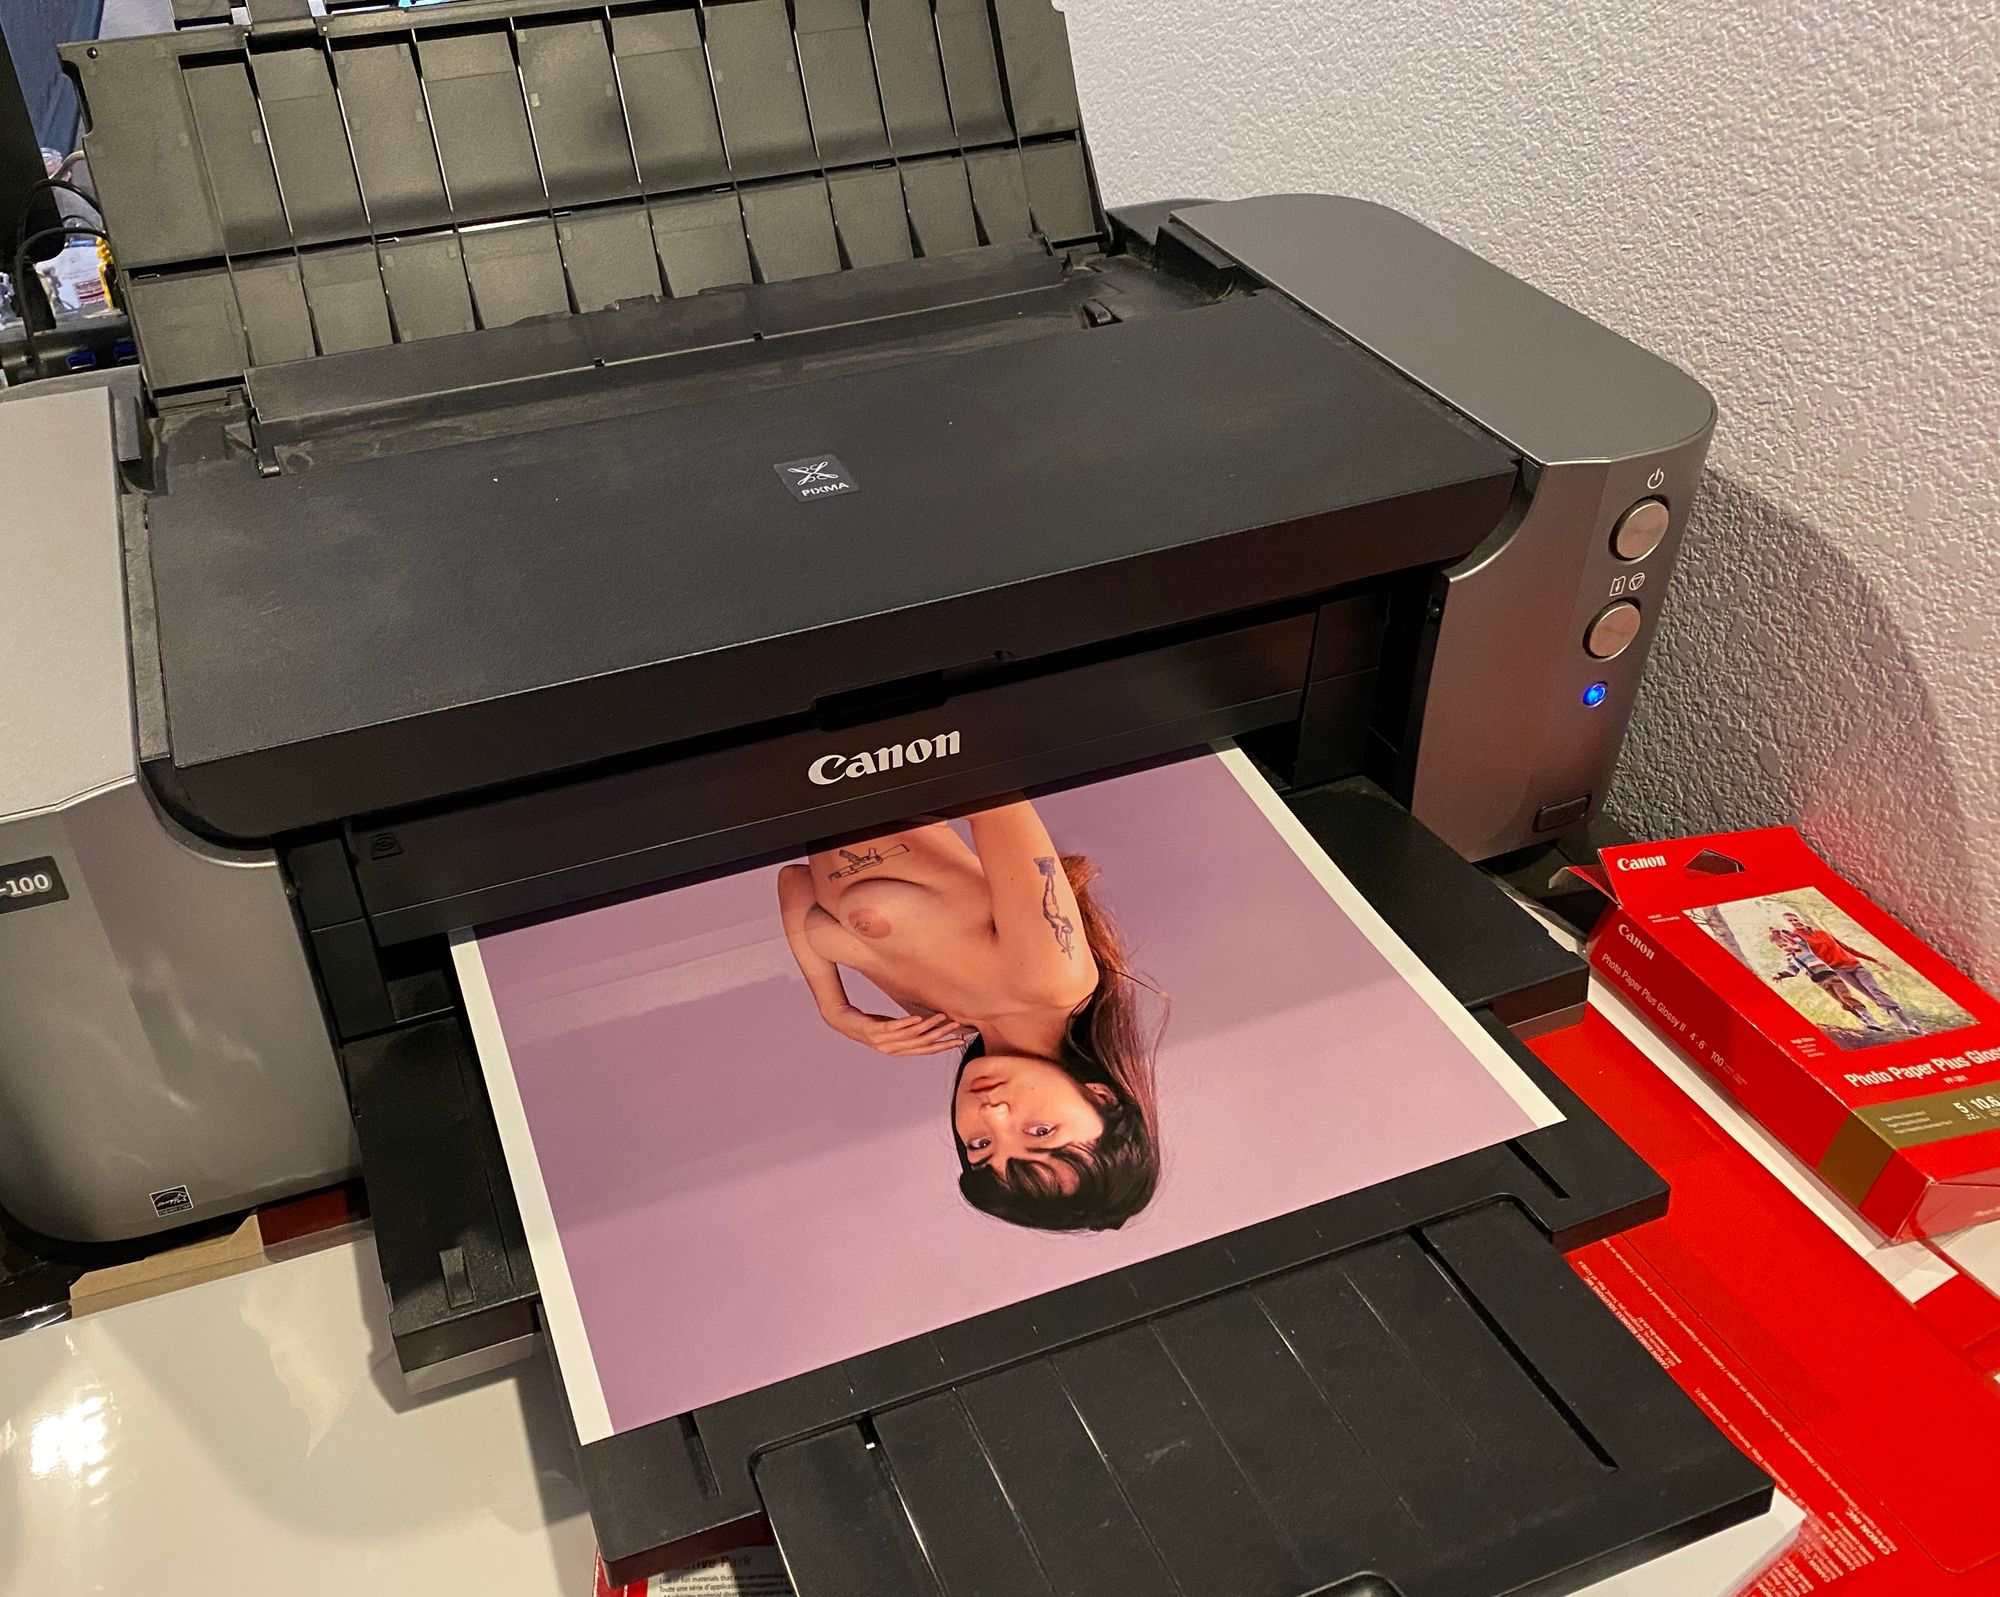
For the first calendar, I went with the best paper stock I had handy: Canon Platinum Pro N (Glossy). This is shinier and higher quality than the historical calendars that inspired the project, but will result in a nice image. I might order a matte or satin paper if I decide to make more, but this works and looks pretty good.
Printing the Calendar Pages
The individual calendar sheets are printed on a premium legal-sized office paper on a color laser printer. There are six pages total (two months per page). These will be cut out and stapled to the backboard to create the calendar.
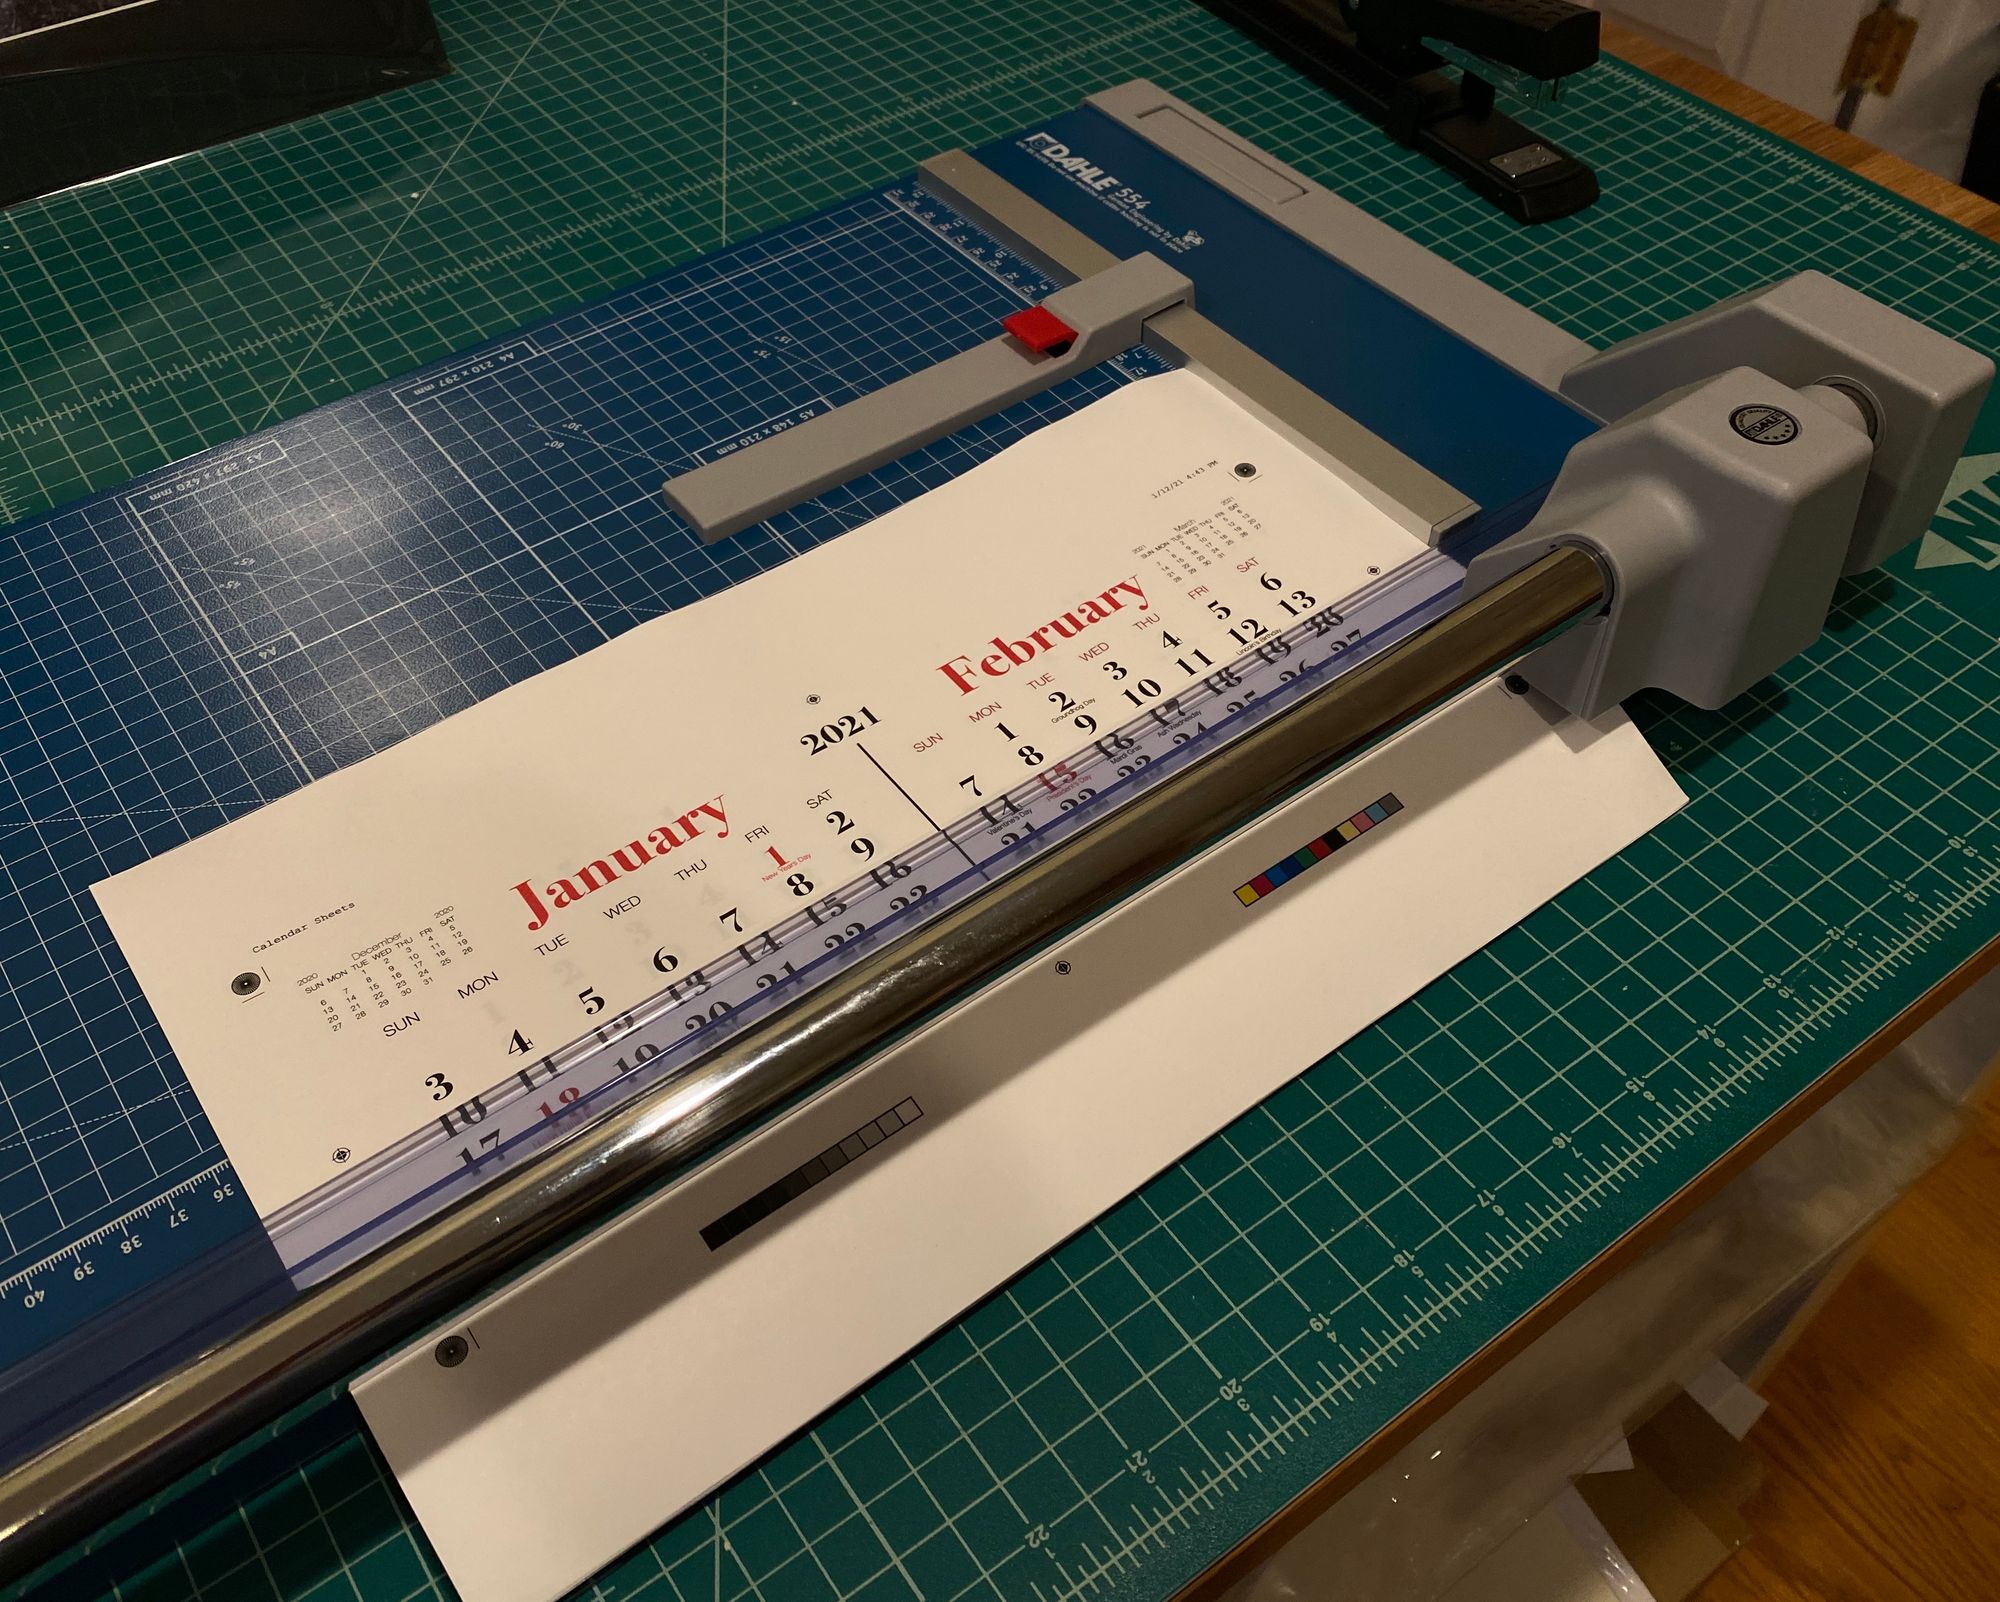
Trimming the Calendar Pages
Unfortunately, I don’t have a guillotine cutter, so I used the best thing do I have: a Dahl professional heavy duty rotary cutter. It generally worked well, but was tough to be as precise as I needed while keeping the pages together.
Trimming the Back Board
I also used the Dahl to cut the backer board. That was an easier cut, since I didn’t have to keep multiple sheets together.
Assembling the Calendar
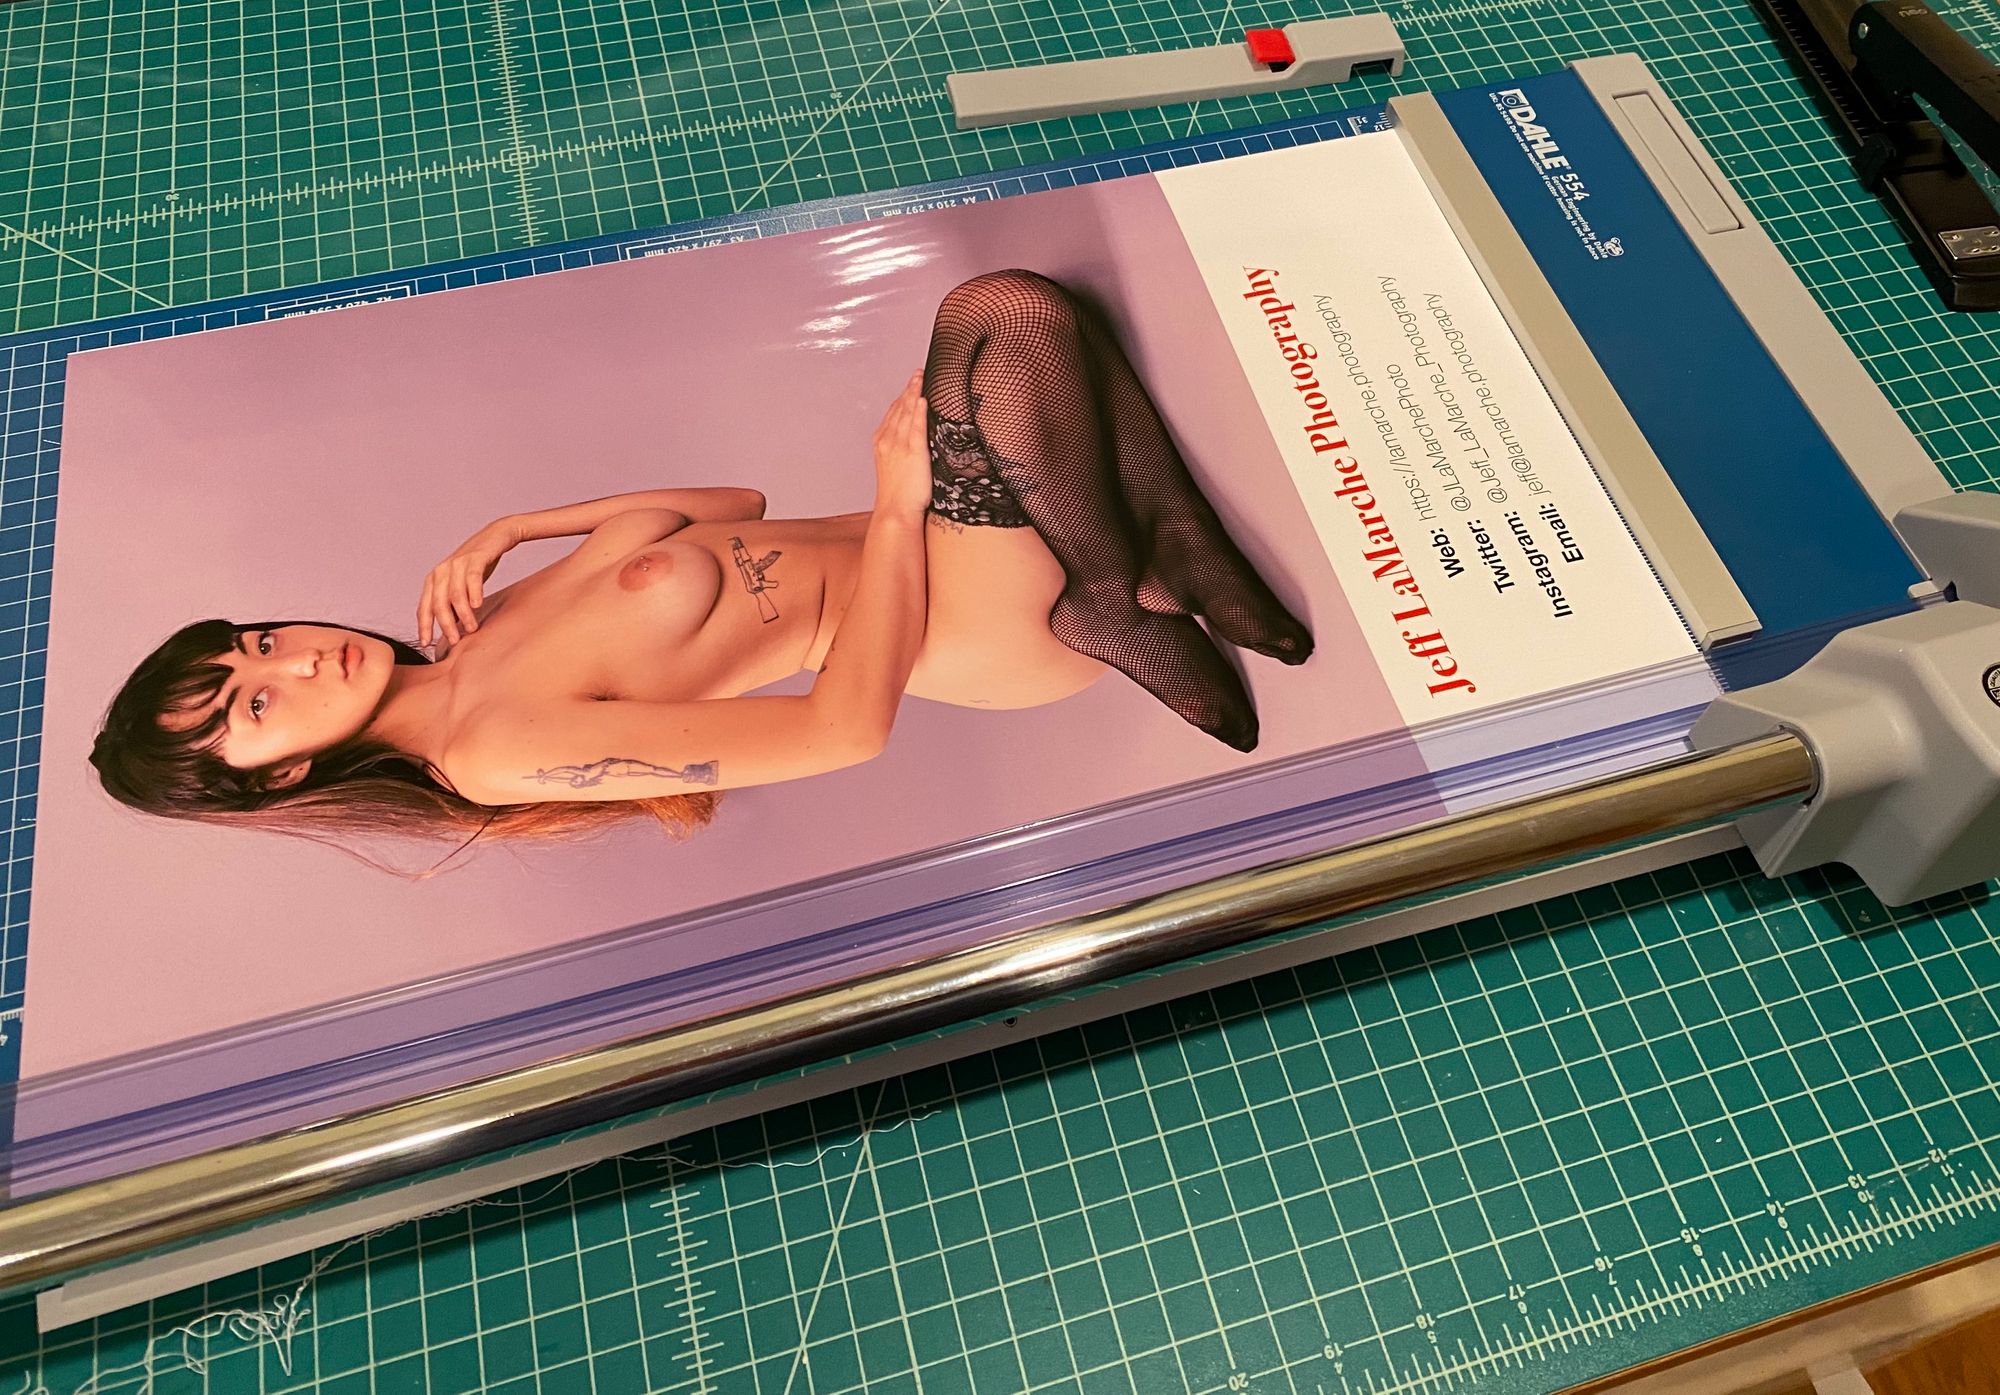
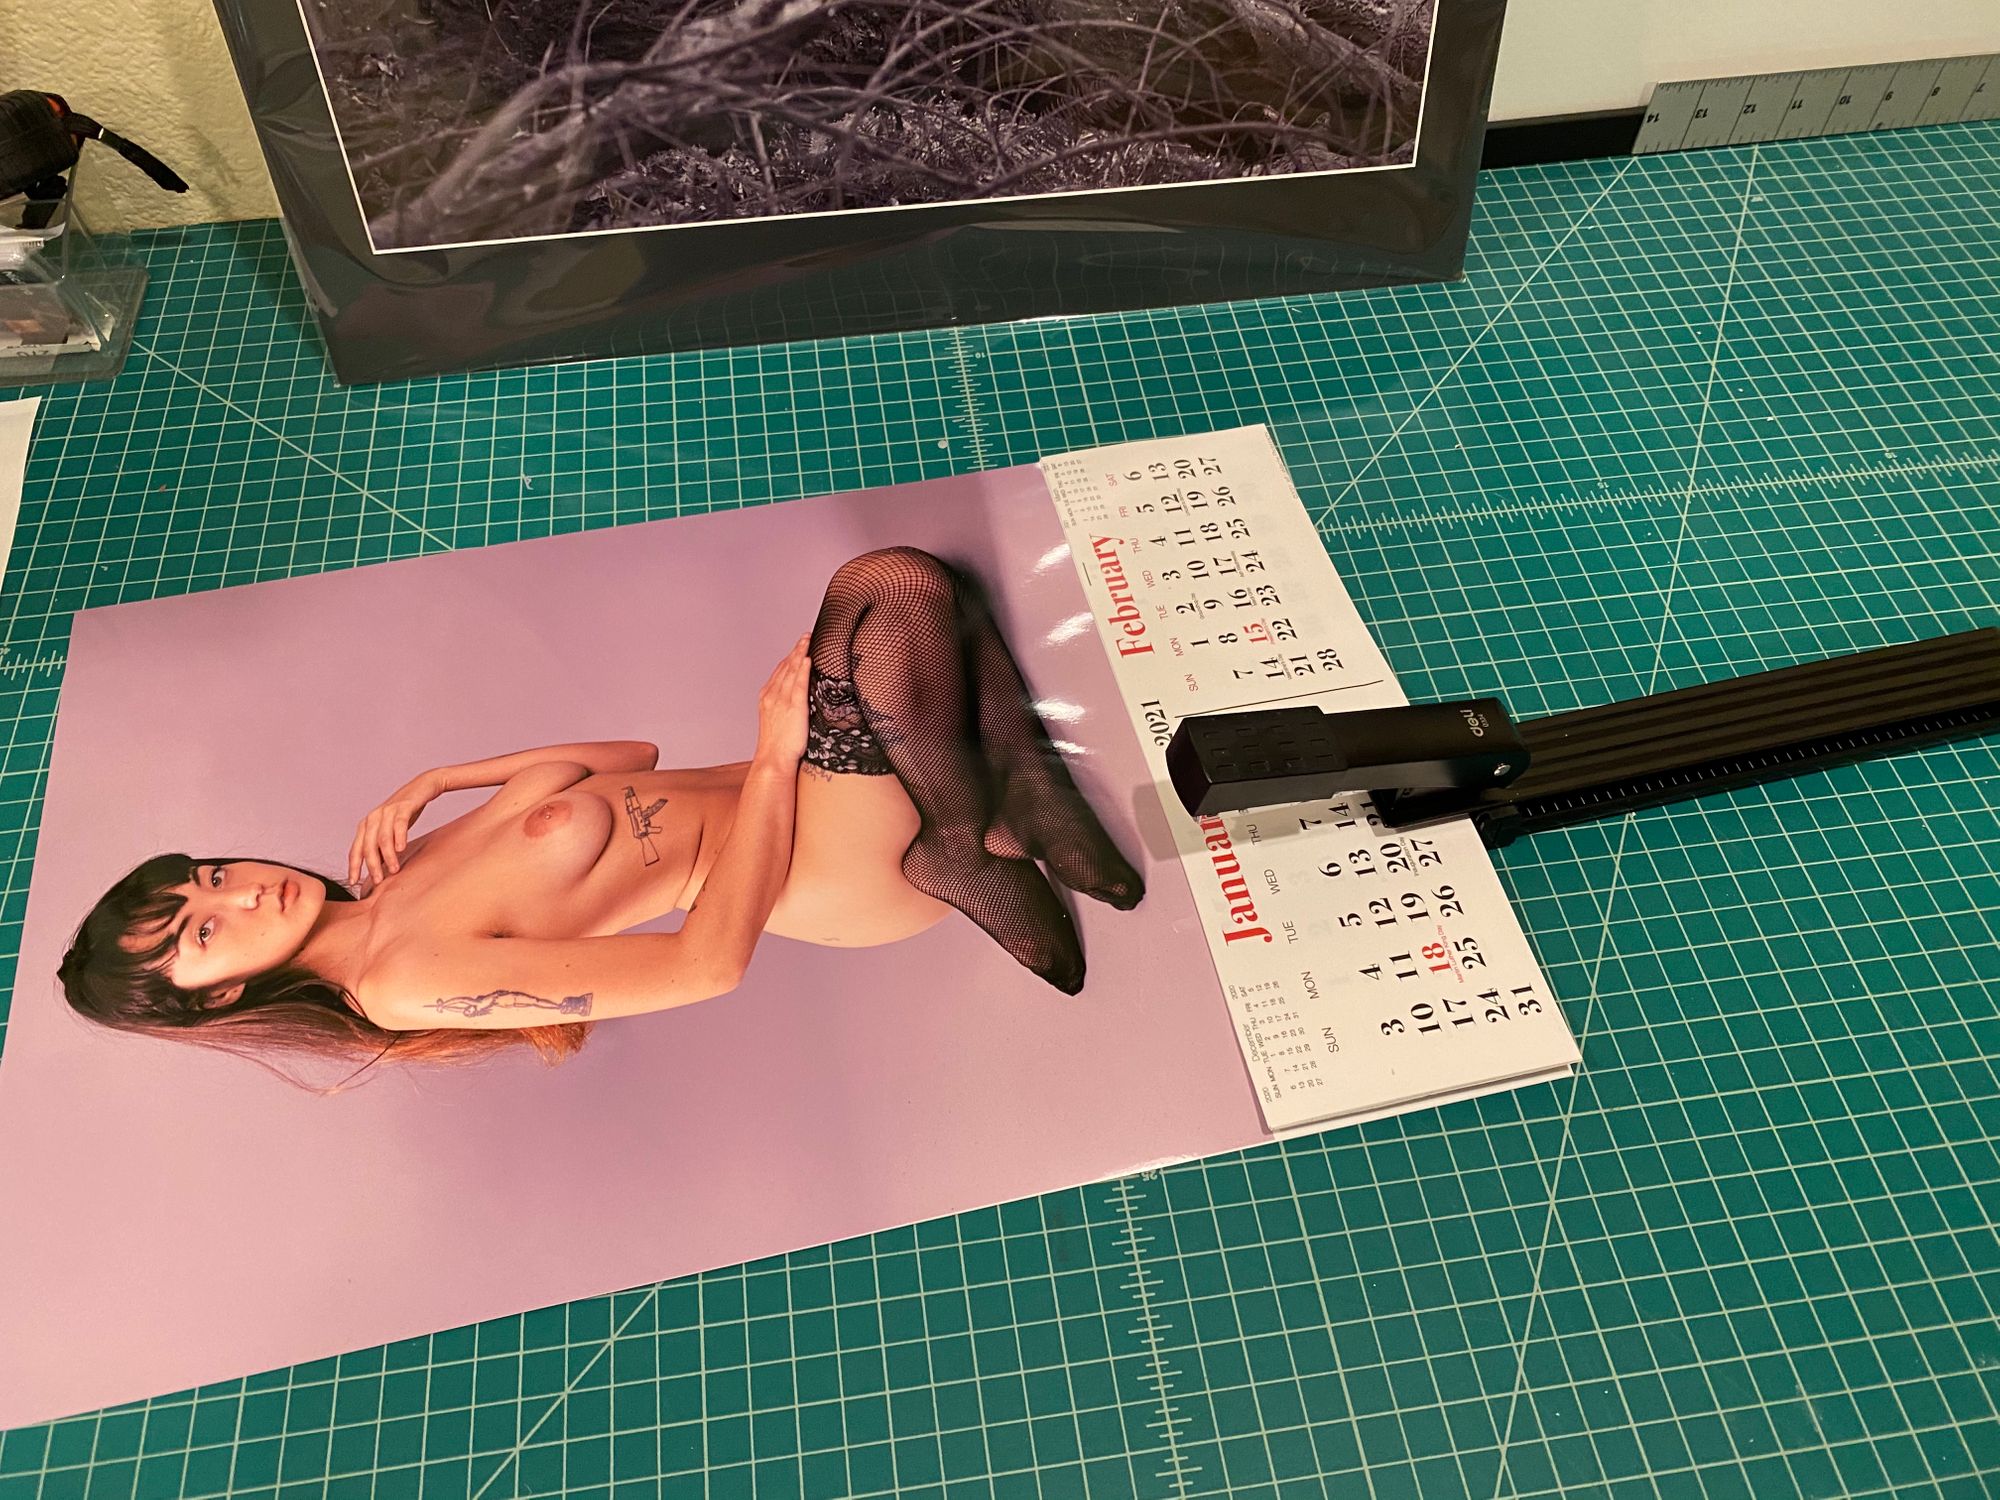
The final step is stapling the calendar sheets to the backer board. I used a cheap saddle-stich stapler to attach the sheets.
And once assembled, we have our calendar:
Just needs a hole punched and it’s ready for the wall!
Lessons Learned
With any kind of project like this, the first one you make is going to be imperfect, and this wasn’t an exception. Still, I’m really pleased with how it came out. Although there are some minor issues, I wouldn’t be embarrassed to hang this first one on the wall.
If I decide to make any more, there are a few changes I’ll make. My margins are a bit too small in a few places. The rotary cutter did a nice job, but it’s not as precise as a good guillotine cutter, and I lost a little bit of my margins to the overprint required for borderless printing. Some cutting guides on the calendar printouts will also help during assembly.
All-in-all, though, I’m quite happy with the result!